Table of contents
Table of contents
Mermaid flowchart syntax: the complete guide with examples
Key takeaways: A Mermaid flowchart is a diagram you write as text instead of drawing by hand. You type something like A --> B, and Mermaid renders two connected boxes. This guide covers every part of the syntax, from basic node shapes to styling and click events, plus how to turn that code into a real, editable diagram in Miro.
Your flowchart is already out of date
You know the drill. You spend twenty minutes in a diagramming tool getting the boxes to line up, the arrows to stop overlapping, and the colors to look intentional. You export it, drop it in the wiki, and move on. Three weeks later, the process changed, and nobody updated the picture. Now the "source of truth" is a screenshot of something that hasn't been true since last sprint.
That's the problem with treating diagrams as pictures instead of code. A picture can't be diffed, version-controlled, or generated by an AI agent that just read your actual codebase. A Mermaid flowchart can.
What is a Mermaid flowchart?
A Mermaid flowchart is a flowchart you define using plain text syntax instead of a drag-and-drop canvas. You write a few lines describing your nodes and how they connect, and Mermaid renders the diagram automatically, complete with layout, arrows, and shapes.
It's part of Mermaid, an open-source diagramming syntax that also covers sequence diagrams, class diagrams, timelines and so many other diagram types. Flowcharts are the most common of the bunch, and for good reason: almost every process, decision tree, or workflow can be mapped as nodes and connections.
Mermaid has picked up a second wind recently for a simple reason: AI models write it fluently. Ask an AI coding agent to diagram your system, and there's a good chance it hands you Mermaid syntax, because that's the format it has practiced the most. Text is also just easier for a language model to reason about than a two-dimensional image, so an agent can make a precise edit to your diagram instead of redrawing the whole thing from scratch.
Basic syntax: direction and declaration
Every Mermaid flowchart starts with a direction keyword. This one line decides whether your diagram reads top to bottom or left to right, and it's the first thing you'll write every time.
- TD or TB: top to bottom
- BT: bottom to top
- LR: left to right
- RL: right to left
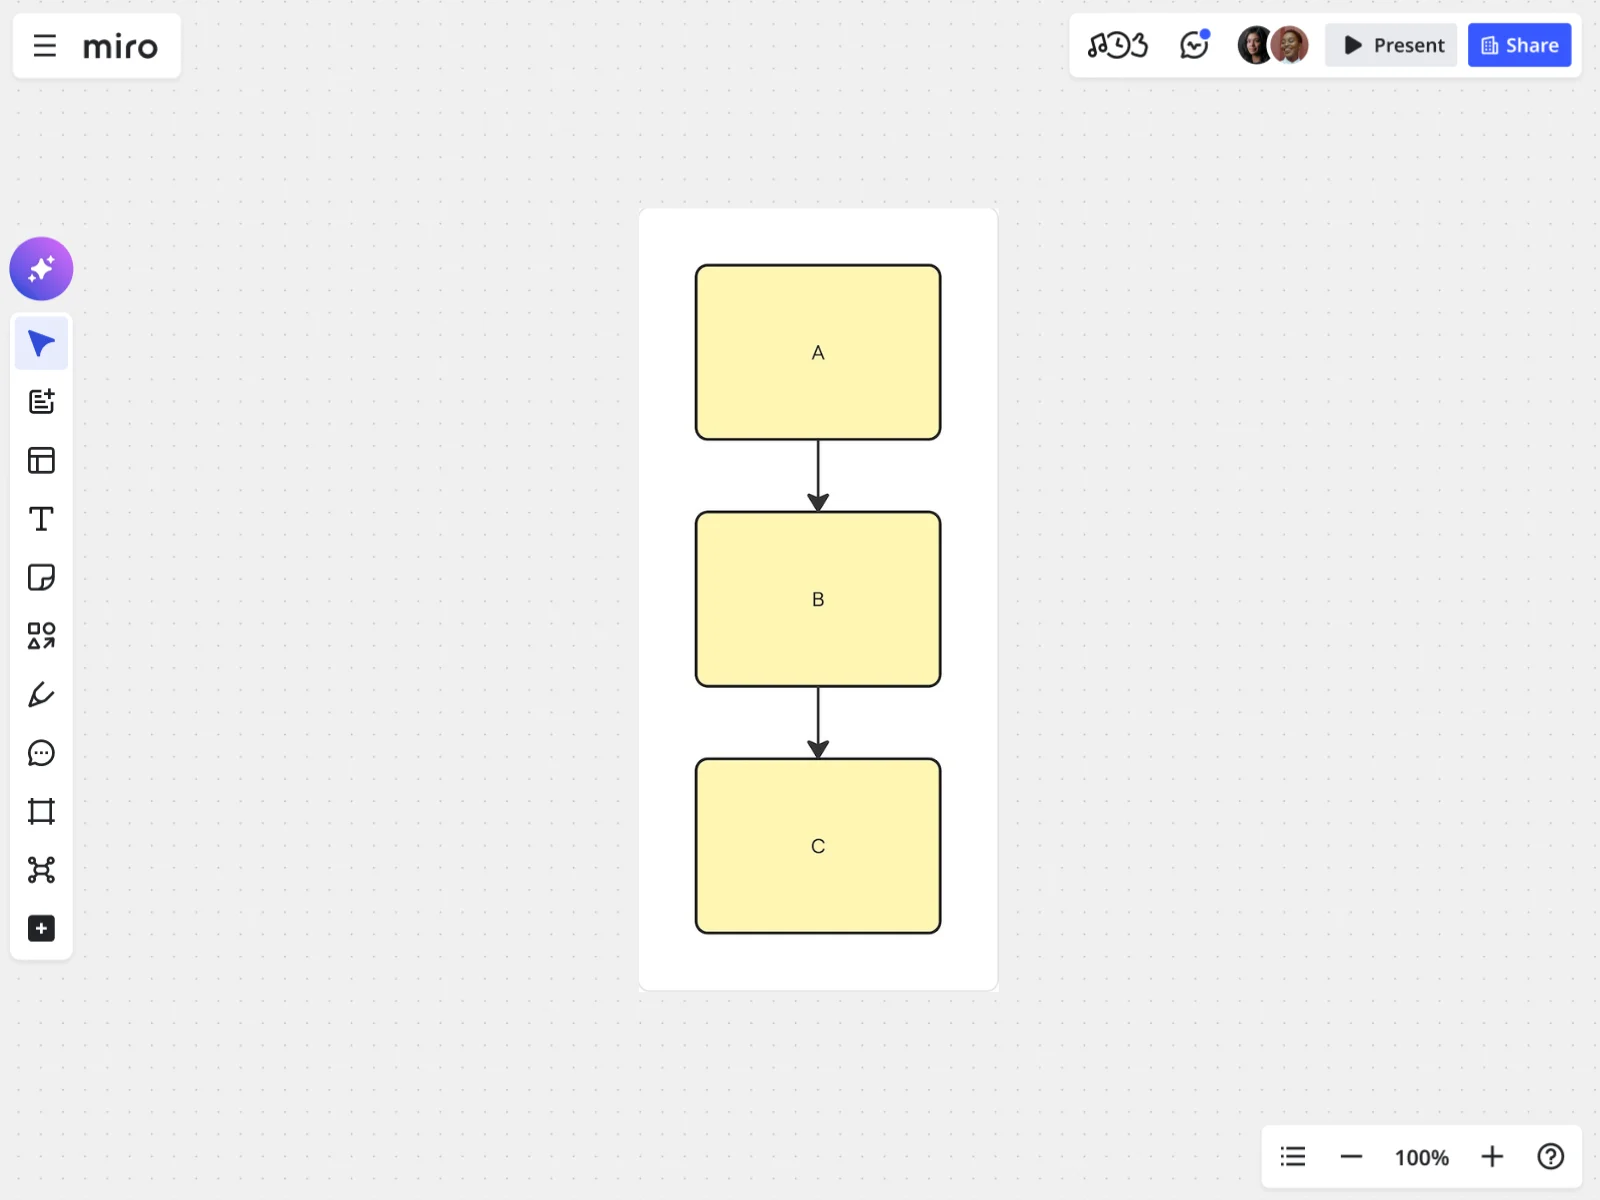
flowchart TD A --> B B --> C style A fill:#fff6b6 style B fill:#fff6b6 style C fill:#fff6b6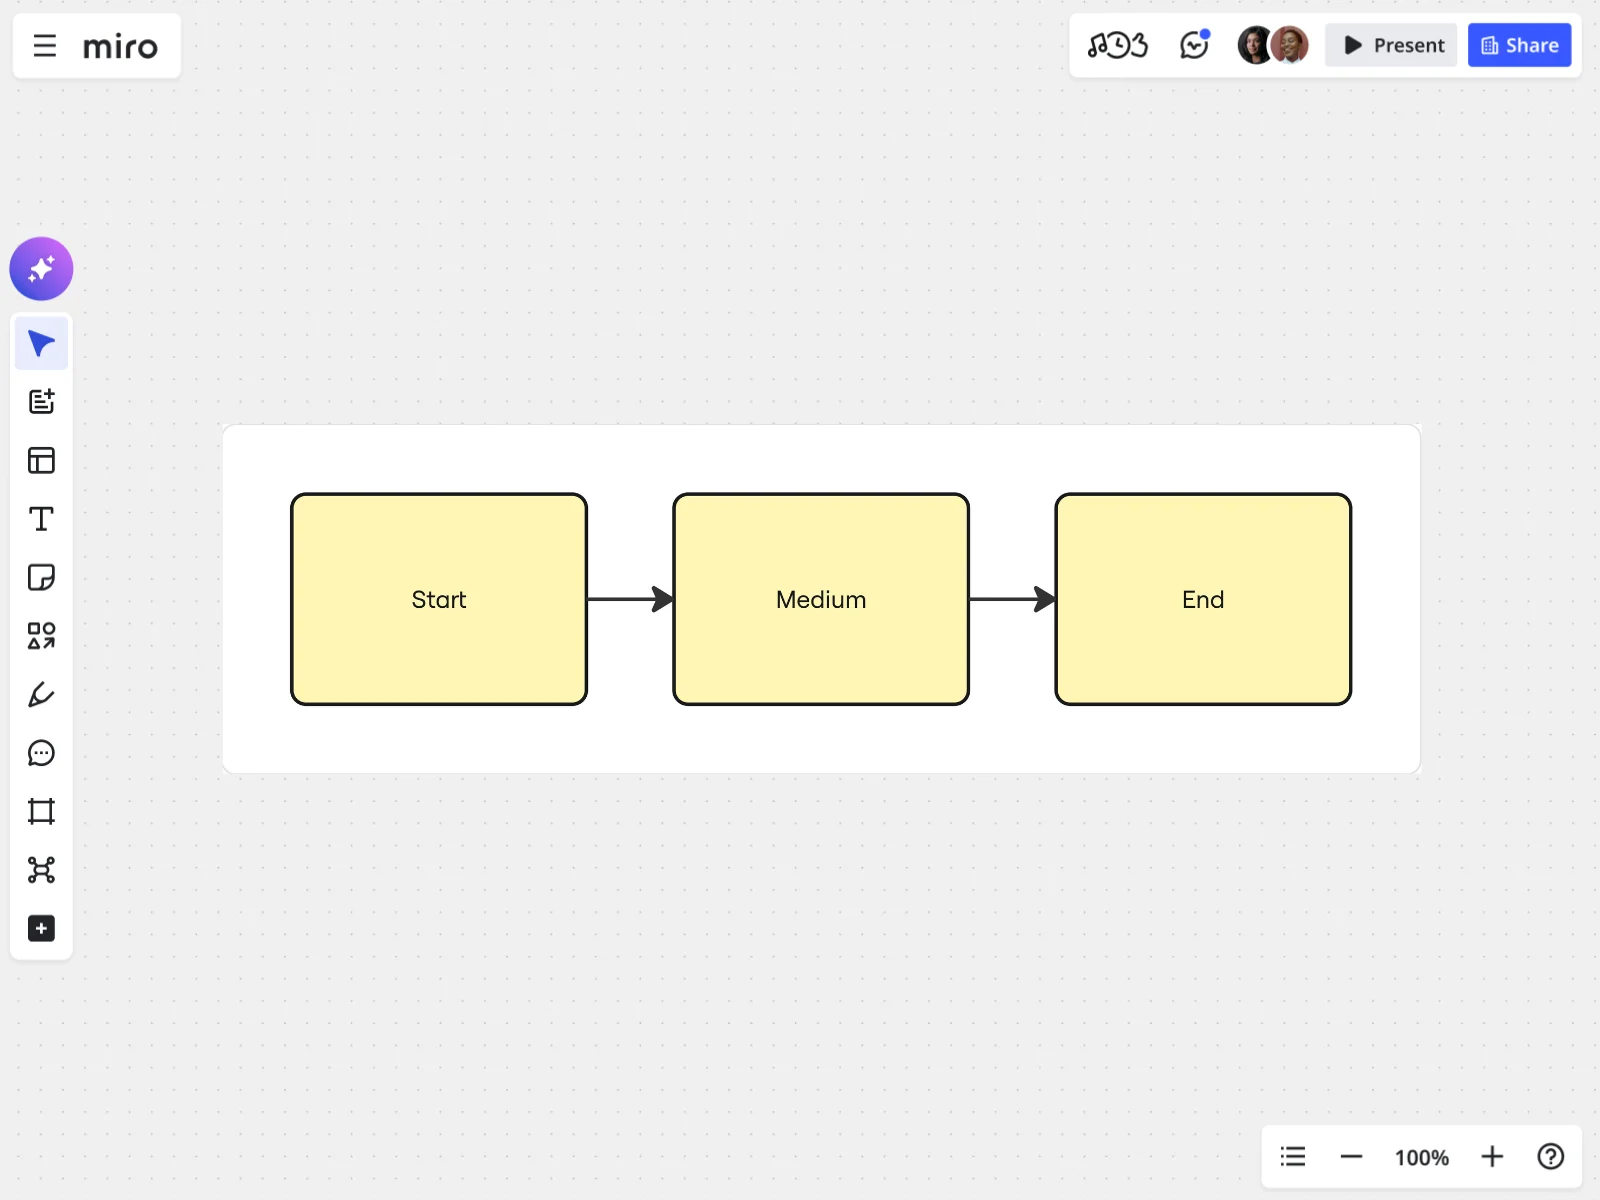
flowchart LR Start --> Medium Medium --> End style A fill:#fff6b6 style B fill:#fff6b6 style C fill:#fff6b6Named, descriptive nodes (Start, Medium, End) read a lot better than single letters once your diagram grows past a handful of steps. Use letters for quick sketches, and switch to real labels for anything you're planning to share.
Node shapes: bracket syntax decides the shape
The brackets around your node's text determine what shape it renders as. You don't pick a shape from a menu. You just type the right symbols, and Mermaid figures out the rest.
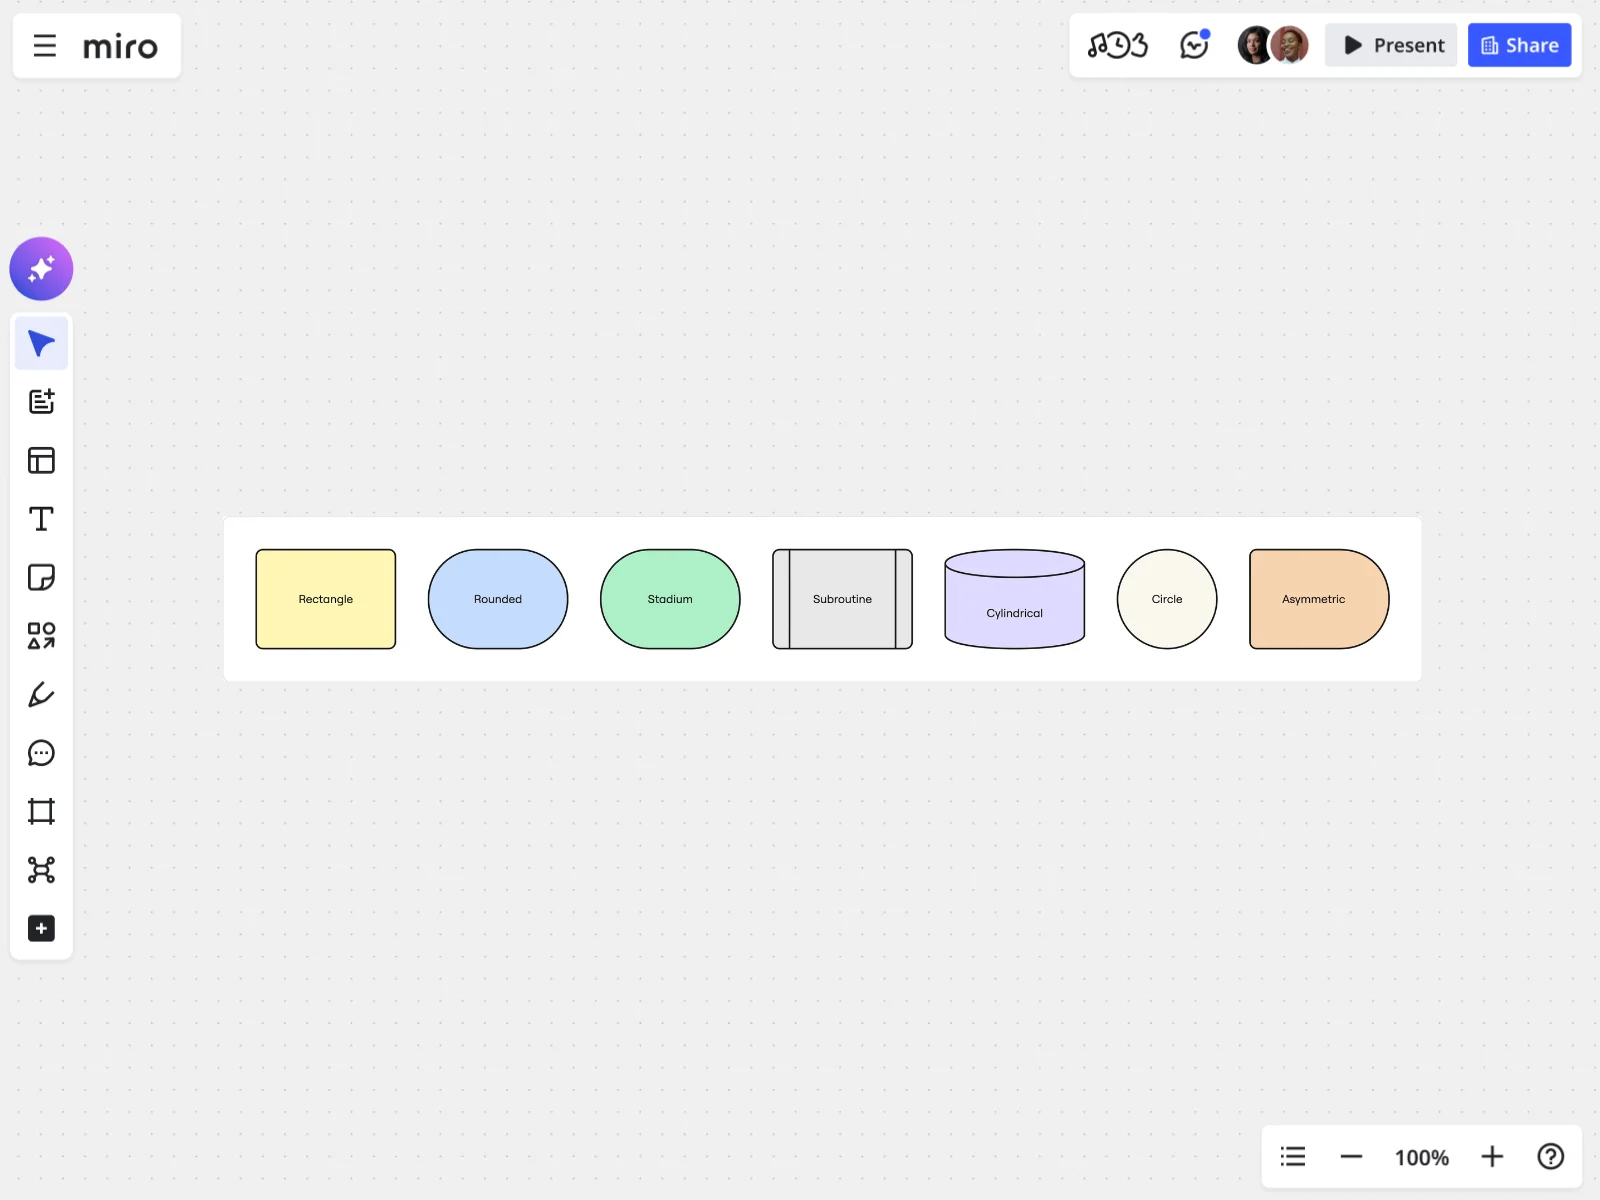
flowchart TD A[Rectangle] B(Rounded) C([Stadium]) D[[Subroutine]] E[(Cylindrical)] F((Circle)) G>Asymmetric]A few of these shapes map to specific use cases worth knowing. Use a rectangle [Text] for a standard process step, a stadium shape ([Text]) for a start or end point, and a subroutine [[Text]] when a node is really a call to a separate, defined process. Reach for a cylinder [(Text)] when you're representing a database or data store, and a circle ((Text)) for a single, self-contained point in the flow.
Mermaid covers a few more shapes worth knowing, including the rhombus for decisions and the hexagon for preparation steps. Special characters like slashes or question marks need quotes around the label:
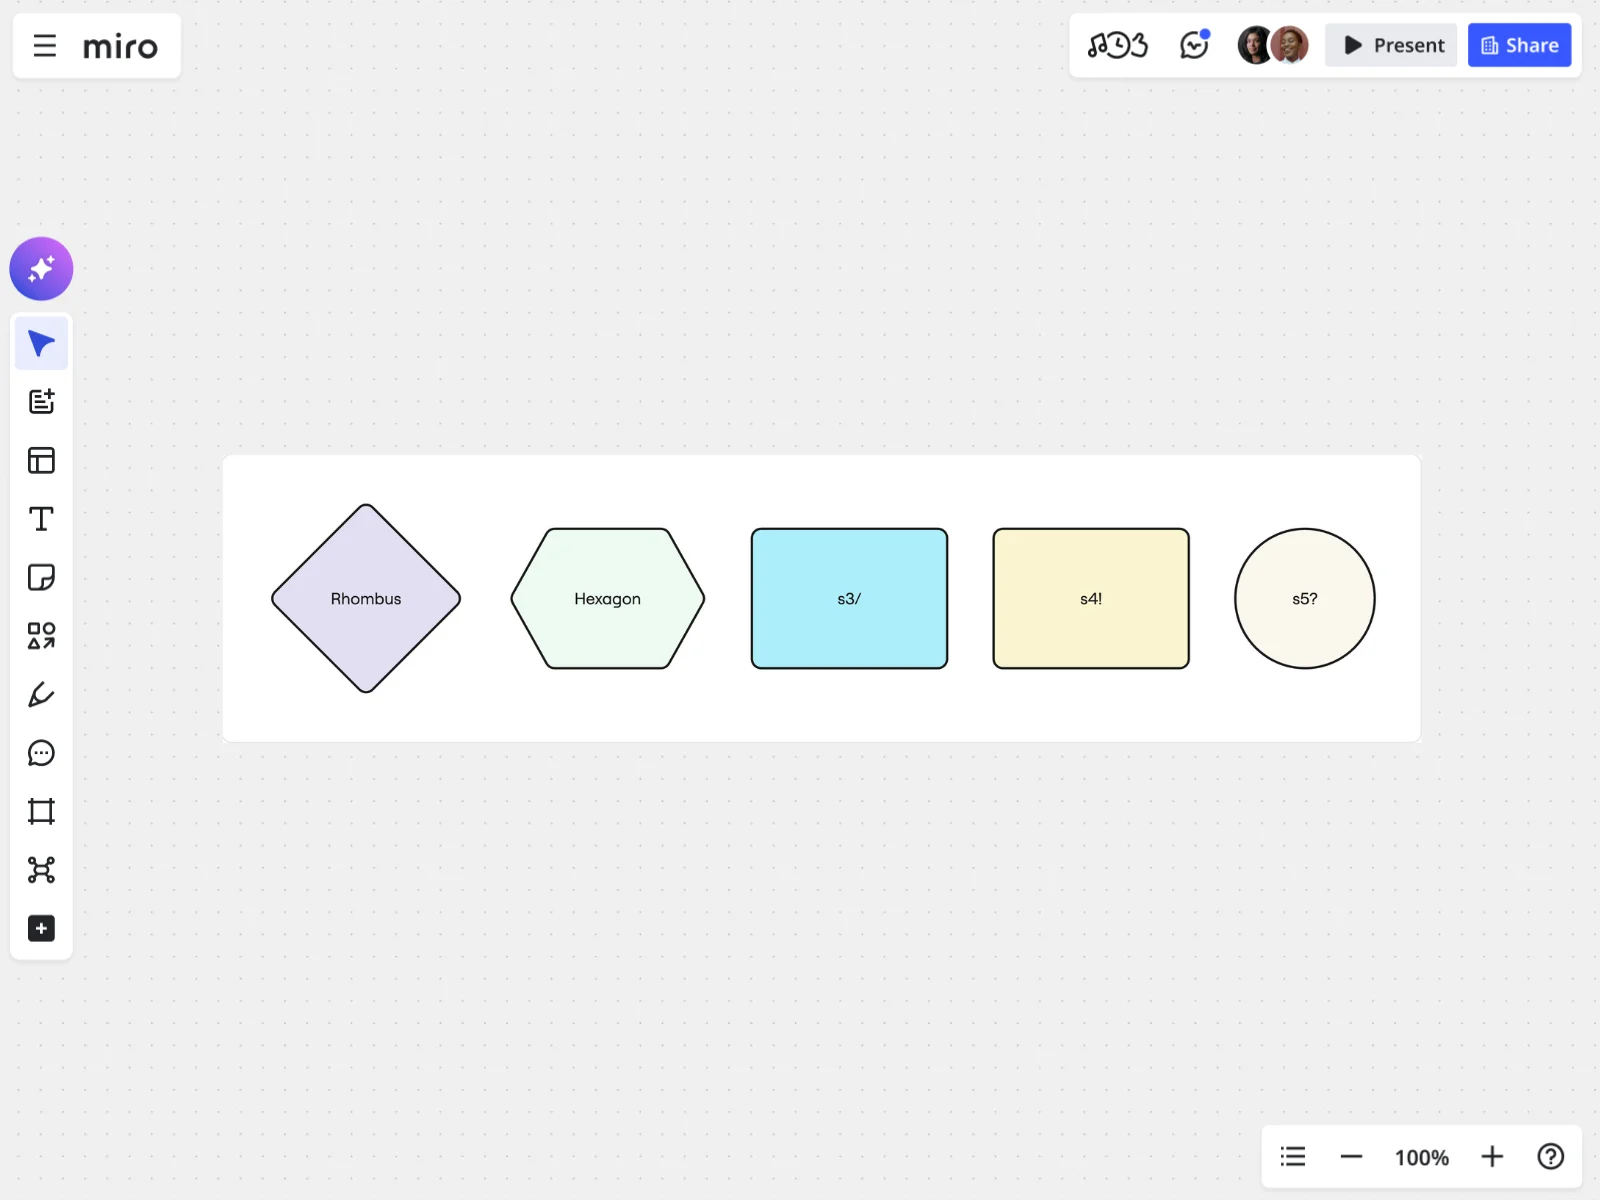
flowchart TDH{Rhombus} I{<!-- -->{Hexagon}} J["s3/"] K["s4!"] L(("s5?"))Links and arrows: connecting your nodes
An arrow tells the reader how one step leads to the next, and Mermaid gives you more than one flavor depending on how strong or optional that connection is.
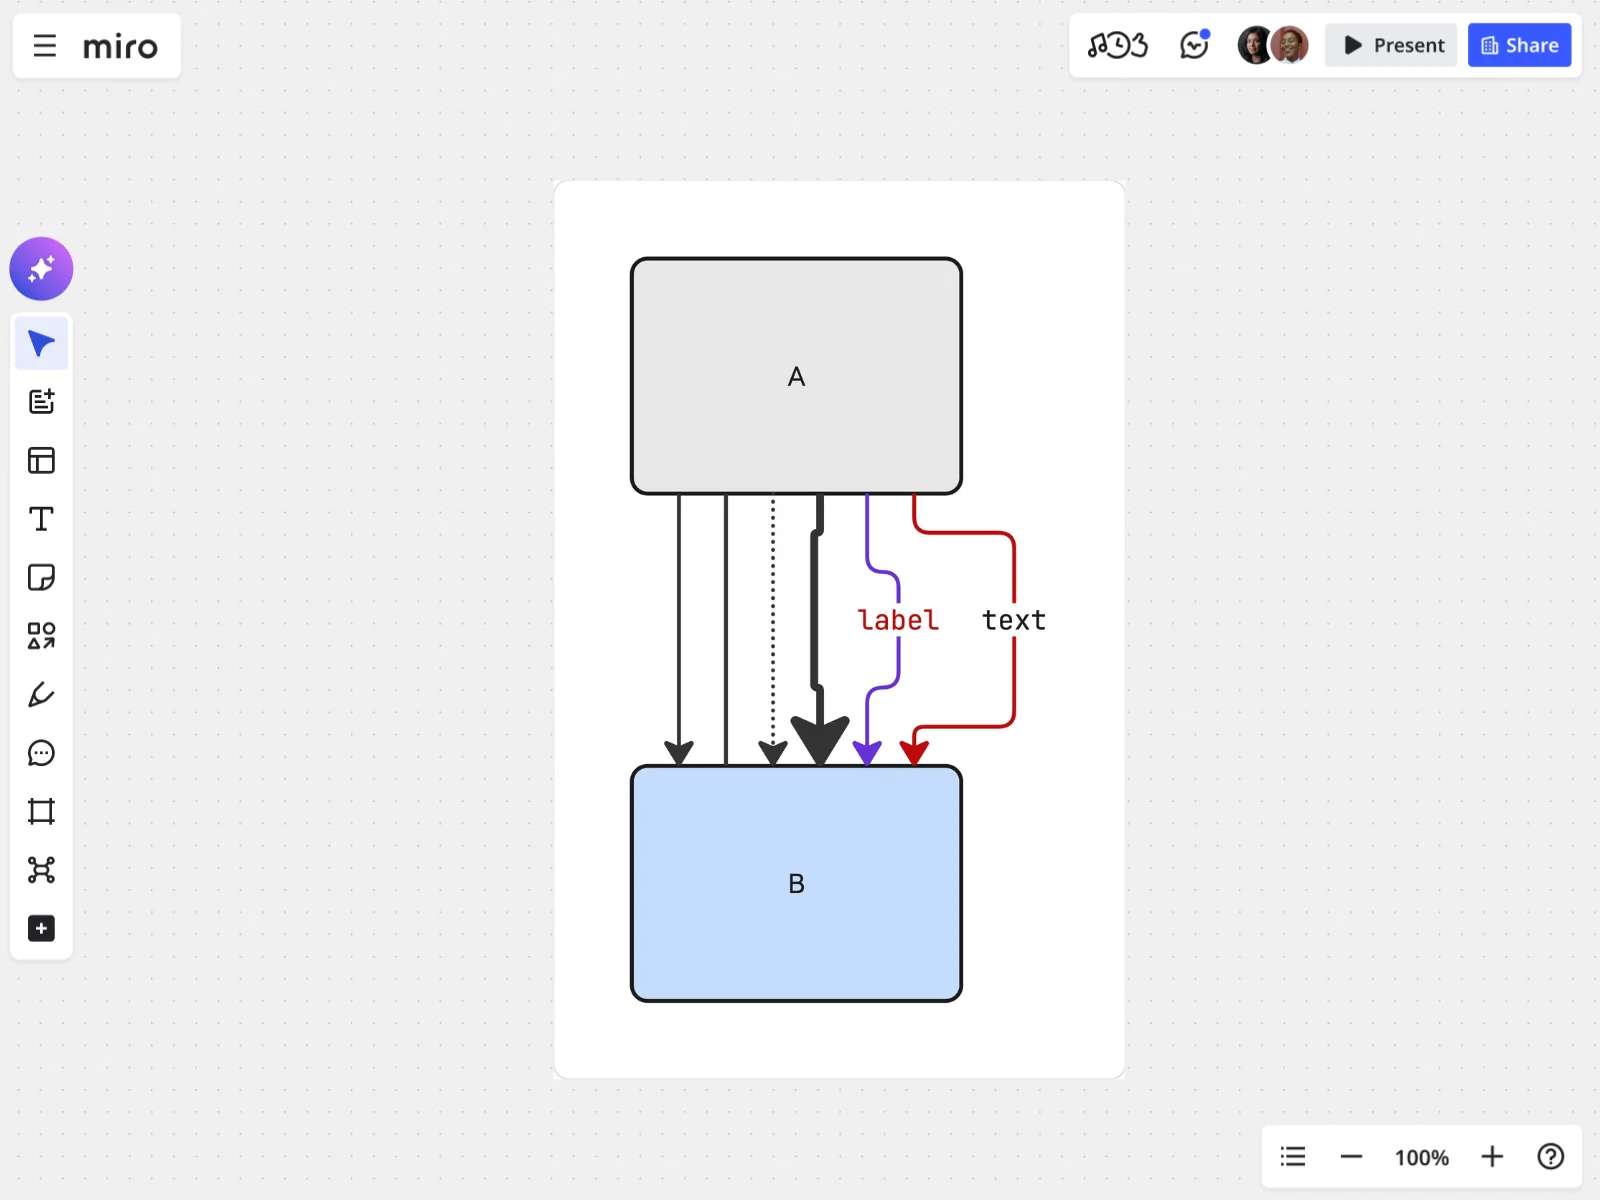
flowchart tdA --> B %% solid arrowA --- B %% solid lineA -.-> B %% dottedA ==> B %% thickA -->|label| B %% with textA -- text --> B %% alt labelstyle A fill:#e7e7e7style B fill:#c6dcff linkStyle 5 stroke:#bd0a0a linkStyle 4 color:#bd0a0a,stroke:#6631d7Each one signals something different: --> is a standard solid arrow, --- is a solid line with no arrowhead for a looser association, -.-> is a dotted arrow for optional or async paths, and ==> is a thick arrow for flagging a critical path. To label an arrow, use either -->|label| or -- label -->. Both do the same thing. And linkStyle, targeting an arrow by its position in the diagram (0 for the first, 1 for the second, and so on), lets you recolor a specific connection instead of every arrow on the board.
You can also connect multiple nodes in a single line instead of writing out every pair:
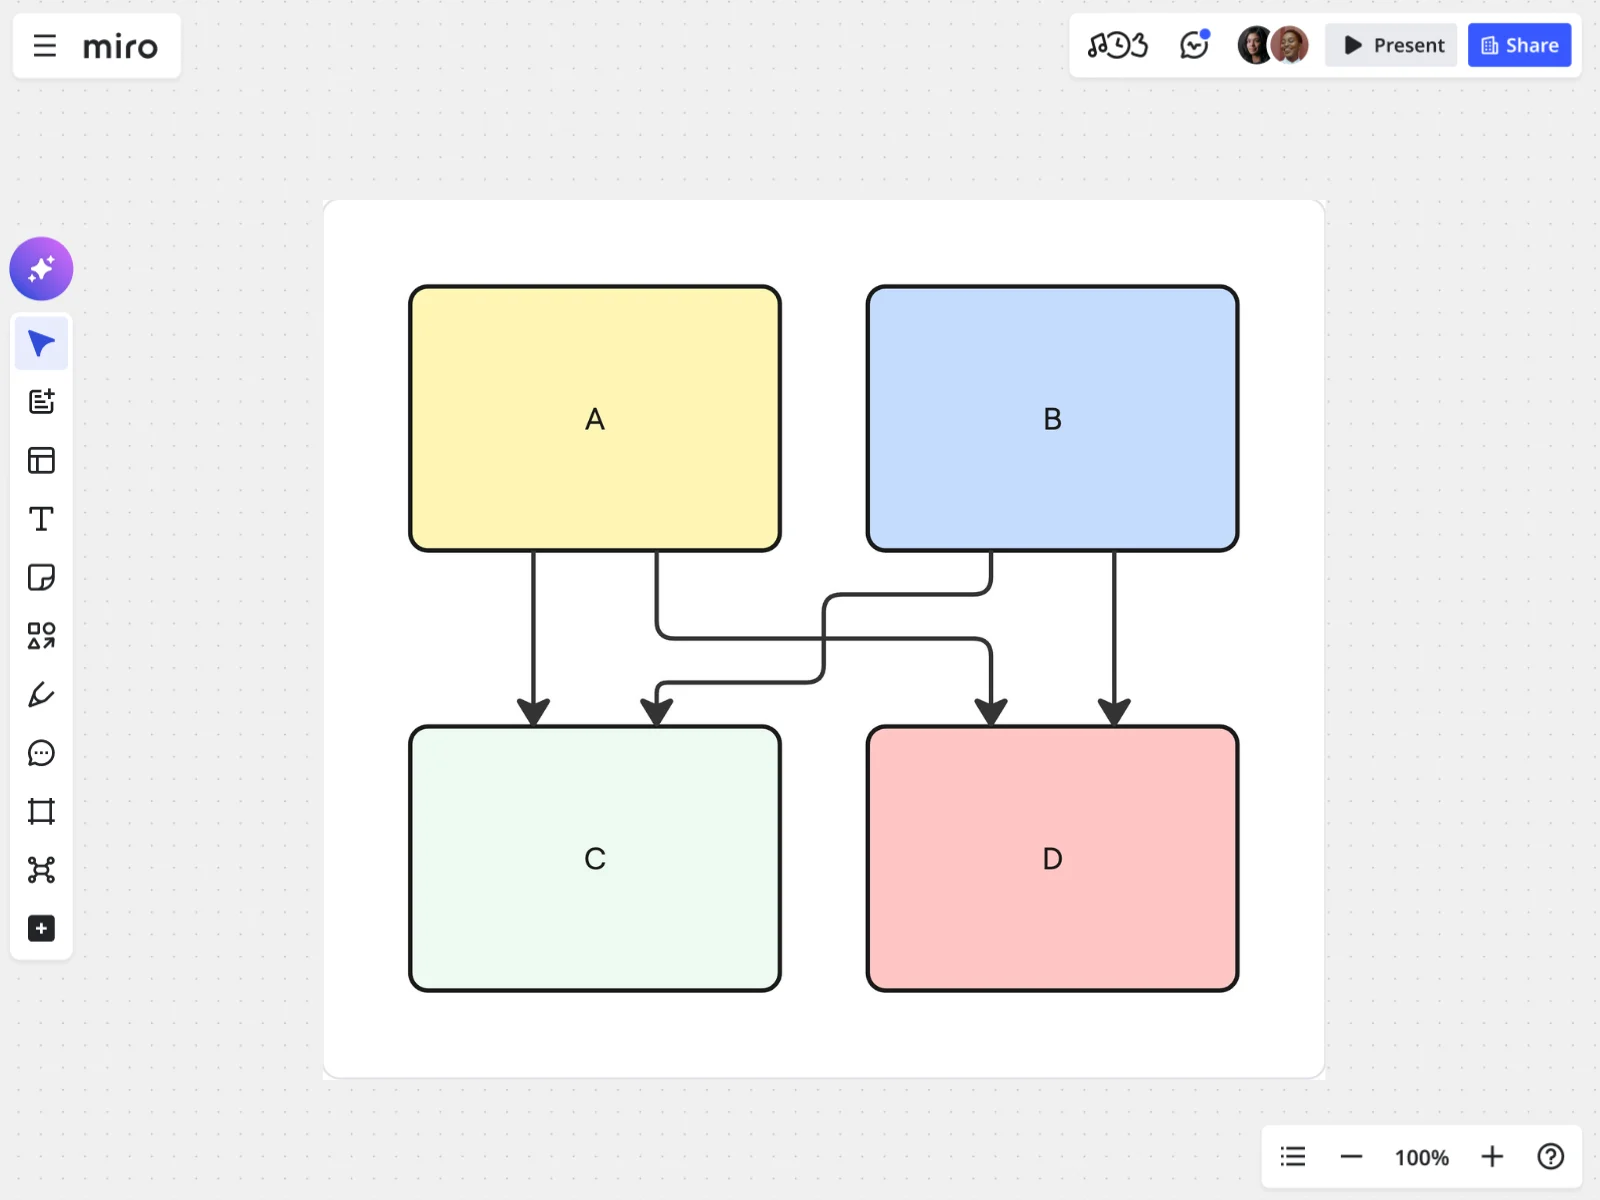
flowchart tdA & B --> C & D %% multistyle A fill:#fff6b6 style B fill:#c6dcff style C fill:#edfaf2 style D fill:#ffc6c6That one line does the same job as four separate arrow statements. It's a small thing, but it keeps a busy diagram's code readable.
Subgraphs: grouping and nesting
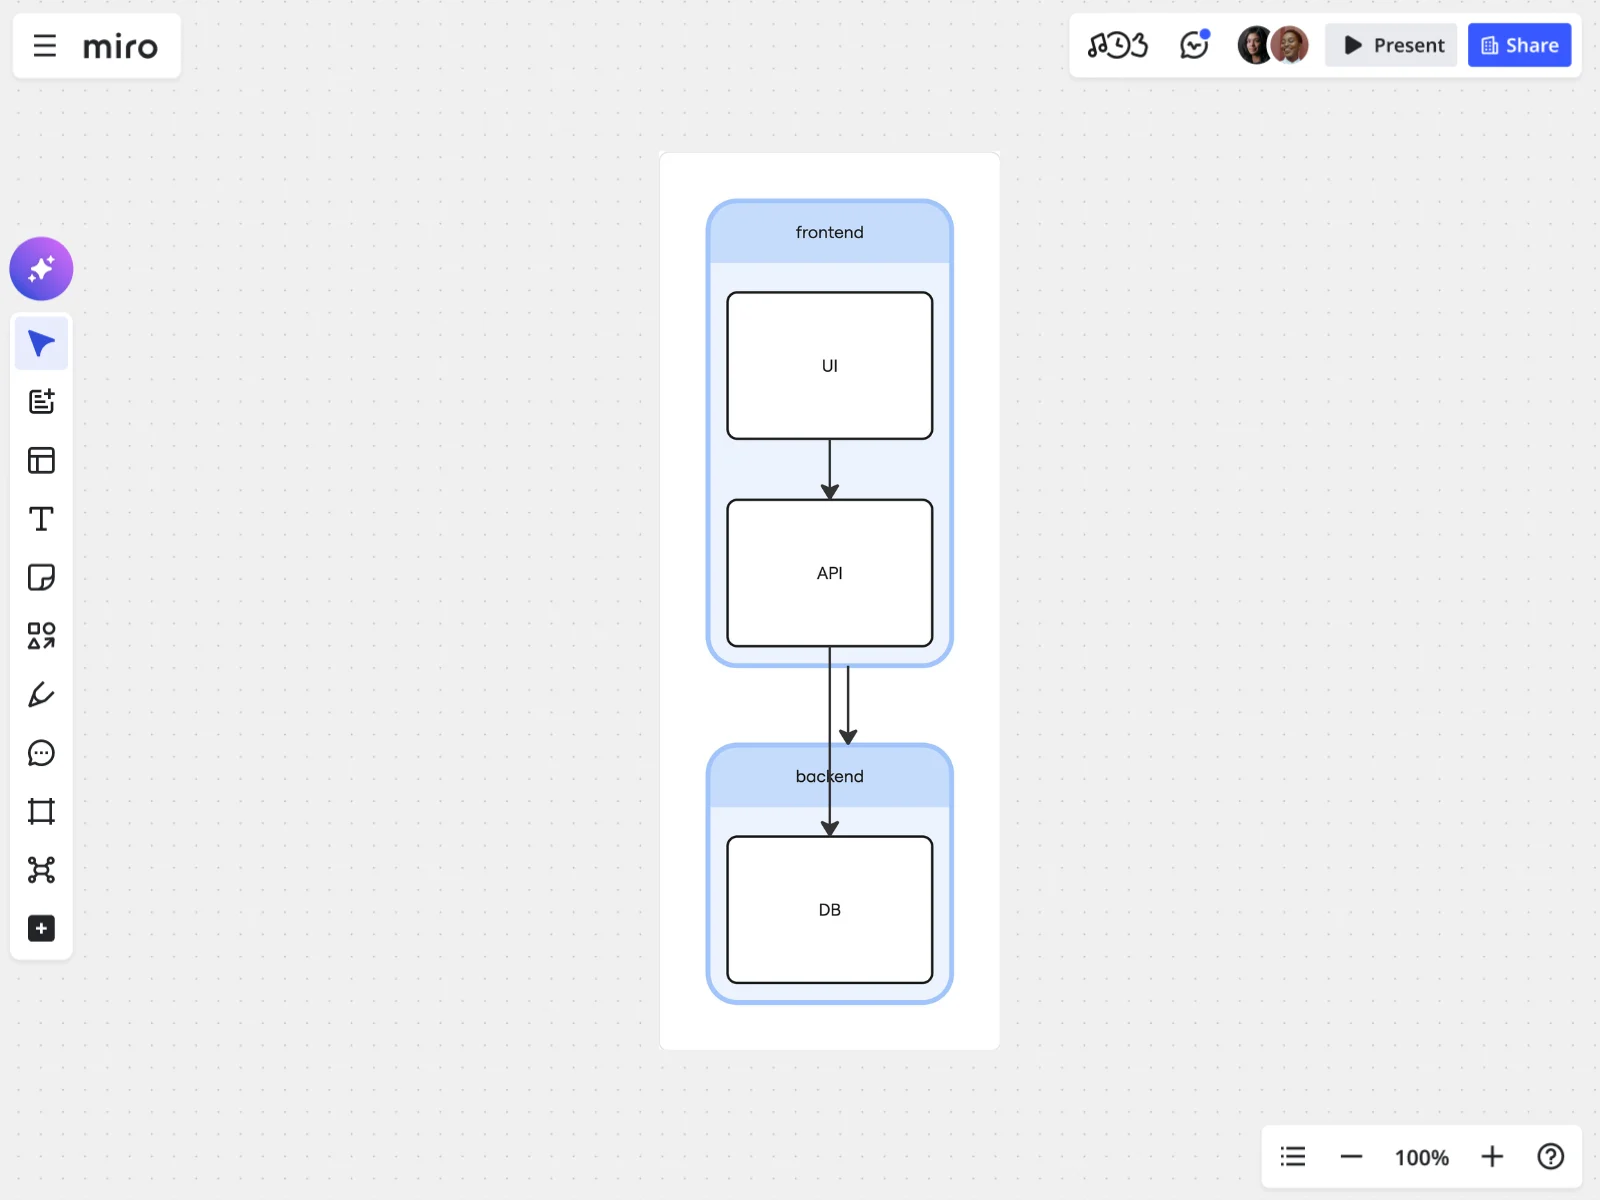
Real systems have sections: a frontend, a backend, a payment step that's really three steps pretending to be one. Subgraphs let you box related nodes together and even give that box its own internal flow direction.
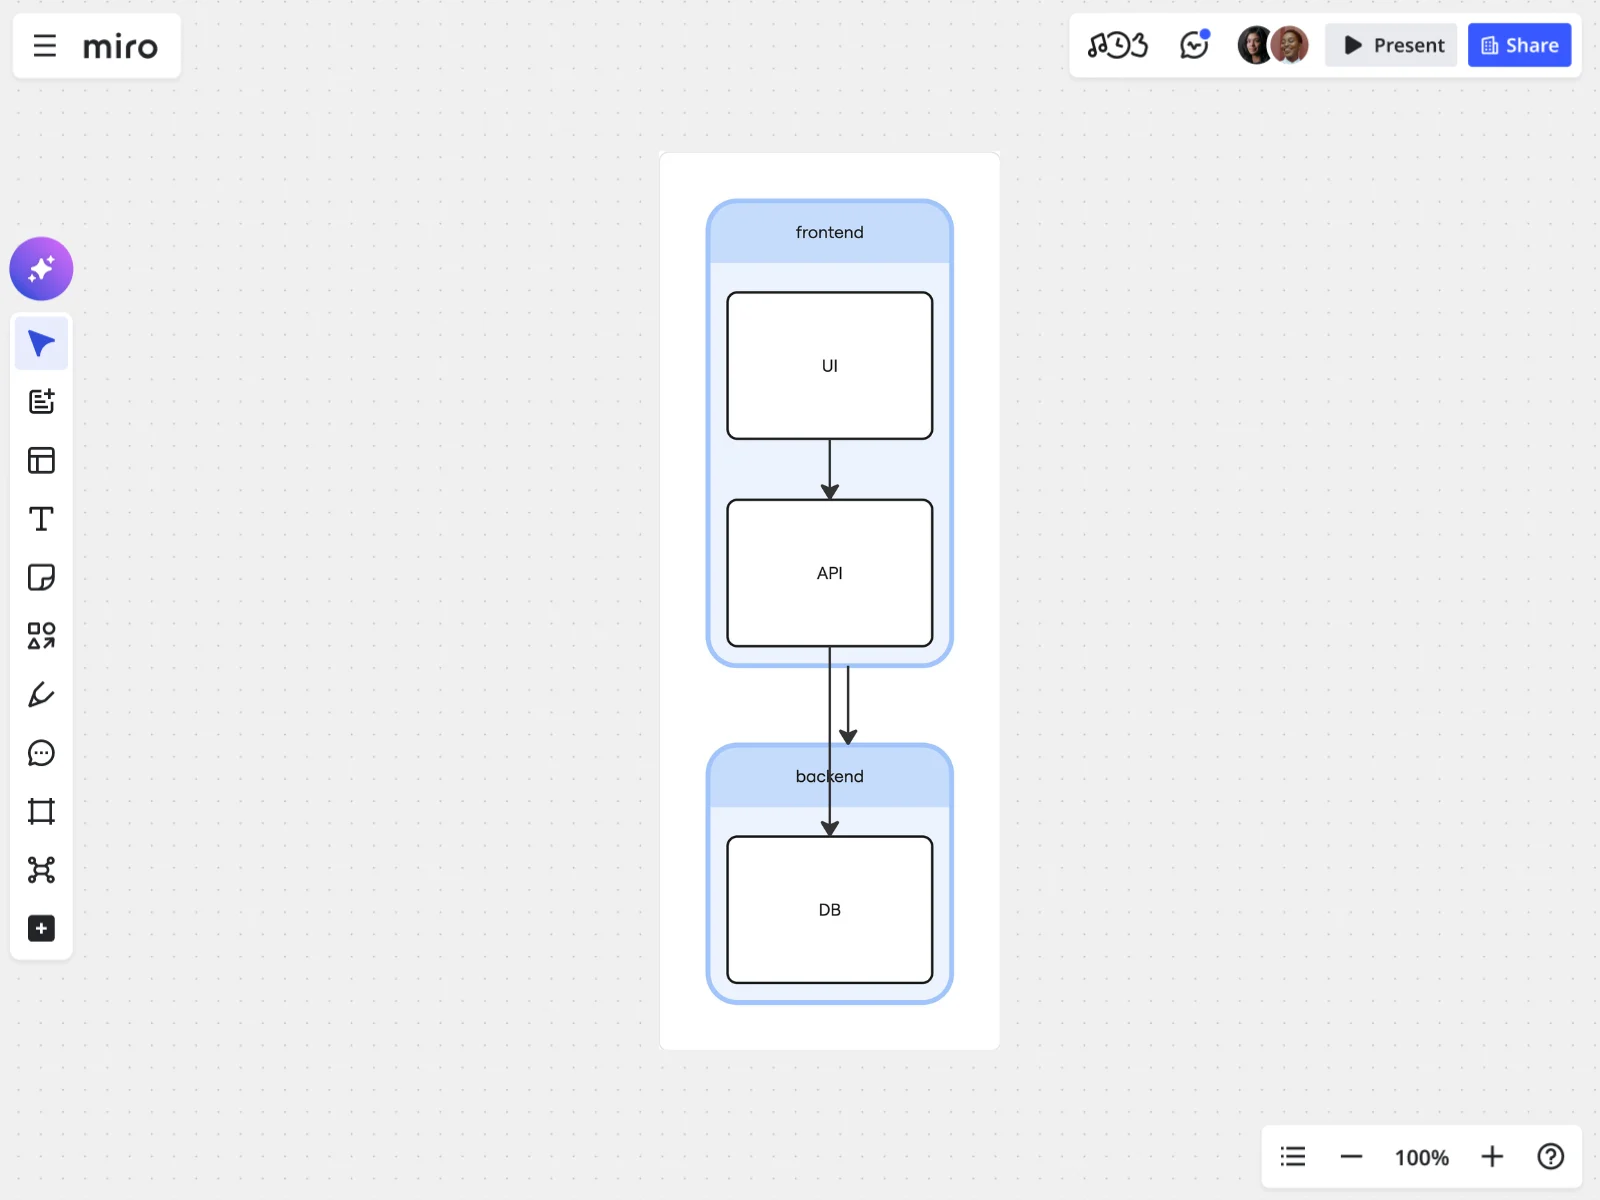
flowchart TB subgraph frontend direction LR UI --> API end subgraph backend API --> DB end frontend --> backendTwo things worth remembering here. First, direction inside a subgraph overrides the parent flowchart's direction, so your frontend can run left to right even while the overall diagram runs top to bottom. Second, a subgraph can be linked like any other node, which is how frontend --> backend works above even though both sides are boxes full of other boxes.
Theming and init directives
If you want a flowchart's colors to match your brand, an incident's severity, or just your own taste, an init directive lets you set that before you draw a single node. It has to go on the very first line of your diagram.
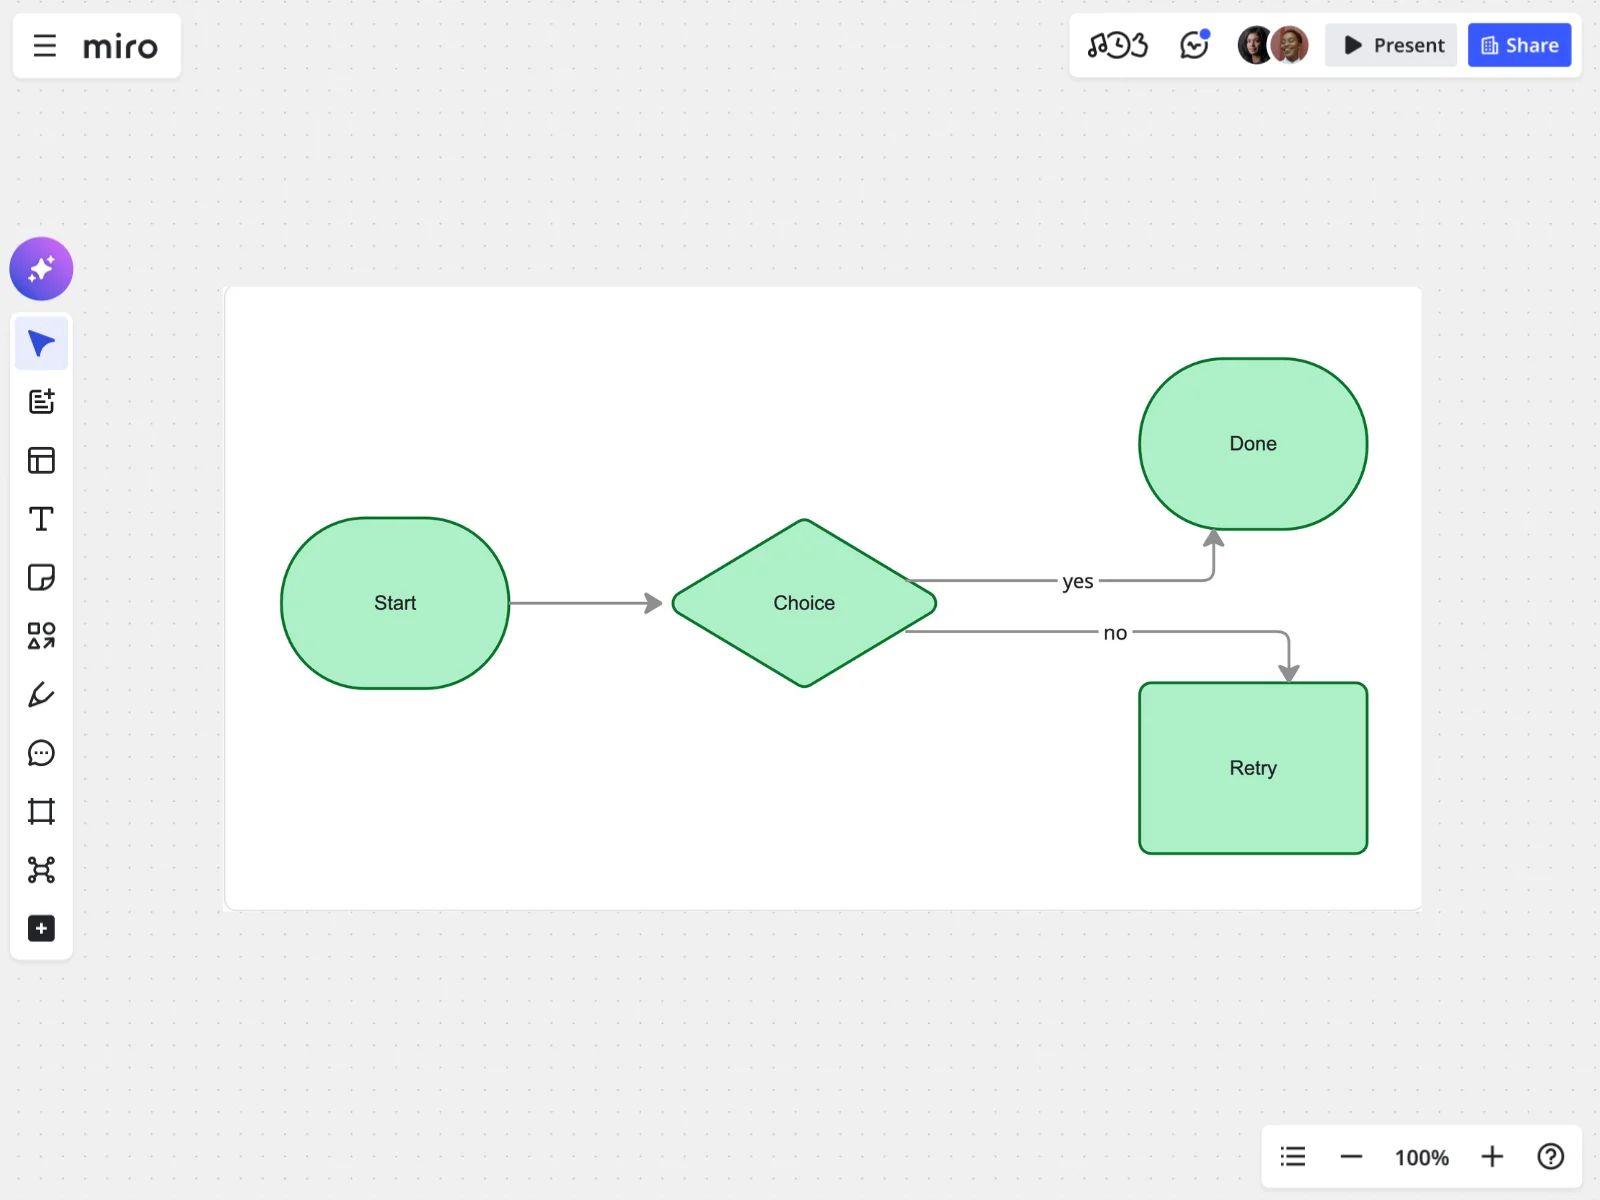
%%{init: { "theme": "base", "themeVariables": { "primaryColor": "#ADF0C7", "primaryTextColor": "#067429", "edgeLabelBackground": "#FFFEEE", "lineColor": "#36352F" }}}%%flowchart LR A[Start] --> B{Choice} B -->|yes| C[Done] B -->|no| D[Retry]Mermaid ships with five built-in themes: default, dark, forest, neutral, and base. Only base gives you access to the full themeVariables object, so if you want custom colors rather than a preset palette, that's the theme to start from.
Interaction: click events and callbacks
A flowchart doesn't have to be static. You can wire a node to open a link, run a JavaScript function, or show a tooltip on hover, which is handy when your diagram doubles as documentation.
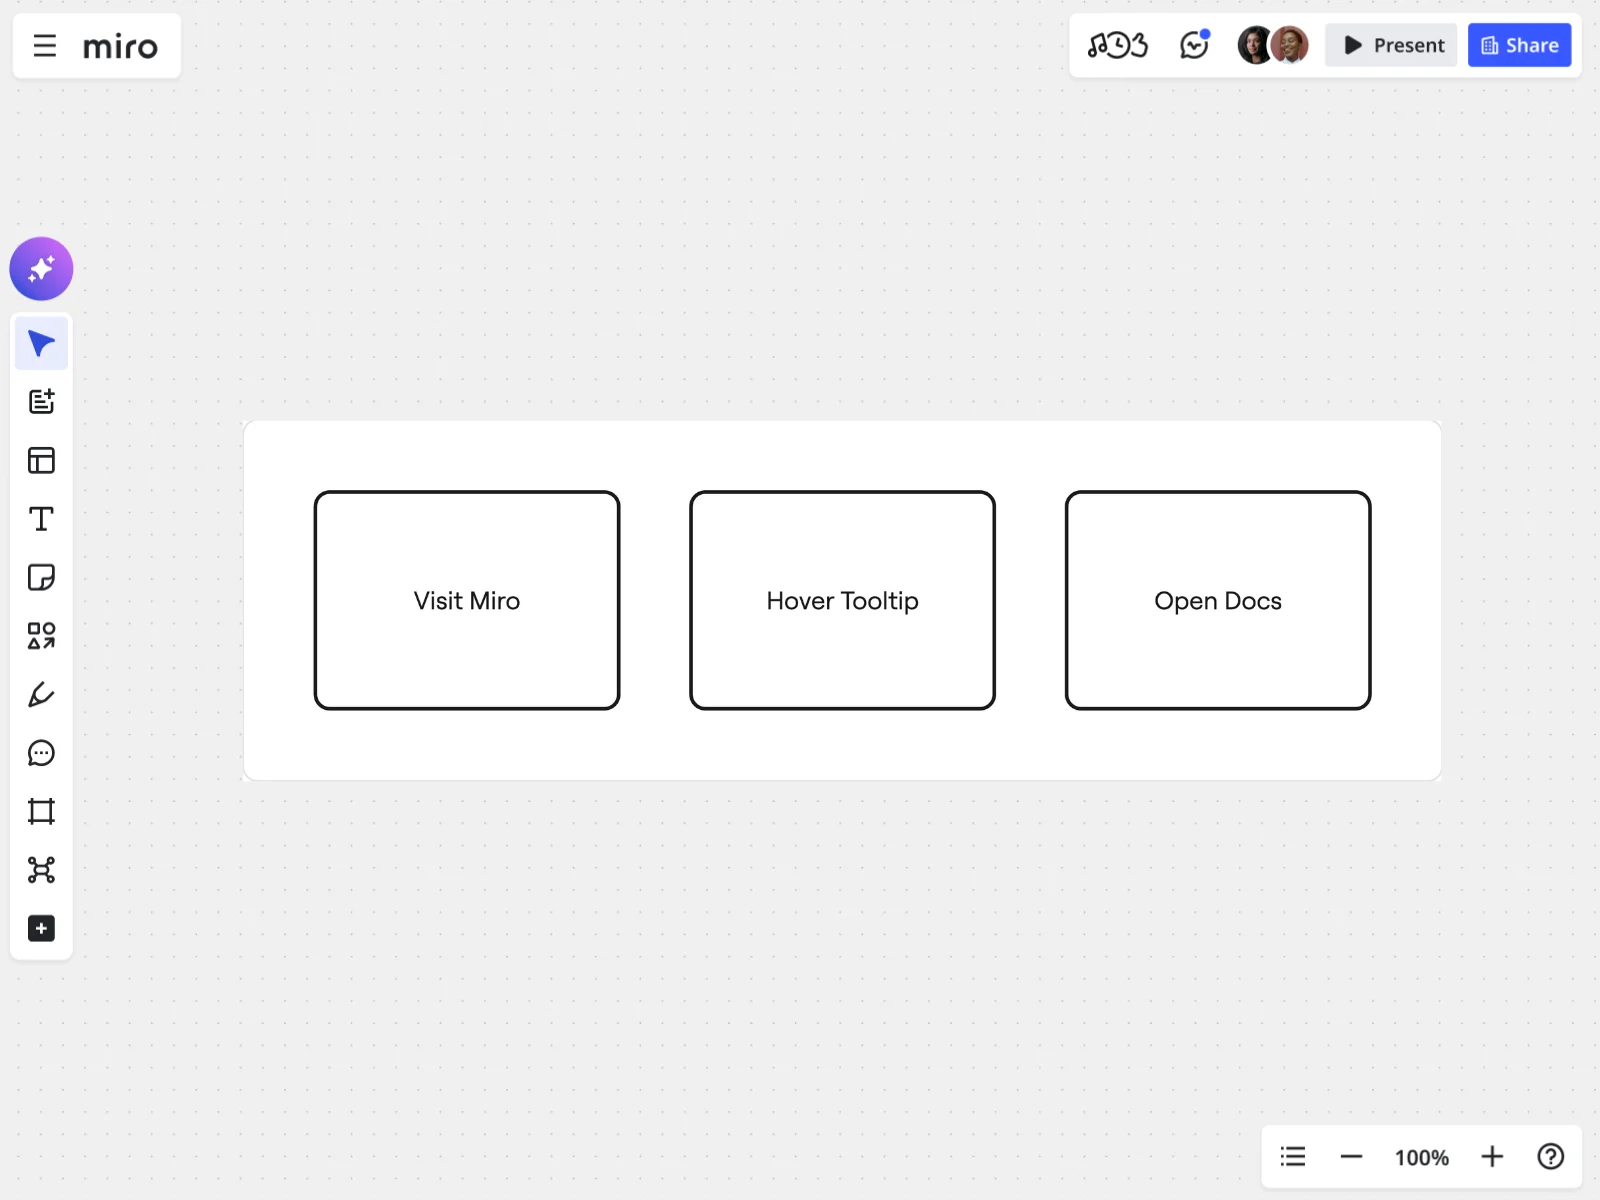
flowchart TD A[Visit Miro] B[Hover Tooltip] C[Open Docs] click A "https://miro.com" _blank click B callback "Tooltip" click C href "/docs" "Open docs"%% JS callback%% <script>%% const callback = (id) =>%% alert('Clicked ' + id);%% </script>Node A opens a link in a new tab. Node B triggers a JavaScript function named callback and shows the hover text "Tooltip." Node C opens a relative link in the current tab with its own hover text. You'll see this pattern most often in internal documentation, where a diagram node links straight to the runbook or ticket it represents.
Styling: colors, classes, and markdown labels
One-off styles work fine for a single node, but they get repetitive fast. classDef lets you define a style once and reuse it across your whole diagram, which matters the moment your flowchart has more than five or six nodes.
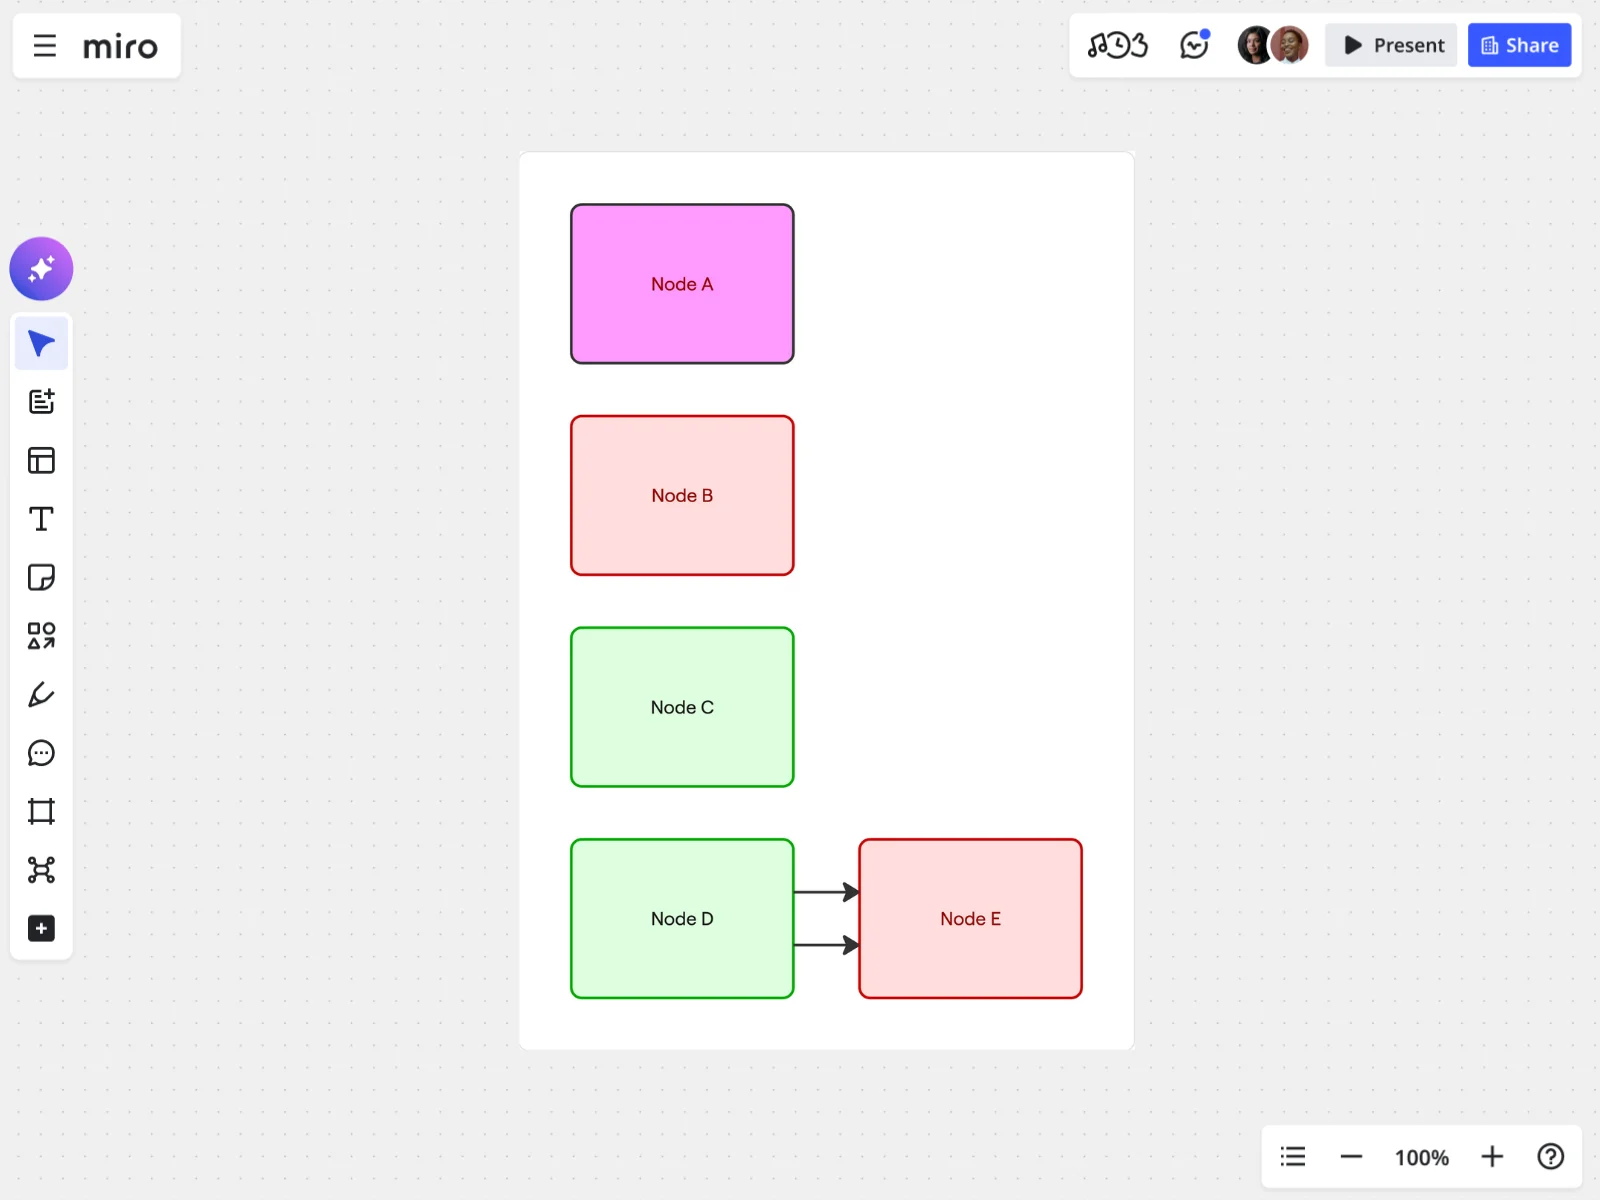
flowchart LR A[Node A] B[Node B] C[Node C] D[Node D] --> E[Node E] %% Inline style style A fill:#f9f,stroke:#333,stroke-width:2px %% Reusable class definition classDef error fill:#fdd,stroke:#c00,color:#900 classDef success fill:#dfd,stroke:#0a0 %% Assign class class A,B error class C success %% Shorthand class assignment D:::success --> E:::errorYou can assign a class two ways: with class A,B error on its own line, or inline with the shorthand D:::success. Both do the same thing. Pick whichever keeps your code more readable.
For richer labels, Mermaid also supports basic markdown formatting inside nodes and edges, as long as you disable HTML labels first:
---config: htmlLabels: false---flowchart LRsubgraph "One" a("`The **cat** in the hat`") -- "edge label" --> b{<!-- -->{"`The **dog** in the hog`"}}endsubgraph "`**Two**`" c("`The **cat** in the hat`") -- "`Bold **edge label**`" --> d("The dog in the hog")endPutting it all together: a full example
This login flow uses most of what's covered above in one diagram: shapes, subgraphs, styling classes, a retry loop, and a click event.
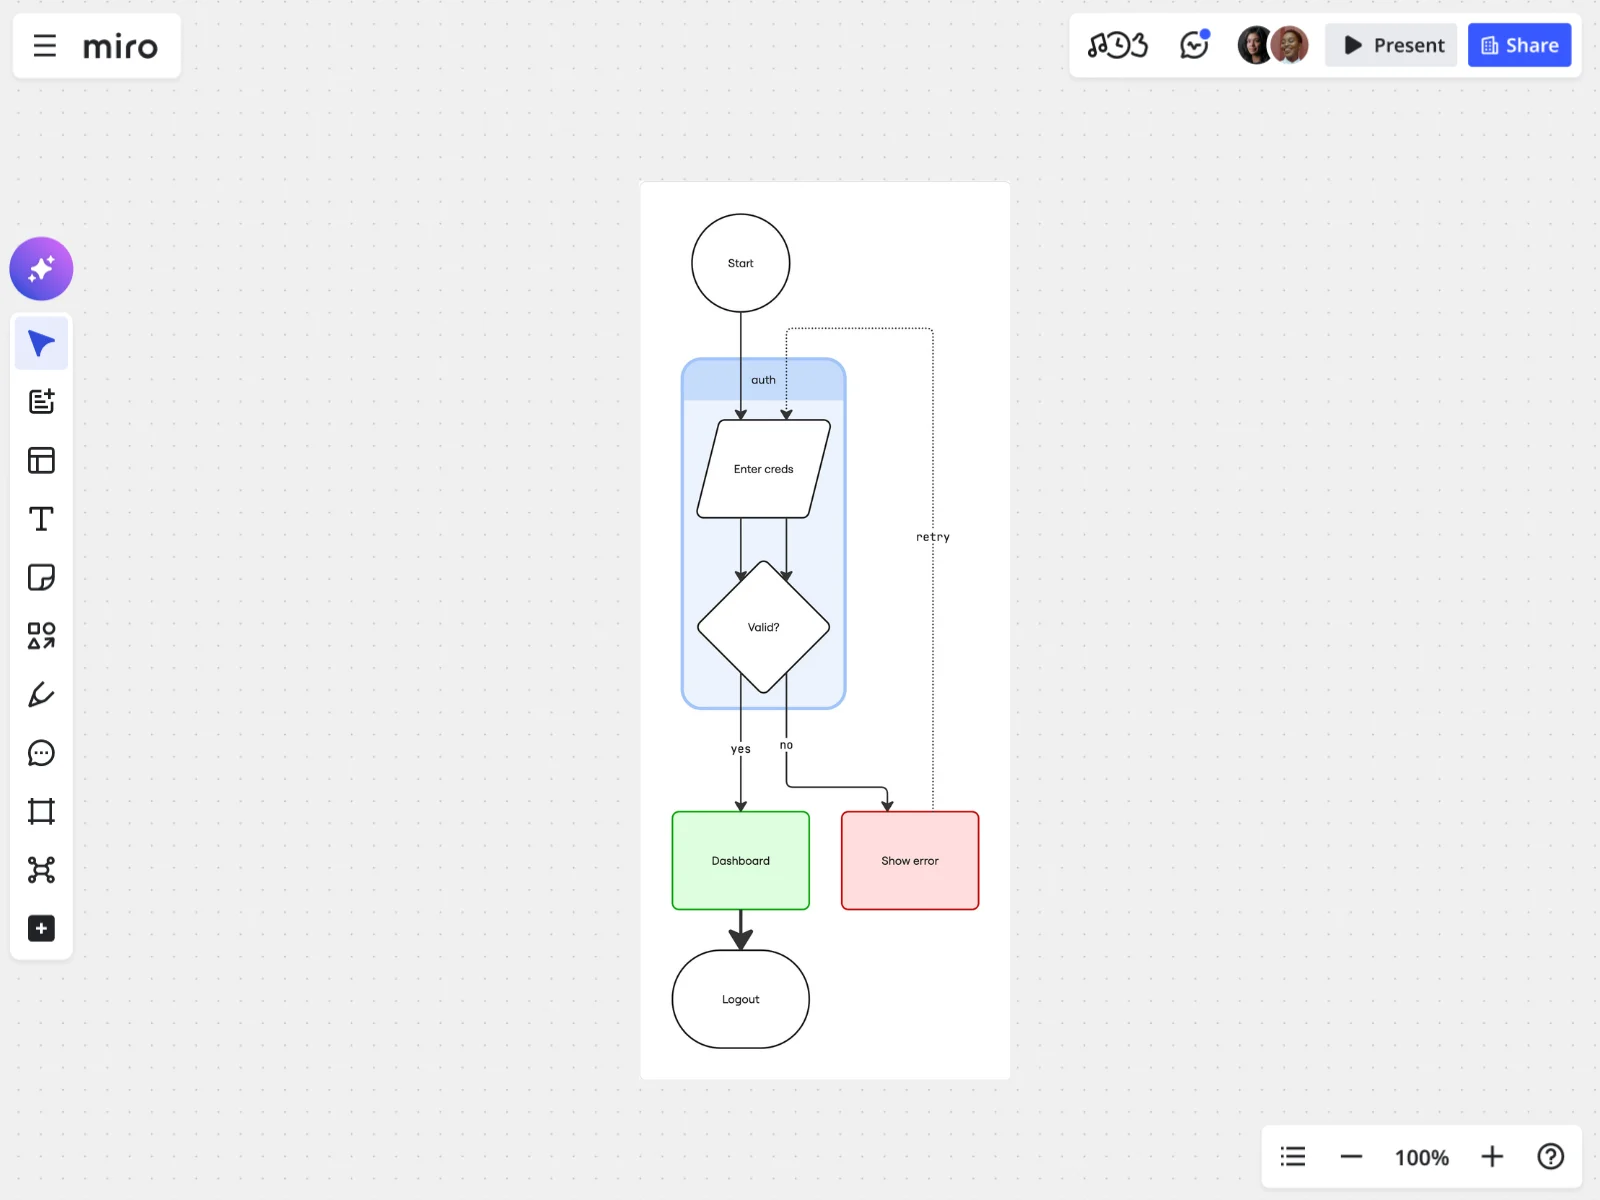
flowchart TD Start((Start)) --> Login[/Enter creds/] Login --> Check{Valid?} Check -->|yes| Home[Dashboard]:::ok Check -->|no| Err[Show error]:::bad Err -.retry.-> Login Home ==> Logout([Logout]) subgraph auth direction LR Login --> Check end classDef ok fill:#dfd,stroke:#0a0 classDef bad fill:#fdd,stroke:#c00 click Home "/dashboard" _selfNotice how little of this is new. It's the same shapes, arrows, subgraph, and classDef pattern from earlier sections, combined into something you'd use for real work. The one new shape here is Login[/Enter creds/], a parallelogram, which Mermaid convention often uses for an input step. The real skill in writing Mermaid isn't memorizing every symbol. It's knowing which handful of patterns cover most of your diagrams.
See all the syntax examples in our Mermaid Flowchart Cheatsheet.
Where Mermaid flowcharts get even better: Miro
Writing the code is half the job. Someone still has to look at it, question a decision, and update it as the process changes. That's usually where Mermaid used to hit a wall: you'd render a diagram, drop a screenshot somewhere, and lose the connection between the code and the picture the moment anyone touched it.
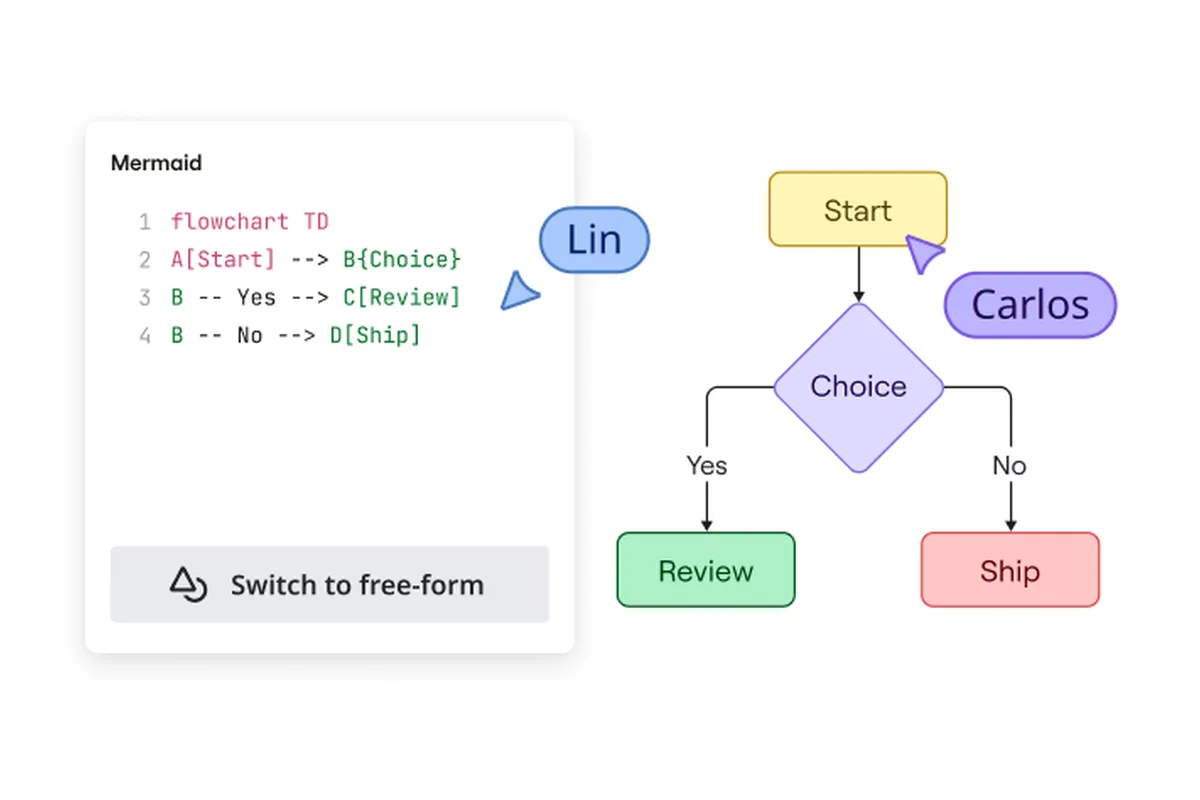
Miro closes that gap with Structured Diagrams with Mermaid, currently in public beta. Paste Mermaid syntax onto a Miro board, or ask an AI agent like Claude Code to generate one straight from your codebase, and it renders as real, editable Miro shapes, not a static image. The Mermaid code stays the source of truth: edit the diagram visually and the underlying code updates with it, so the two never drift apart.
That matters for a few reasons. Your team can work on the diagram together instead of around it: comment directly on a node instead of starting a side thread in Slack, and everyone stays in the context of the actual decision. Because the diagram is still Mermaid under the hood, an AI agent can read it back, make a targeted edit, or draft a document like an architecture decision record from your team's comments, ready to open as a pull request. And you're not stuck with someone else's layout. Change the flow direction, adjust spacing, or open the code panel and edit the syntax by hand, all without leaving the board.
Flowcharts get the full visual editing experience today. Sequence, class, and entity-relationship diagrams also render as native shapes, but treat those as code-first for now until visual editing catches up to them.
How to build a Mermaid flowchart in Miro
- Open the Creation bar, select Formats, then Diagram, and click Build with code.
- Paste Mermaid syntax you already have, start from a template, or ask your AI agent to generate a flowchart straight from your codebase or a set of requirements.
- Watch it render as native Miro shapes with an automatic layout, so you're not manually nudging boxes to keep the lines from crossing.
- Open the diagram in focus mode to edit it directly: click a shape to change its label or style, adjust the flow direction, or open the code panel and edit the Mermaid syntax by hand.
- Invite your team to comment on the diagram itself, right where the decision is actually happening.
- When you're done, export it as an image, copy the Mermaid code back into your repo, or let your agent read the diagram and your team's comments back through Miro's MCP server.
If you already know Mermaid, you can start typing straight into the code panel. If you don't, start from a template and learn the syntax by editing something that already works.
More Mermaid flowchart examples for you to try
You don't have to write your first Mermaid flowchart from scratch. Each of these templates is a real Mermaid board you can open, read, and edit, so you learn the syntax by changing something that already works instead of staring at an empty canvas.
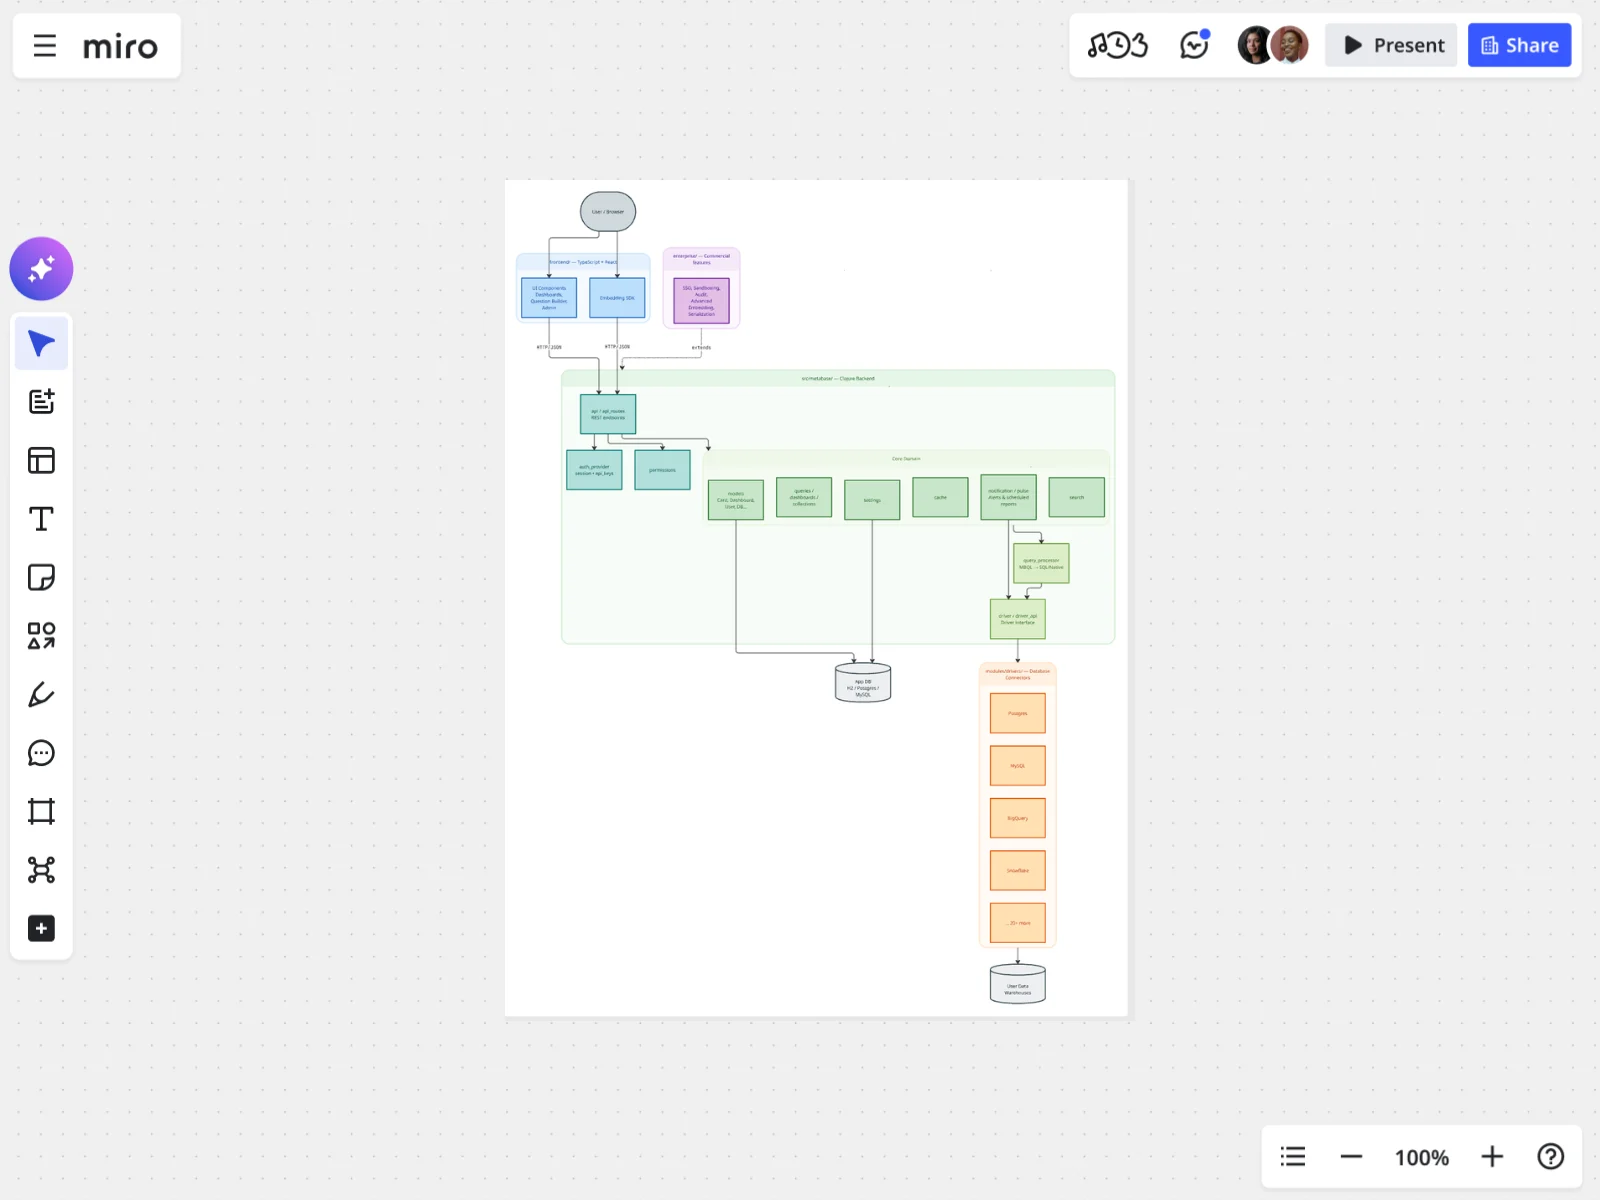
Introduction to Mermaid diagramming in Miro
This is the one to open first if you've never written a line of Mermaid. It walks through the syntax at the pace this guide does: direction keywords, node shapes, arrow types, and a few styled examples, each one paired with its rendered diagram right next to the code. Because it's a live board and not a static reference page, you can change a node label or swap a shape and watch the render update immediately. That immediate feedback loop is the fastest way to learn what each symbol actually does, rather than memorizing a syntax table.
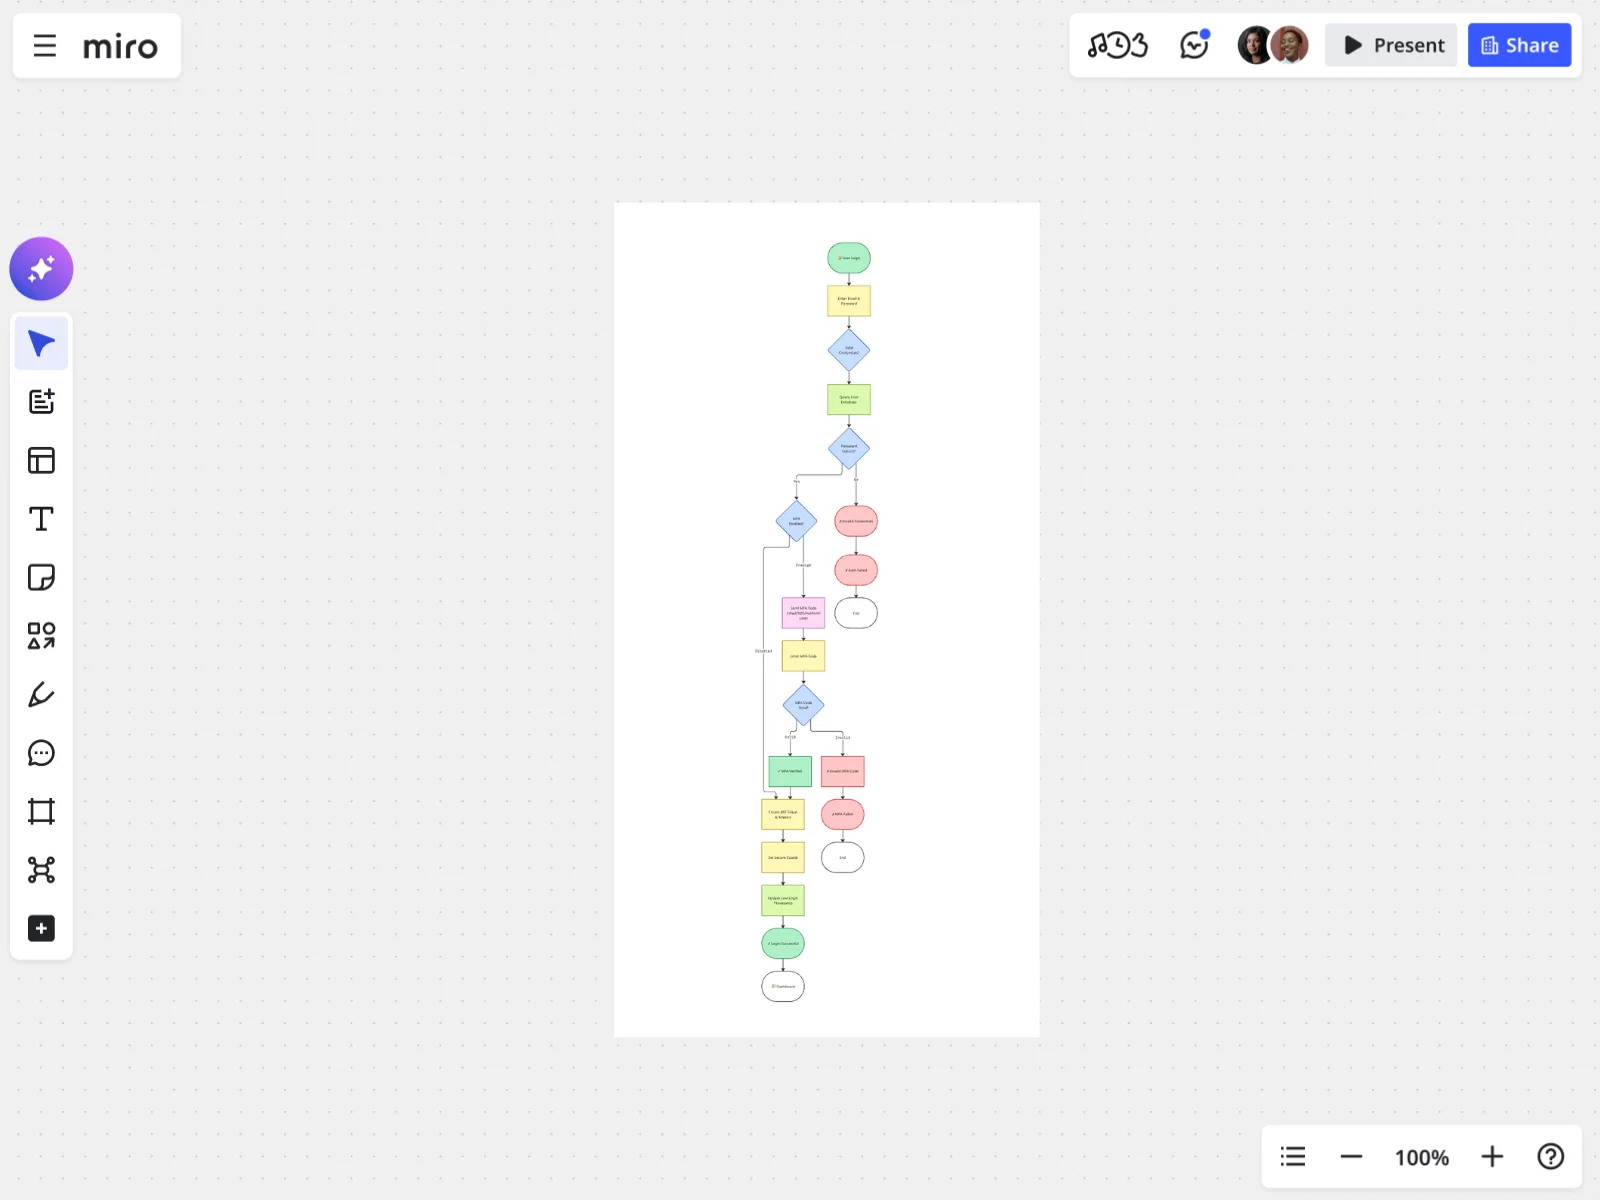
User authentication flow with Mermaid code
This one gives you a working login flow already built: a user enters credentials, the app checks them, and the diagram branches into a success path to the dashboard or a failure path back to a retry. It's close in spirit to the full example earlier in this guide, and it's a good template to grab if you're documenting any kind of authentication, sign-up, or approval flow with a validation step in the middle. Swap in your own node labels and branching logic, and you've got your own auth diagram without touching the layout.
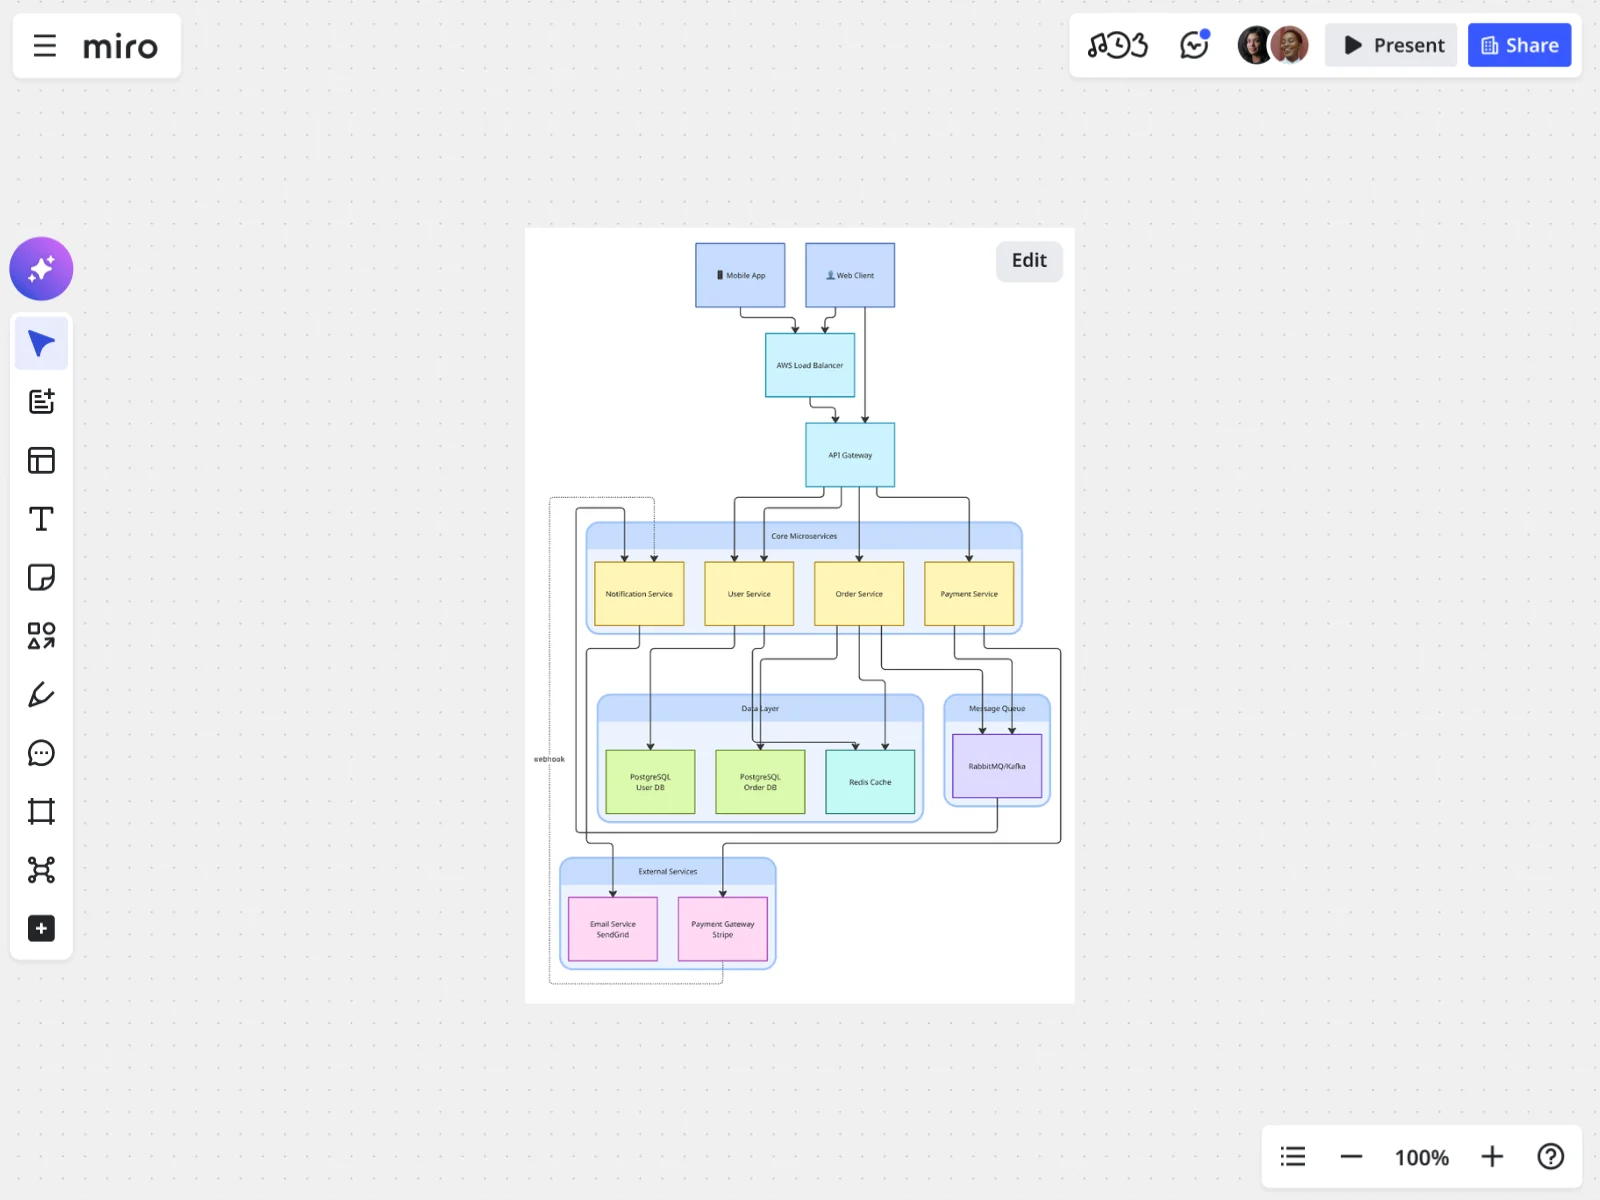
Microservices technical architecture
This is the template to reach for once your diagram outgrows a simple linear flow. It's built around subgraphs, the same grouping technique covered earlier in this guide, so you can box services, APIs, and data stores into clearly labeled sections instead of letting every node float in one flat diagram. It's a solid starting point for onboarding docs, architecture reviews, or any diagram where you need to show how several services actually talk to each other, not just what each one does on its own.
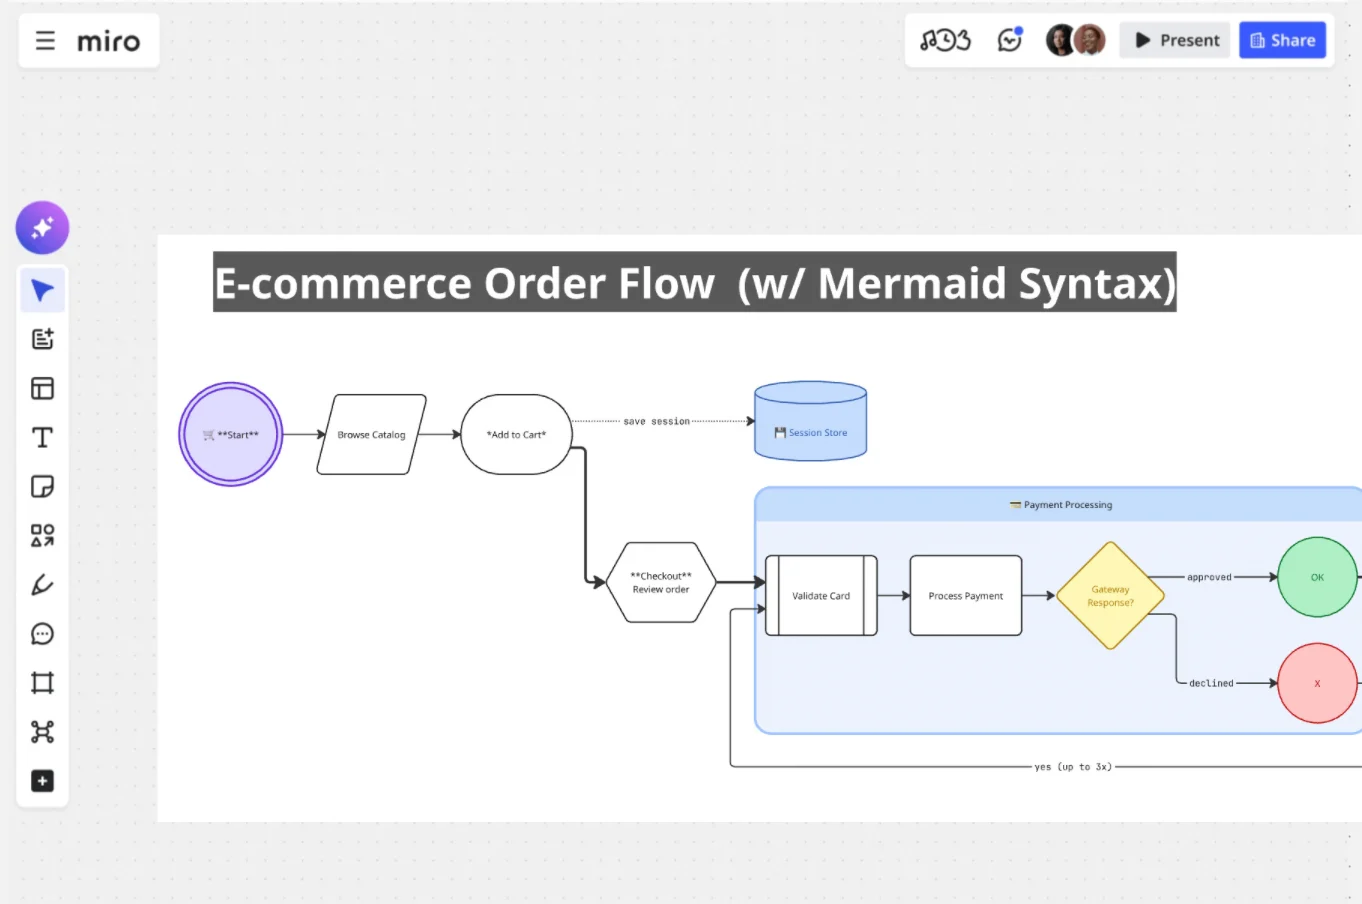
This template maps the full e-commerce process: catalog browsing, payment processing, backend fulfillment, and automated transactional emails.
Grab any of these templates, swap in your own steps, and you'll have a working flowchart in minutes instead of starting from an empty canvas.
Frequently asked questions
What is a Mermaid flowchart? A Mermaid flowchart is a flowchart defined in plain text using Mermaid's syntax rather than drawn by hand. You describe nodes and the arrows connecting them, and Mermaid renders the diagram automatically with layout and shapes included.
How do I create a flowchart with Mermaid? Start with a direction keyword like flowchart TD, then add nodes and arrows, for example A[Start] --> B[End]. Add shapes with brackets, labels on arrows with -->|label|, and group related steps with subgraph.
Can I style a Mermaid flowchart? Yes. Use inline style for one-off changes, classDef and class for reusable styles across multiple nodes, and an %%{init}%% directive at the top of your diagram to set a theme and custom colors.
How do I use Mermaid flowcharts in Miro? Open the Creation bar, choose Formats, then Diagram, and select Build with code. Paste your Mermaid syntax or ask an AI agent to generate it, and Miro renders it as an editable native diagram you can style, comment on, and share.
What does Miro offer for Mermaid flowcharts? Miro's Structured Diagrams with Mermaid renders Mermaid code as real, editable shapes, keeps the code and diagram in sync as either one changes, and lets AI agents generate or read diagrams back through Miro's MCP server.
Try it yourself
The fastest way to learn Mermaid flowchart syntax is to write one and watch it render. Open the Mermaid diagram editor in Miro, paste in one of the examples above, and start changing it until it looks like your actual process.
Read more
Join our 100M+ users today


