Table of contents
Table of contents
How to conduct user testing with prototypes: A guide for collaborative teams
Summary
Traditional user testing creates silos — research happens in one tool, designs in another, and insights get lost in translation. This guide shows design leaders and UX researchers how to conduct collaborative prototype testing where cross-functional teams observe together, synthesize in real-time, and iterate faster.
Key takeaways:
- The collaboration advantage: Research shows that having multiple evaluators participate in testing increases problem detection by 30-43%, but only if your tools enable real-time collaboration
- The silo problem: 71% of leaders report that switching between tools causes friction and interrupts workflows—especially when testing tools are disconnected from design and research platforms
- Speed matters: Companies like GitHub increased collaborative tool usage by 140% by integrating prototyping, testing, and synthesis in one workspace, compressing iteration cycles from weeks to days
- AI-powered prototyping: Generate testable prototypes directly from user research sticky notes using Miro AI, keeping prototypes grounded in actual insights rather than assumptions
- Real-time synthesis: Conduct 10-15 minute post-session synthesis sprints where the entire team moves from observations to prioritized action items while impressions are fresh
- Continuous testing culture: Lower the barrier to testing by maintaining a ready-to-use collaborative workspace, enabling weekly testing sessions instead of infrequent large studies
Read time: 15 minutes
Collaborative AI Workflows
Join thousands of teams using Miro to build the right thing, faster.
User testing prototypes explained
You just wrapped up a user testing session. There were five participants, twelve pages of notes spread across three tools, and a Zoom recording saved somewhere. Now comes the tough part: turning all those scattered observations into design decisions your team will use.
Sound familiar?
User testing often leads to information silos. Research is done in one platform, designs are stored in another, notes are scattered across different apps, and synthesis happens elsewhere. By the time insights reach designers and developers, the context is lost and the urgency is gone.
Here’s what makes this frustrating: according to a Forrester Consulting study from 2025, 71% of leaders say that switching between tools causes friction and interrupts workflows—and 69% say the same about switching between core work tools and AI tools specifically. But most teams can’t solve this problem because their tools separate observers from the testing process.
What if user testing didn’t have to happen in a silo? When your entire cross-functional team—researchers, designers, PMs, engineers—can observe sessions together, add contextual notes in real-time, and iterate on prototypes within the same workspace, validation doesn’t just happen faster. It happens better.
You’ll learn:
- Why testing prototypes early prevents expensive development mistakes
- How to set up collaborative testing environments on a shared canvas
- Practical frameworks for both moderated and unmoderated testing
- Techniques for synthesizing feedback live with your entire team
- Real workflows that take you from insight to implementation, fast
Why test with prototypes? The economics of early validation
Let’s talk about money.
If you find a navigation flaw in a wireframe, it costs a few hours of design time. If you find the same flaw after engineering has built it, it takes days to fix. If you find it after launch, you risk losing conversions and damaging user trust.
Research from the Design Management Institute shows that design-led companies outperform the S&P 500 by 219% over ten years. This is mostly because they test assumptions early and make changes based on user feedback. Testing prototypes early helps you meet user needs and avoid expensive mistakes during coding or after launch.
In 2025, the stakes are even higher. The same Forrester study found that 75% of leaders think most AI tools focus on individual, not team, productivity, and 47% strongly agree. As a result, organizations use point solutions that create more silos, so collaborative testing workflows are more important than ever.
What prototype testing actually validates
Concept viability Before investing in visual design or technical architecture, prototypes answer: does this solution actually address the user’s problem? Prototype testing helps designers identify usability issues early, validate concepts and design decisions, and deliver a product that meets user expectations.
Information architecture Users show whether your navigation makes sense, if the content hierarchy is clear, and where they expect to find important features. These insights shape how you design the experience, even before you write any production code.
User flow logic Task completion rates expose friction points before they’re cemented in code. Can users complete their primary goal? Where do they get confused? What do they expect to happen next?
Feature prioritization Testing multiple prototype variations reveals which features users actually value versus what seemed clever in the brainstorming session. This evidence-based prioritization prevents scope creep and focuses development on high-impact work.
The fidelity spectrum
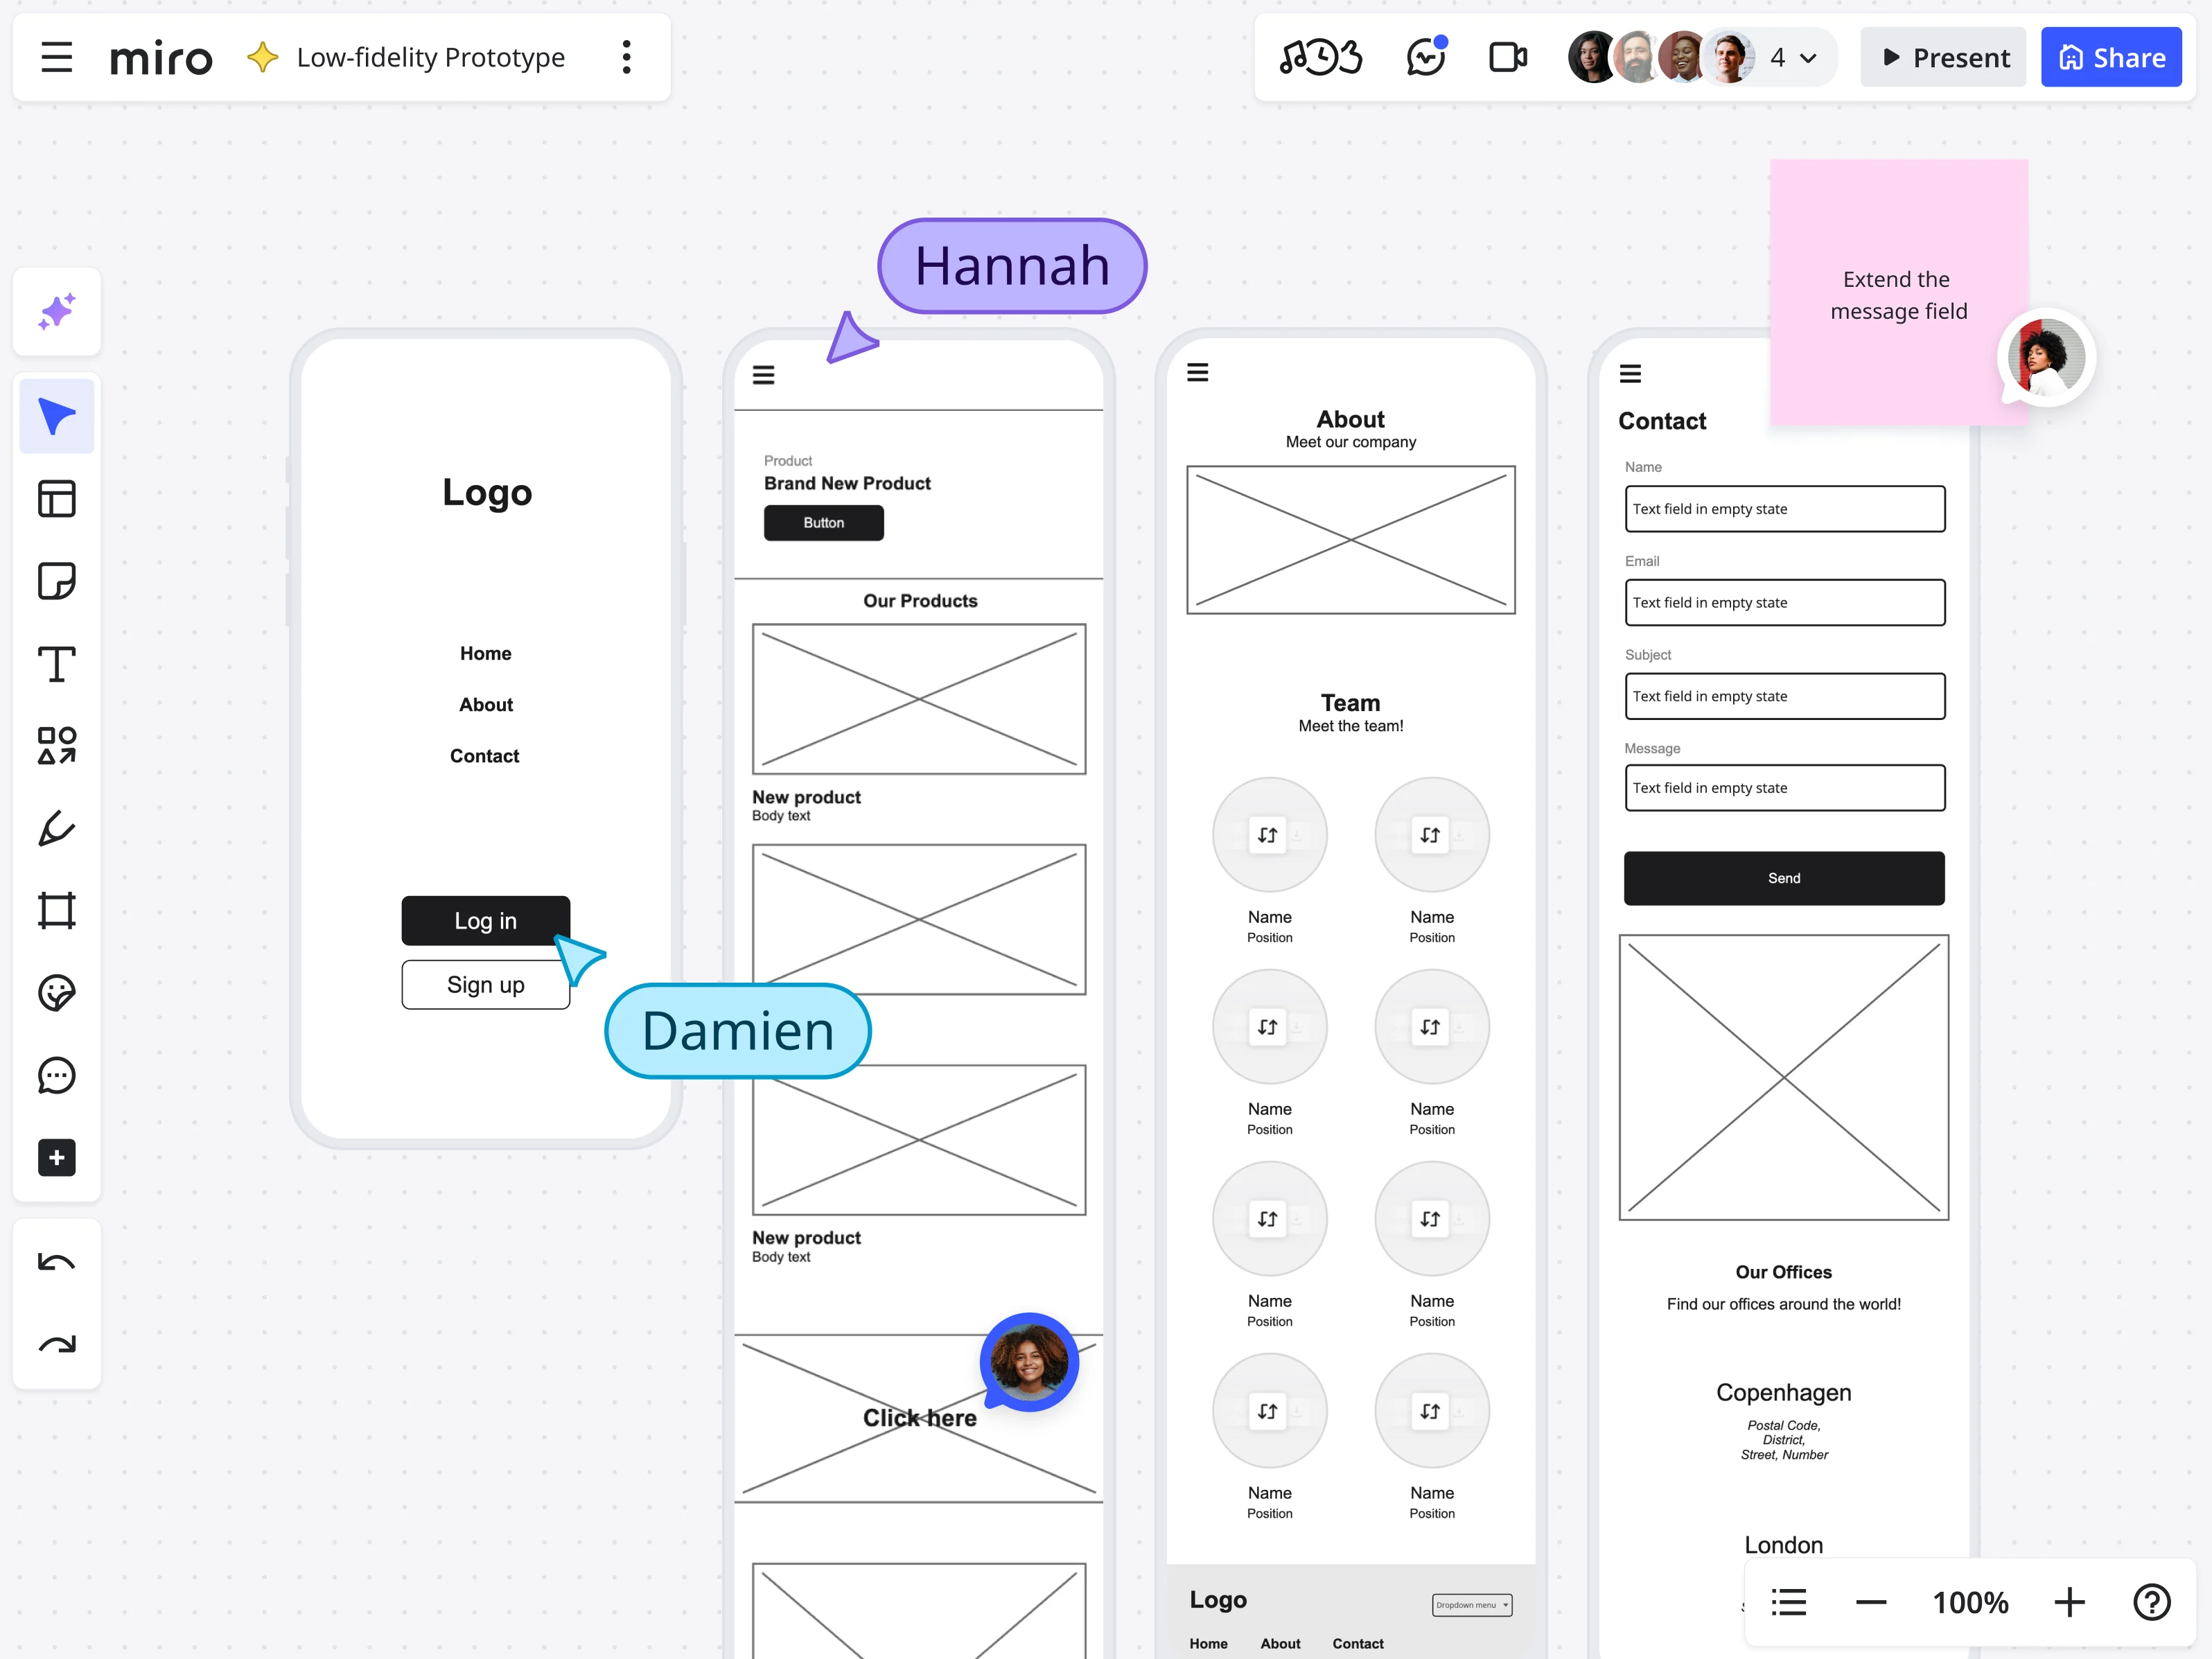
Low-fidelity testing: Simple wireframes are great for testing core ideas. Users are more comfortable giving honest, critical feedback on these early prototypes because they know they are just rough drafts.
Mid-fidelity testing: More developed designs with realistic content but simplified visuals, perfect for validating specific interactions and refining task flows.
High-fidelity testing: Interactive prototypes that closely resemble the final product, ideal for usability testing before development and stakeholder presentations.
Miro’s context-preserving advantage
Traditional workflows break down because each fidelity level lives in a different tool. Lo-fi sketches in one app, wireframes in another, high-fidelity mockups in a third, testing notes in yet another platform.
According to Forrester’s 2025 research, 89% of leaders say improving collaboration and teamwork is critical to achieving company goals, yet tools remain fragmented. This is why 82% of leaders are interested in AI solutions that drive collaboration and teamwork—they’re looking for integrated approaches.
With Miro, you are not limited to one fidelity level. Teams can start with lo-fi sketches, turn them into mid-fi wireframes using Miro AI, and add more detail as they go—all on the same canvas where your research and user personas are already available. The context stays intact.
Setting up your collaborative testing environment
Traditional user testing keeps the participant’s experience separate from the observer’s space. But what if everyone worked in the same space, organized so participants can focus while your team captures detailed observations?
The testing room concept
In Miro, create a unified testing environment where both the participant’s experience and the observer’s workspace exist on the same infinite canvas—just in different “rooms.”
This addresses a critical need: Forrester’s 2025 study found that 92% of leaders say that visual collaboration platforms are important or critical to collaboration—and 79% say their organization’s use of digital canvas tools for collaborative work has increased in recent years.
Building your Miro testing board: A deep dive
The power of collaborative testing in Miro comes from how you structure your board. Here’s how to set up an environment that connects research, prototyping, testing, and synthesis in one workspace.
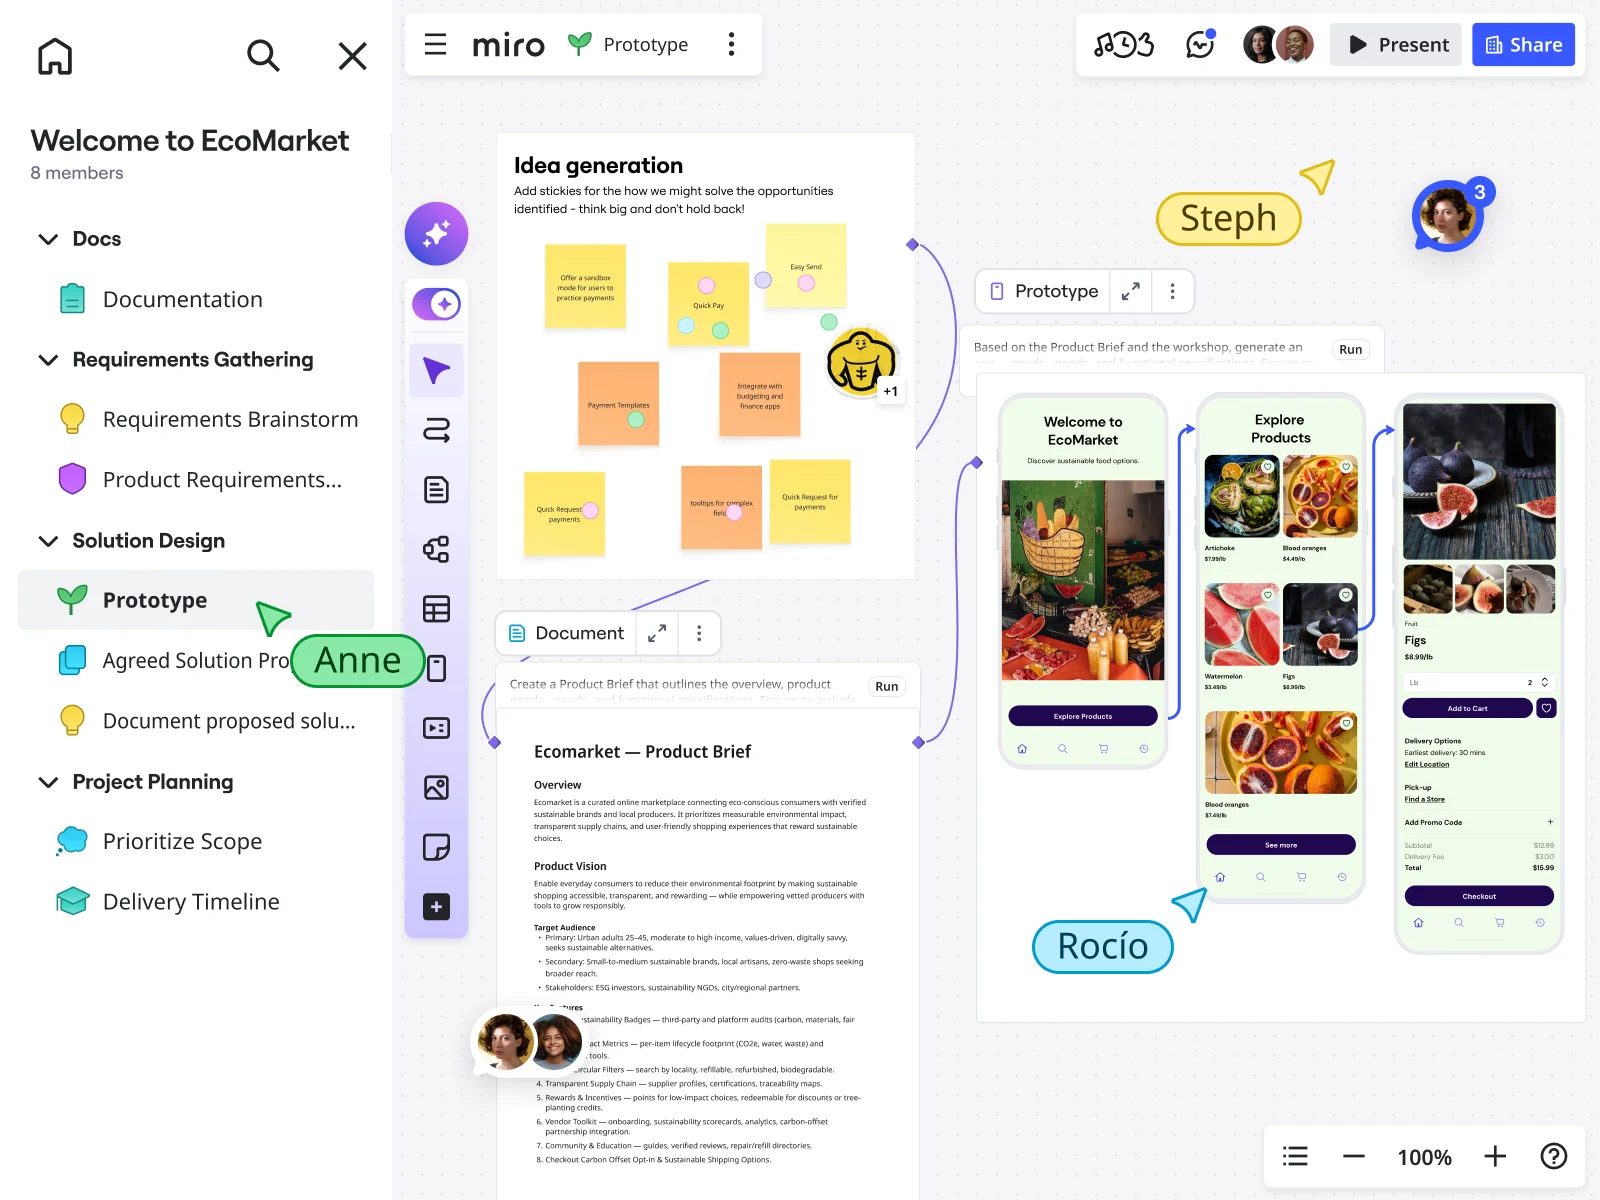
1. The prototype frame: Where testing happens
Your prototype frame is where participants interact with your design. Miro’s prototyping capabilities make this more powerful than a simple clickable mockup—you’re creating interactive experiences that feel real.
Creating prototypes with Miro’s AI-powered tools
Miro Prototypes transforms how teams move from concept to testable design:
Generate from context: Instead of starting with a blank screen, Miro AI uses everything already on your canvas as context. Select your user research sticky notes, journey maps, or wireframe sketches, describe what you need to test, and Miro generates interactive prototypes that reflect your actual research insights.
This is transformative for testing velocity. Your prototype isn’t based on assumptions—it’s grounded in the user research sitting right next to it on the canvas.
Convert screenshots to editable prototypes: Already have reference designs or competitor examples? Upload screenshots and Miro AI converts them into editable, clickable prototypes instantly. This is invaluable for testing “inspired by” concepts or iterating on existing products.
Build with editable components: Unlike static image-based prototypes, Miro Prototypes use editable components built specifically for product flows. You can customize screens, adjust layouts, and toggle between design variations without recreating everything from scratch.
Create clickable flows with hotspots: Add interactive hotspots to create realistic user journeys. Participants click through your prototype just like they would a real product, revealing navigation issues and interaction expectations.
Test multiple variations side-by-side: Generate multiple prototype variants to test different approaches simultaneously. Position them side-by-side on your canvas, each with its own testing observation area, to directly compare user reactions.
Watch how teams use Miro for user research and synthesis:
Maintain brand consistency: Upload a brand image to apply your visual identity without manually adjusting every element. Your prototype matches your look and feel instantly, making stakeholder presentations more convincing.
Automate updates across your workspace: Changes to your prototype can automatically sync with linked specifications and documentation. When you update a screen based on testing feedback, teams working downstream see those changes reflected in their work—keeping everyone aligned.
Pro integration: Miro’s innovation workspace means your prototype connects to everything else your team uses. Import from design tools, export to development handoff, and keep all related work—research, strategy, planning—connected to the prototype being tested.
2. The observation deck: Your collaborative research hub
Create a separate frame where stakeholders gather during live sessions—invisible to participants but active for your team. This is where real-time collaboration transforms testing from a solo research activity into a team sport.
Live note-taking zones organized by theme:
- 🚫 Blockers: Tasks users couldn’t complete
- ⚠️ Friction points: Tasks completed but with confusion or hesitation
- 💡 Feature discoveries: Capabilities users expected but didn’t find
- ✨ Delight moments: Positive reactions worth amplifying
- 💬 Key quotes: Verbatim statements capturing insights
- 🎯 Navigation issues: Problems finding features or understanding structure
- 🔧 Technical observations: Performance issues, bugs, or interaction problems
Participant context panel:
- Basic demographics
- Relevant product experience level
- Recruiting criteria they met
- Session date and moderator
This context helps observers interpret behaviors correctly. When someone struggles with terminology, knowing whether they’re a technical user or novice changes how you interpret that struggle.
Test script reference: Keep your research questions visible to all observers. This keeps everyone aligned on what you’re trying to learn and prevents the common problem of observers getting distracted by interesting but irrelevant details.
Real-time synthesis grid: As patterns emerge, observers can start clustering related observations even before the session ends. When three people independently note the same navigation confusion within minutes of each other, the pattern becomes immediately visible.
Cross-functional lenses: Create designated zones for different team perspectives:
- Design observations: Visual hierarchy, interaction expectations, accessibility
- Engineering notes: Technical feasibility, performance concerns, implementation questions
- Product/business impact: Feature requests, competitive insights, business implications
- Research context: How behaviors align with personas, journey maps, and existing knowledge
The power? While you conduct the interview, your cross-functional team captures multi-dimensional insights simultaneously. Designers note interaction preferences, engineers flag feasibility concerns, and PMs assess business impact—all without disrupting the user’s experience.
This collaborative approach is what leaders are seeking: Nearly half (47%) of leaders in Forrester’s 2025 study plan to measure “improved collaboration” when considering the impact of their AI investments.
3. The synthesis workspace: From insights to action
Adjacent to your observation area, create a workspace that turns observations into decisions.
Affinity mapping grid:
Pre-labeled categories make synthesis faster:
- Usability issues (by severity: critical, major, minor)
- Feature requests (must-have vs. nice-to-have)
- Mental model mismatches (what users expected vs. what we provided)
- Pain points (current problems users described)
- Workflow insights (how tasks fit into users’ broader work)
Prioritization matrix: Plot insights on impact vs. effort quadrants:
- High impact, low effort: Quick wins to implement immediately
- High impact, high effort: Strategic initiatives requiring planning
- Low impact, low effort: Backlog candidates
- Low impact, high effort: Probably never
Action items tracker: Convert insights into concrete next steps:
- Specific change needed
- Owner assigned
- Target date
- Link to supporting evidence (user quotes, frequency counts)
Evidence gallery: Create a curated showcase of the most compelling evidence:
- Direct user quotes
- Screenshots of confusion moments
- Task completion metrics
- Before/after comparisons
This becomes invaluable for stakeholder presentations. Instead of saying “users struggled,” you show five different users saying variations of “I couldn’t find where to save my work” alongside screenshots of them clicking incorrect locations.
4. Research context integration
The advantage of testing in Miro isn’t just the testing environment—it’s maintaining connection to everything that informed the prototype.
User personas board: Link to your user personas so observers can reference them during sessions. When behaviors don’t match expected patterns, you’re documenting persona gaps in real-time.
Journey maps: Keep customer journey maps visible to understand where tested tasks fit in the broader experience. A frustrating task might be acceptable at one journey stage but fatal at another.
Problem statement: Pin your core problem statement at the top of the board. Every insight gets evaluated against “does this help us solve the original user problem?”
Research repository: Link to previous research, competitive analysis, and analytics data. When participants mention something unexpected, observers can quickly check whether it aligns with or contradicts existing knowledge.
Setting up for different testing types
Moderated testing setup: Share your Miro board link with screen sharing enabled. You control the prototype while the participant describes their thought process. Observers watch via video but interact with the board silently, adding notes to the Observation Deck.
The participant sees your screen showing the prototype. Your team sees the same thing plus the Observation Deck where they’re collaboratively building your research database.
Unmoderated testing setup: Create a guided testing frame with clear instructions embedded directly in the board. Share the board link with participants who work through tasks independently, using Miro’s commenting feature to leave feedback directly on specific screens.
Add clear navigation guides:
- “Start Here” markers
- Numbered task sequence
- Instructions for leaving feedback
- Completion confirmation
Critical setup elements:
- Separate layers for different roles so notes don’t overlap visually
- Color-coded sticky notes by observer type for quick synthesis
- Timer widgets to track task completion times
- Video embedding areas for linking to session recordings
- Quick-access templates for common observation types
Moderated vs. unmoderated: Choosing your testing approach
The question isn’t which method is “better”—it’s which method fits your current research needs.
Moderated testing: When you need depth
Moderated sessions give you the richness of human conversation. You guide participants through tasks, ask follow-up questions, and probe deeper when they hesitate or express confusion.
When to choose moderated:
- Testing complex workflows that need explanation
- Early-stage concepts requiring context setting
- Situations where you need to understand the “why” behind behaviors
- Exploring new problem spaces or unfamiliar user segments
The Miro-specific moderated workflow
Pre-session (10 minutes): Brief observers on the Observation Deck. Assign roles—who tracks navigation issues versus feature requests versus technical concerns. This division of attention ensures comprehensive coverage.
During session (30-45 minutes): You control the prototype and screen share. Observers silently add sticky notes to designated theme areas. Multiple perspectives capture different facets simultaneously:
- Designer notes visual confusion
- Engineer notes interaction expectation
- PM notes business impact
- Researcher probes the user’s mental model
Immediate synthesis (10-15 minutes): Spend 10 minutes as a team moving notes into affinity clusters while impressions are fresh. This real-time synthesis separates collaborative testing from traditional research.
Unmoderated testing: When you need scale
Unmoderated testing allows you to conduct tests at scale, making it ideal for teams seeking fast, quantitative feedback. Participants complete tasks independently, providing written feedback or think-aloud recordings.
When to choose unmoderated:
- Validating specific task flows across many users quickly
- A/B testing design variations at scale
- When geographic diversity matters and scheduling is complex
- For quick validation of high-confidence changes
The asynchronous nature means you can test with 15-20 participants across different time zones without scheduling challenges. Your entire team can log in throughout the testing period to watch patterns emerge in real-time.
The hybrid approach
Many teams get best results combining both methods. Use unmoderated testing to validate task flows with 15-20 participants, then conduct 5-6 moderated sessions to explore the “why” behind patterns. In Miro, both sets of insights accumulate in the same workspace, creating a comprehensive evidence base.
The collaborative advantage
When designers, PMs, and engineers contribute to note-taking and pattern recognition, buy-in for changes happens organically. No one questions implementing a fix they personally observed users struggling with. The evidence isn’t filtered through a researcher’s interpretation—everyone saw it firsthand.
Live synthesis: Turning feedback into action in real-time
Traditional user testing follows a linear process: conduct sessions → transcribe notes → create findings document → schedule presentation → debate recommendations → maybe implement changes. This pipeline takes weeks.
When your team observes testing together on a shared canvas, synthesis becomes a collaborative, continuous activity.
During-session synthesis techniques
Themed note-taking: Observers add sticky notes directly to relevant theme sections. Real-time categorization means synthesis starts before the session even ends.
Silent pattern recognition: With multiple observers contributing simultaneously, patterns become visible quickly. When three observers independently note “user expected search in top right” across two sessions, the trend is obvious.
Cross-functional context: Different perspectives converging creates richer insights:
- Designer notes: “User tried to click non-linked text in header”
- Engineer notes: “Easy fix—make all similar elements consistent”
- PM notes: “Affects 40% of user flow, high priority”
Post-session synthesis sprint (10-15 minutes)
Minutes 1-3: Affinity mapping - Drag themed sticky notes into tighter clusters. “Navigation confusion” might group into “couldn’t find settings,” “back button unclear,” “menu structure illogical.”
Minutes 4-7: Pattern identification - Discuss which issues appeared across multiple participants. Use Miro’s voting feature to identify consensus on severity.
Minutes 8-10: Prioritization - Move impactful insights onto your prioritization matrix. High impact, low effort? Ship it this week.
Minutes 11-15: Action assignment - Convert high-priority insights into action items with specific owners tagged right on the canvas.
The cumulative intelligence effect
After 5-6 testing sessions, your Miro board becomes a living repository where:
- Designers reference specific user quotes when explaining design rationale
- Engineers see issue frequency when estimating fix efforts
- PMs pull data for stakeholder updates without requesting reports
- New team members understand user needs by exploring the canvas
Real-world impact: GitHub’s product development transformation
GitHub’s product development team faced a common challenge: translating user insights into validated product decisions quickly enough to maintain their competitive edge. Their engineering and product teams needed a way to test concepts, gather feedback, and iterate without the traditional delays of disconnected tools and sequential handoffs.
By implementing collaborative testing and prototyping workflows in Miro, GitHub transformed how their teams validated ideas. Product managers could generate quick prototypes from user research findings, test them with internal and external users, and synthesize feedback with engineering teams watching in real-time. This eliminated the traditional bottleneck where research insights lived in one tool, designs in another, and development decisions happened separately.
The impact was measurable and significant. GitHub increased their use of collaborative AI and innovation tools by 140%, reaching over 1 million team events monthly. Miro became central to their rapid synthesis and team alignment processes. As GitHub’s Senior Product Manager, Alexandra Yanes, explained: “One of the most powerful things is leadership modeling. So executives didn’t just talk about the use of AI; they were actually using it. It helped replace that hesitation internally with curiosity—that permission to explore, fail, and learn.”
Key takeaway: When cross-functional teams test and synthesize in the same workspace where prototypes are created, the entire innovation cycle accelerates. GitHub’s experience demonstrates that connecting research, prototyping, and validation on a single platform doesn’t just save time—it fundamentally changes how teams build confidence in their product decisions and move from insight to implementation.
Advanced techniques: Maximizing value
Multi-variant testing
Position prototype variants side-by-side on the canvas with separate Observation Decks for each. After all sessions, compare notes to identify the winner. When Version A’s Observation Deck shows six “couldn’t find checkout” notes and Version B has zero, the decision is clear.
Leveraging Miro AI for faster iteration
After synthesis identifies critical changes:
- Select problematic screens + synthesis notes documenting issues
- Use Miro AI to generate improved prototype variants incorporating feedback
- Test the revised version with new participants within hours, not weeks
This compressed feedback loop enables multiple testing rounds in the time traditional approaches need for one.
Scaling across teams
Create template testing boards with pre-built structures that new projects can clone. Establish naming conventions for easy searching across projects. Use Miro’s search to surface insights across all testing boards—query “all observations tagged ‘onboarding’” to see patterns across different product areas.
Building a continuous testing culture
Weekly testing sessions with lightweight preparation. The barrier to testing drops when your workspace is always ready.
Test small changes continuously rather than waiting for complete redesigns. Velocity of learning compounds.
Rotating moderation exposes more people to direct user feedback, building organizational empathy.
Common pitfalls and how to avoid them
Pitfall 1: Observer overload Solution: Cameras off, microphones muted, notes captured silently. Assign specific themes to different observers.
Pitfall 2: Analysis paralysis Solution: Research from Nielsen Norman Group shows that testing with five users typically uncovers 85% of usability problems. After 5-6 sessions, stop testing and implement top priority fixes.
Pitfall 3: Broken context Solution: Keep everything connected on one canvas. When prototype, research notes, testing observations, and synthesis live together, the chain of reasoning remains intact. This addresses the 71% of leaders who report that switching between tools causes friction and interrupts workflows.
Pitfall 4: Solo synthesis Solution: Make synthesis collaborative and immediate. When the team participates in real-time pattern recognition, they don’t need convincing to implement changes.
Pitfall 5: Testing too late Solution: Test early with simple prototypes to enable fast, low-cost iterations. The earlier you test, the cheaper mistakes are to fix.
Getting started: Your first collaborative testing session
Week 1: Setup (3-4 hours)
- Create your testing board: Use Miro’s prototype template as your foundation
- Build your prototype: Create screens using Miro Prototypes or import from other tools
- Brief your team: 15-minute walkthrough of board structure, observer roles, and synthesis process
Week 2: Testing (5-7 hours)
- Recruit 5-6 participants: Start with internal team members or existing customers
- Schedule 45-minute sessions: 30 minutes testing, 15 minutes synthesis sprint
- Moderate thoughtfully: Guide participants, probe hesitations, stay curious
- Observe collectively: Team captures notes silently, then synthesizes immediately
Week 3: Implementation (4-6 hours)
- Prioritize fixes: Review affinity-mapped insights with full team
- Assign owners: Convert top issues into actionable tasks
- Iterate prototype: Make prioritized changes
- Plan round 2: Schedule next testing round with new participants
Scaling up
Once you’ve completed one cycle successfully, establish a regular testing cadence. Weekly testing sessions with continuous iteration work better than infrequent large studies.
Validation shouldn’t happen in a silo
User testing isn’t just about finding problems—it’s about aligning teams around solutions.
When researchers test alone and present findings later, teams debate interpretations. When cross-functional teams observe together, synthesize collectively, and iterate rapidly, validation becomes a shared experience.
The collaborative approach transforms user testing from a phase-gated deliverable into a continuous team activity. Insights flow directly from observation to implementation because the people who need to act on feedback are present when it’s captured.
Miro enables this shift by keeping everything connected. Your user research informs prototypes. Prototypes are tested with real users. Testing generates synthesis. Synthesis drives iteration. All on one canvas where context never breaks and collaboration never stops.
Stop letting valuable user insights get lost in translation. Start testing collaboratively, synthesizing in real-time, and building products your users actually need.
Ready to try collaborative testing?
Explore these Miro resources to build your first collaborative testing workspace:
- Prototype templates - Ready-made testing board structures
- User interview templates - Structured research frameworks
- Research synthesis templates - Turn observations into insights
- Miro Prototyping - AI-powered prototyping features
Your next breakthrough isn’t hiding in a research report nobody reads. It’s waiting to be discovered collaboratively, synthesized immediately, and implemented quickly—all on the same canvas where your team already works.
Frequently asked questions
Can multiple team members observe and take notes during the same user testing session in Miro?
Yes, Miro supports unlimited observers on the same board during live testing sessions. Your entire cross-functional team—designers, product managers, engineers, researchers—can watch the session via video call while simultaneously adding notes to the Observation Deck. Each observer can work on separate layers or designated areas to keep notes organized, and you can use color-coded sticky notes to distinguish between different roles.
How does Miro protect sensitive user research data and participant information?
Miro provides enterprise-grade security features to protect sensitive research data. You can control board access through granular permissions, limiting who can view, edit, or comment on testing boards. For boards containing participant personal information or confidential research findings, you can set private board access, require password protection, or restrict sharing outside your organization. Miro is SOC 2 Type II certified and compliant with GDPR, CCPA, and other privacy regulations. Additionally, you can use Miro's guest access feature to share specific frames (like just the prototype) with external participants while keeping your Observation Deck and synthesis workspace completely private and invisible to them.
Can I integrate Miro with my existing user research and design tools?
Yes, Miro integrates with the major tools in your research and design workflow. You can import prototypes from Figma, Adobe XD, and Sketch directly into Miro boards using native integrations or by uploading design files. For research documentation, Miro connects with tools like Notion, Confluence, and Google Workspace, allowing you to link testing boards to broader research repositories. You can also embed Zoom, Microsoft Teams, or other video conferencing tools directly in your Miro board for conducting remote testing sessions. For synthesis and reporting, export findings to Jira, Asana, or other project management tools to create actionable tickets. Miro's API also enables custom integrations if you use specialized research tools. This connected ecosystem means your testing insights can flow seamlessly into your existing workflows without requiring teams to abandon their preferred tools.
How can distributed or remote teams conduct collaborative user testing in Miro?
Miro is built for distributed collaboration, making it ideal for remote user testing. Remote team members can join testing sessions from anywhere and contribute observations in real-time, just like co-located teams. For asynchronous collaboration, observers in different time zones can review session recordings embedded in the board and add their notes to the synthesis workspace on their own schedule. The infinite canvas means there's always room for everyone's contributions without crowding. Use Miro's commenting features to have threaded discussions about specific observations, and leverage @mentions to bring specific team members' attention to important findings.
Can I create reusable testing templates for my team and share best practices across the organization?
Absolutely. Once you've built an effective testing board structure, you can save it as a custom template that your entire organization can use. This ensures consistency in how different teams conduct user testing, capture observations, and synthesize findings. You can create different template variations for different testing scenarios—moderated vs. unmoderated, mobile vs. web, early-stage concept testing vs. high-fidelity validation. Share these templates through Miro's template library, making them discoverable by anyone in your organization. Include instructions, best practices, and examples directly in the template so new researchers or team members understand how to use the board effectively. Many organizations maintain a "center of excellence" board that links to all approved testing templates, research frameworks, and synthesis tools, creating a centralized knowledge base. This systematization helps scale user research practices across growing teams while maintaining quality and consistency.
Author: Miro team
Last update: January 22, 2026