
Table of contents
Table of contents
How to use Miro — your guide to mastering our innovation workspace
Getting started in Miro
Whether you’re new to our innovation workspace or simply looking for a refresher, we’ve got you covered. In this quick guide, we’ll walk you through 6 simple steps on how to use Miro and make the most of it. We’ll also share some tips to get creative and speed up your workflow.
By the end, you’ll know exactly how to create and populate Miro boards, collaborate in real time and async, and even run your own workshops.
So let’s get started.
How to use Miro in 6 simple steps
Ready to dive into our innovation workspace? Here are 6 simple steps on how to use Miro:
Step 1: Get a Miro account
The best way to learn how to use Miro is to jump in and get familiar with it. So be sure to sign up for a Miro account to start following along with the rest of the steps in this guide.
Whether you’re looking for a powerful free plan or ready to get your entire team on board, there’s a Miro plan for every need — explore them all to find the right one for you!
Step 2: Create a new Miro board
To create a new board, head to your dashboard and click on the plus icon labeled New board. Once you’ve got your Miro board open, head to the top left and click on the title to give it a name. It’s not required, but it’ll definitely make it easier to search for it in your dashboard later on.
Planning on collaborating? Head to the top right and click on Share to invite people to edit your Miro board with you in real time — even if you aren’t all in the same room. You can always adjust your Sharing settings later on.
Once you’re all set up, you’re ready to start creating and visualizing content on your infinite canvas.
Step 3: Create your own content in Miro
There are countless ways to populate your Miro board — and it all depends on your goals. Most of the time, you’ll find everything you need on the creation toolbar, on the left of your board. From there, you can drag and drop shapes, link them up with connection lines, add text, or draw using the Pen tool.
You can also click on the plus icon at the bottom of the toolbar to discover more apps and tools — including a wide range of shape libraries, and even diagramming apps like Mermaid and PlantUML.
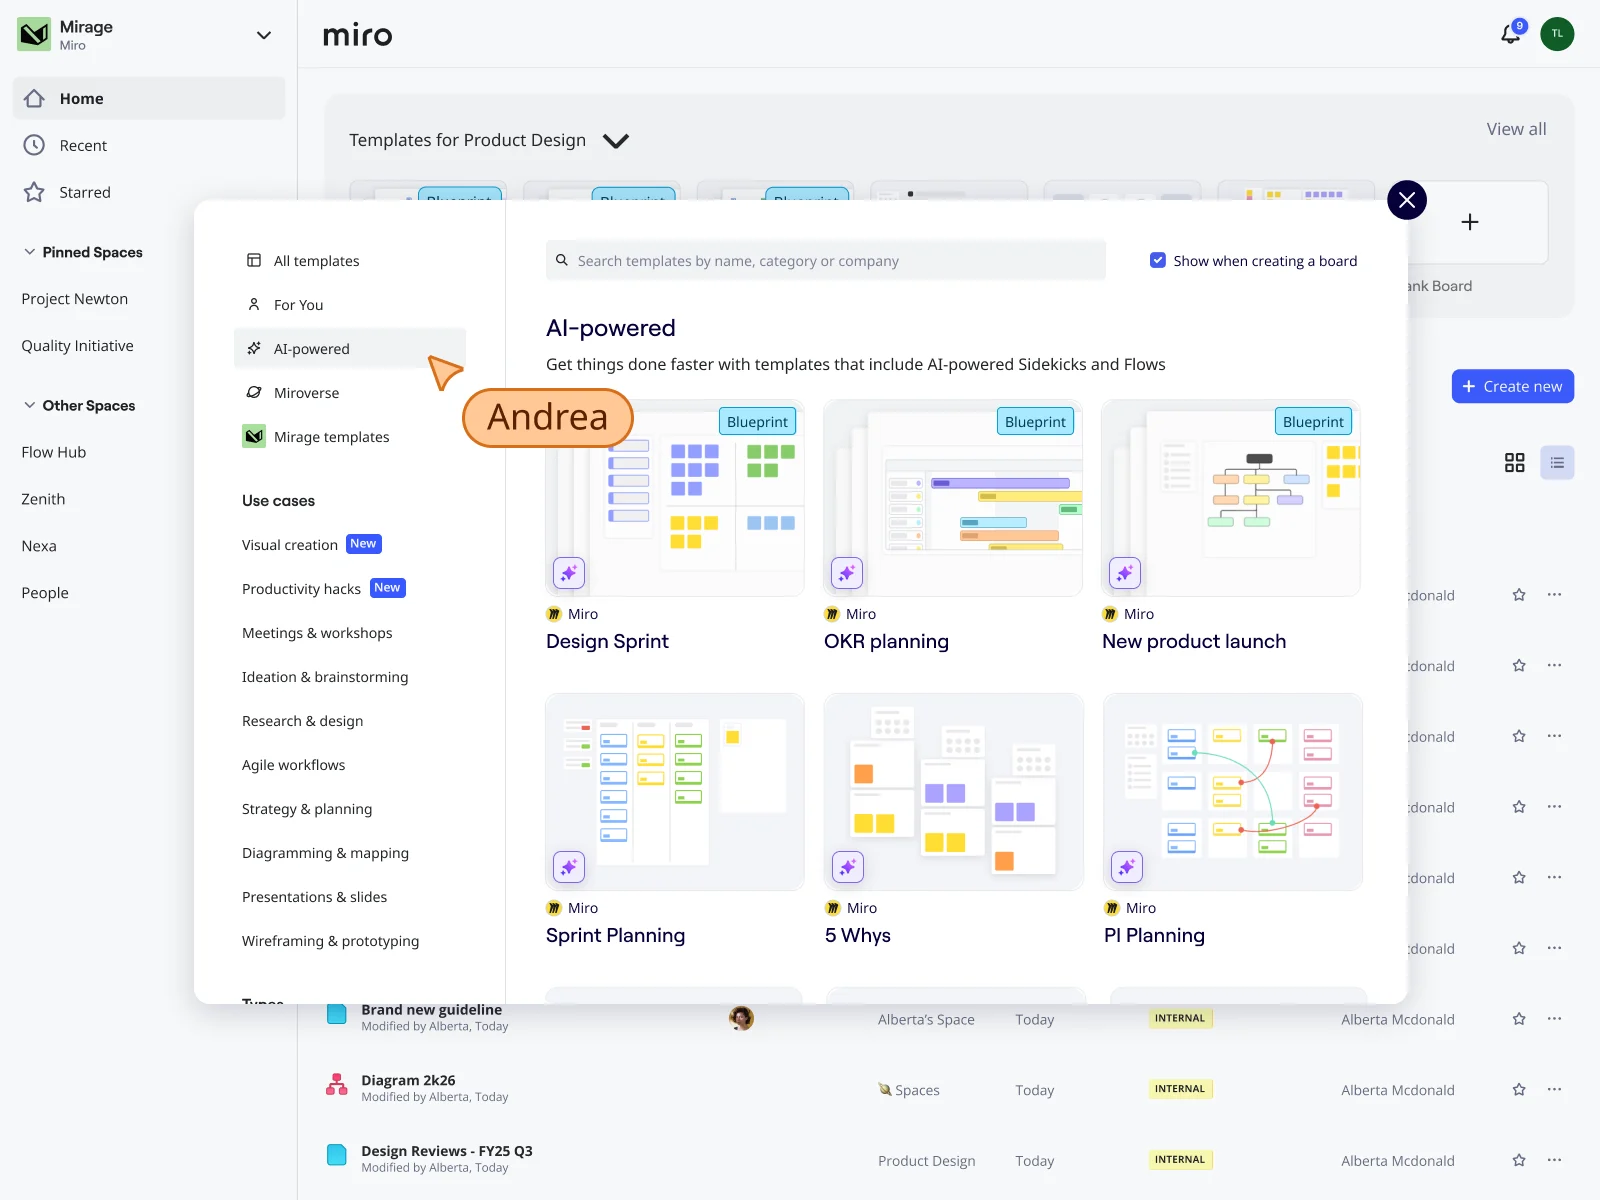
Step 4: Use a template
Not ready to create from scratch? Save time with one of our 300+ templates designed for all kinds of use cases — from diagramming and mapping to running agile workflows. Head to the creation toolbar and click on Templates, which will open our Template picker.
All of our templates are fully customizable, which means you can edit add, duplicate, resize, rearrange, or remove content. You can also change up the look and feel as you’d like, which can be great for adapting a template to your brand guidelines.
Pro tip: Working in one of our diagramming and mapping templates? Keep an eye out for our automated diagramming tools — allowing you to quickly expand the diagram in just a few quick clicks.
Step 5: Add context to your Miro board
The great thing about having an infinite canvas to work with is that you get to visualize content, data, and other important documents and images all at the same time — allowing you to do more with less.
Embed everything from YouTube videos to Google Sheet documents simply by pasting a URL onto your canvas. With over 130 app integrations, Miro also lets you import content from other popular platforms, like Jira, Asana, and ClickUp.
In other words, you get to keep working with all the tools you love without having to go back and forth. You’ll also have a single source of truth to easily keep everyone on the team up to date and aligned with.
Step 6: Share your Miro board
Knowing how to use Miro includes knowing how to share what you’ve made. And we’ve got you covered with plenty of sharing options to choose from.
Looking for feedback right on your Miro board? Invite others to view and comment on your board using the Share button on the top right. From there, you can tag each other in comments and start meaningful discussions without missing a beat.
Alternatively, you can share a link to your Miro board, embed it on other websites, or simply export it as a PDF or image — just to name a few.
Core features that transform how teams work
The intelligent canvas
Miro’s canvas isn’t just a whiteboard — it’s a living workspace that understands your content and helps you work smarter.
What you can do:
- Drag and drop any content type: sticky notes, images, docs, videos, prototypes
- Connect ideas visually with arrows and flowcharts
- Group related items into frames for organized thinking
- Zoom from 10,000-foot strategy view down to execution details
Work your way: Structure your canvas in whatever way fits your project. There are no forced hierarchies or rigid layouts—just your ideas, organized as you prefer.
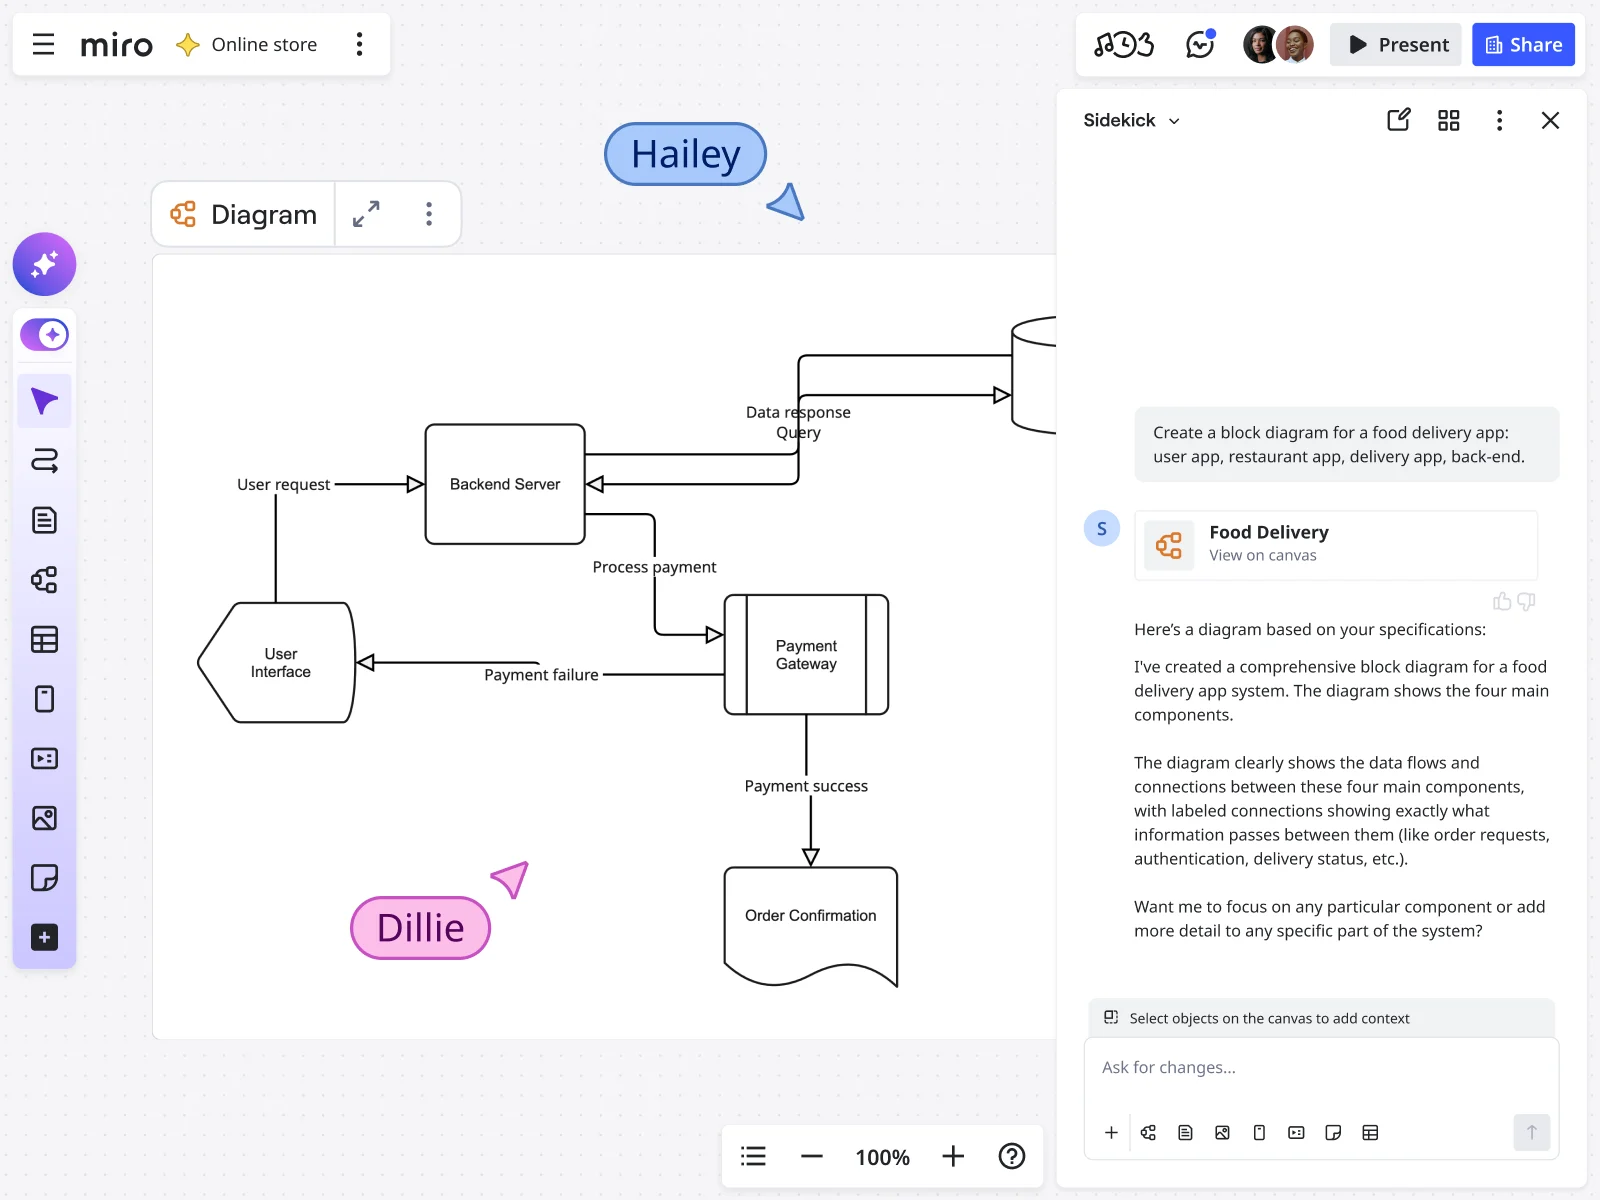
Create with AI: From idea to output in seconds
Instead of spending hours building frameworks from scratch, use Miro’s AI features to generate first drafts instantly. For a quick experiment, try asking Miro to draft your next team brief right now. This will not only save time but also encourage rapid experimentation, aligning with the build-measure-learn loop and driving adoption of AI within your team.
Available AI formats:
Docs: Generate briefs, summaries, or meeting notes Example: “Create an interview outline for user research on our mobile checkout flow”
Sticky notes: Brainstorm ideas, generate insights, or expand on concepts Example: “Give me 15 ways to improve onboarding for enterprise customers”
Diagrams & mind maps: Visualize systems, processes, or connections Example: “Map the dependencies between our microservices architecture”
Tables: Structure research findings, feature comparisons, or project plans Example: “Create a competitive analysis table for project management tools”
Images: Generate visuals for mood boards or concept exploration Example: “Create a futuristic interface concept for a health tracking app”
Prototypes (Beta): Build interactive wireframes for websites or apps Example: “Design a landing page for a B2B SaaS analytics platform”
How it works:
- Click on the Miro AI icon above the creation bar
- Choose your format or select a Sidekick (custom AI assistant)
- Type your prompt — be specific about what you need
- Refine the output by selecting content on your board for additional context
- Iterate: Keep prompting to adjust, expand, or redirect the AI’s work
Pro tip: Select existing content on your board before prompting. Miro AI analyzes your selection to generate more relevant, contextualized outputs.
Sidekicks: Your specialized AI collaborators
Rather than generic AI assistants, Sidekicks act as personalized AI partners designed to drive specific results. Consider them as tools like the 'Insight Synthesizer' for diving deep into data, or the 'Sprint Accelerator' to speed up your team's productivity.
How to use Sidekicks:
- Access Miro AI and select Sidekicks
- Choose a pre-built Sidekick or create your own custom assistant
- Your Sidekick guides you through multi-step workflows, asking questions and generating relevant outputs at each stage
Example workflow with the Product Discovery Sidekick:
- Start: Describe your product challenge
- Sidekick generates: Problem statements, user persona hypotheses, research questions
- You refine: Select the most promising directions
- Sidekick creates: Interview scripts, affinity mapping frameworks, insight synthesis docs
Custom Sidekicks: Build your own AI assistant by defining its role, expertise, and workflow steps. Train it on your team’s specific processes and terminology.
AI-powered workflows: From research to roadmap
Miro connects the dots between discovery, planning, and execution with AI workflows that transform raw inputs into structured outputs. Instead of spending hours manually clustering and organizing data, Miro's AI synthesizes insights in seconds, reducing not only time but also the cognitive load on your team. This efficiency helps uncover hidden opportunities that may be buried in data, ultimately driving quicker and more informed decision-making.
Research synthesis workflow:
- Import customer interview notes, support tickets, or user feedback
- AI clusters insights by theme automatically
- Generate prioritized opportunity areas
- Convert findings into actionable product specs
Sprint planning workflow:
- Brainstorm user stories with your team
- AI groups stories by feature area and identifies dependencies
- Auto-generate acceptance criteria for each story
- Export directly to Jira or Azure DevOps
Strategy alignment workflow:
- Facilitate async brainstorm: “What should our H2 priorities be?”
- AI synthesizes responses and identifies common themes
- Generate structured strategy doc with goals, initiatives, and success metrics
- Share with stakeholders as polished presentation
Real-time and async collaboration
Your team doesn’t work in the same place or at the same time. Miro makes both synchronous and asynchronous collaboration seamless.
Live collaboration:
- See teammates’ cursors in real-time as they work
- Jump on video chat without leaving the board
- Use timers and voting for structured decision-making
- Present mode for walking stakeholders through your work
Async collaboration:
- Leave comments and @mentions for teammates to address later
- Record video explanations using integrated screen capture
- Set up async brainstorms where anyone can contribute on their schedule
- Review board activity feed to catch up on what changed
Smart notifications: Get pinged when someone needs your input, but stay focused otherwise.
Advanced platform capabilities
Intelligent Canvas: Context-aware workspace
Miro’s canvas understands your content and suggests next steps.
Smart connections: Draw a line between two objects, and Miro suggests relationship types (depends on, blocks, relates to)
Auto-organization: Drag sticky notes near each other, and Miro offers to align them into clean grids
Contextual suggestions: Start typing in a sticky note, and Miro recommends relevant templates or frameworks
Apps & integrations: Your tools, connected
Bring data and content from the tools you already use directly into Miro.
Design & product tools:
- Figma: Embed designs for feedback and annotation
- Jira/Azure DevOps: Sync user stories and tasks
- Airtable/Notion: Pull in research databases and roadmap data
Communication platforms:
- Slack: Get board updates and share boards without switching apps
- Microsoft Teams: Collaborate on boards during meetings
- Zoom: Run workshops with Miro embedded in video calls
Productivity suites:
- Google Drive: Import docs and sheets
- Microsoft 365: Embed Excel data and PowerPoint slides
Advanced collaboration features
Attention management: Ring a bell to bring everyone’s view to your cursor. This is useful for guiding large groups through complex boards.
Private mode: Work on sections without teammates seeing until you’re ready to share
Presentation mode: Navigate through frames like slides for stakeholder reviews
Board permissions: Control who can view, comment, or edit at the board or team level
Enterprise-grade security you can trust
When your strategic work lives in Miro, security isn’t optional.
Security controls:
- SAML-based single sign-on (SSO) with major identity providers
- Two-factor authentication (2FA)
- Role-based admin permissions
- Sharing policies and domain restrictions
- Idle session timeout
Advanced security add-on (Enterprise Guard):
- Auto-detect sensitive data (PII, PHI, PCI, IP)
- Dynamic guardrails that block risky actions based on content classification
- Encryption key management (bring your own key)
- Content lifecycle policies for retention and deletion
Compliance certifications:
- SOC 2 Type II
- ISO/IEC 27001, ISO/IEC 42001 (AI)
- GDPR compliant with EU/US/Australia data residency options
- HIPAA-ready for healthcare organizations
How teams ship faster with Miro
Product teams: From discovery to delivery
The challenge: Product teams juggle research insights, design explorations, roadmap prioritization, and sprint planning across disconnected tools. Context gets lost. Decisions get rehashed. Shipping slows down.
How Miro helps:
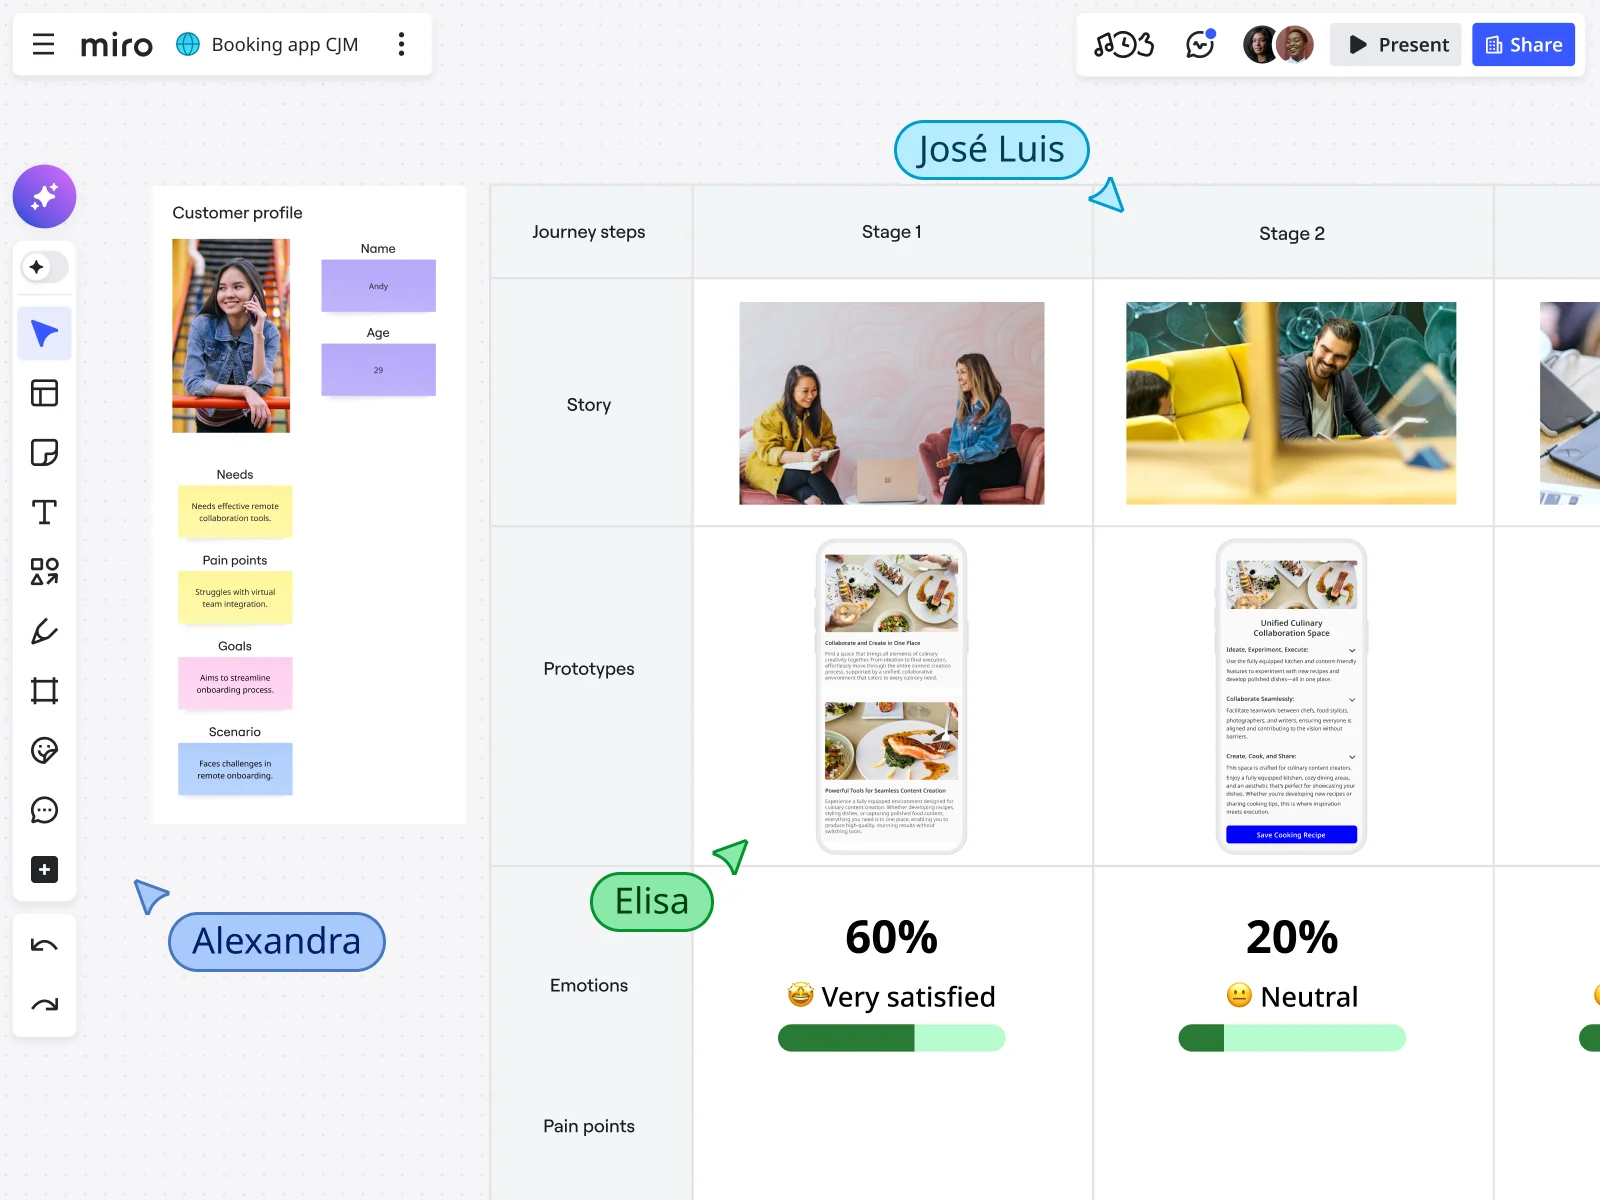
Discovery: Map customer journeys, synthesize user research, and identify opportunity areas, all in one workspace where your whole team can see the evidence behind decisions.
Define: Run prioritization workshops (RICE, value vs. effort) with stakeholders in real-time. AI workflows help you translate opportunities into structured specs.
Design: Bring Figma designs into Miro for cross-functional feedback. Run design critiques and usability testing reviews without forcing designers to context-switch.
Deliver: Sync user stories to Jira automatically. Run retrospectives to improve team velocity.
Real example: Medibank reduced product planning time by 50% by consolidating discovery, roadmapping, and sprint planning into Miro.
Design teams: Collaborate without compromise
The challenge: Designers need feedback from PMs, engineers, and stakeholders — but design tools like Figma weren’t built for cross-functional workshops.
How Miro helps:
Moodboards & style exploration: Use Create with AI to generate visual directions instantly. Gather inspiration, refine with your team, and establish design principles.
Prototyping (Beta): Build interactive wireframes directly in Miro using AI. Skip the lorem ipsum — generate realistic content for more authentic testing.
Design reviews: Embed Figma prototypes in Miro boards. Add voting, comments, and sticky note feedback for structured critiques.
Handoff: Create annotated specs with context about design decisions. Engineers see the why, not just the what.
Marketing teams: Align on strategy, execute with clarity
The challenge: Campaign planning involves stakeholders across content, design, growth, and sales. Alignment meetings eat up days. Priorities shift mid-flight. Execution suffers.
How Miro helps:
Campaign planning: Map out multi-channel campaigns visually. Assign owners, set timelines, and track deliverables, all on one board everyone can reference.
Content calendars: Plan editorial calendars collaboratively. Use AI to brainstorm content ideas, then vote on priorities as a team.
Creative briefs: Use Create with AI to generate first-draft briefs, then refine them with stakeholders asynchronously. This means no more endless email threads.
Go-to-market alignment: Run GTM planning sessions that bring together positioning, messaging, channel strategy, and launch timeline in one clear view.
Engineering teams: Visualize systems, align on architecture
The challenge: Technical discussions benefit from visuals, but engineers don’t want to spend hours in diagramming tools. Documentation gets stale. Context gets lost in Slack threads.
How Miro helps:
System design: Generate architecture diagrams from prompts like “Map our microservices dependencies.” Engineers can then refine these diagrams instead of starting from scratch.
Technical planning: Run story mapping sessions to break down epics. Identify dependencies visually before they cause sprint delays.
Incident retrospectives: Map out incident timelines collaboratively. Identify root causes and prevention strategies with structured frameworks.
Documentation: Turn diagrams and technical discussions into living docs that update as your systems evolve.
Tips for getting the most from Miro
Start with a template and customize it for your team. Don’t waste time building frameworks from scratch. Choose a template that fits your needs and adapt it to your process.
Use frames to structure complex boards: Frames act like pages within your canvas. They keep large boards organized and make presentations easier.
Keyboard shortcuts save hours:
Learn these first:
- N = New sticky note
- T = Add text
- C = Add comment
- Ctrl/Cmd + D = Duplicate selection
Use async collaboration: Not everything needs a meeting. Set up boards where teammates contribute on their own time, then sync up to decide.
Give AI context: The more specific your prompts and the more content you select before prompting, the better your results.
Set up team templates: Standardize how your team runs retros, planning sessions, or design reviews by saving custom templates.
4 resources for learning how to use Miro
When it comes to learning, everyone’s got their preferred method. So if you’re looking for more ways to learn how to use Miro, we’ve got four more resources for you. Check them out:
Miro Academy
Level-up your Miro skills by taking one of our many video courses. From beginner-friendly intro courses to use-case-specific courses like technical diagramming, Miro Academy is your one-stop shop for all kinds of tutorials for our innovation workspace — not to mention the perfect place for async learning.
Plus — if you pass a quiz, you might just earn a shiny Miro Verified badge to share on your social media profiles. Explore all our Miro Academy courses to find the one you’re looking for.
Miro’s YouTube channel
Speaking of video, have you checked out Miro’s YouTube channel? Dive into a library of over 500 videos, packed with plenty of video tutorials on how to master all kinds of use cases — from customer journey mapping to running Retrospectives.
Immerse yourself in quick audio and visual content you can easily pause, rewind, and fast-forward to learn how to use Miro at your own pace.
Miro Community Forum
The Miro Community Forum is a great space for coming together with other Miro users learning how to master our innovation workspace. Exchange tips and tricks with thousands of forum members on countless topics — from diagramming and running agile workflows to discussing what’s new in Miro.
Or start your own topic in seconds and get the next meaningful conversation going.
Miro Help Center
Have you tried turning it off and on again? Miro’s Help Center is there to help you solve everyday technical challenges you might run into in our innovation workspace — on top of supercharging your journey to becoming a Miro pro.
Discover all kinds of handy tips from how to restore deleted boards to how to manage users on your team — and more.
Common questions about Miro
Can I use Miro offline? Miro requires an internet connection for real-time collaboration. However, you can view boards offline in the mobile app.
Is Miro secure enough for confidential work? Yes. Enterprise customers get SOC 2 Type II and ISO 27001 certifications, plus optional advanced security features like encryption key management and automatic sensitive data detection.
How does Miro AI work? Will it train on my data? Miro AI uses your board content only to generate outputs for you. Your data isn’t used to train AI models. For Free plan users who opt in, anonymized interaction data (not content) helps improve AI accuracy. Enterprise customers can disable data collection entirely.
What’s the difference between Miro and other whiteboards? Miro combines infinite canvas flexibility with AI-powered productivity and enterprise-grade integrations. Unlike basic whiteboard tools, Miro connects to your existing workflow (Jira, Figma, Slack) and uses AI to accelerate research synthesis, planning, and documentation.
Do I need design skills to use Miro? Not at all. Miro is built for everyone, including PMs, marketers, engineers, designers, and strategists. Templates and AI features handle the structure, so you can focus on your ideas instead of formatting.
Can I migrate content from other tools into Miro? Yes. Import images, PDFs, CSVs, and more. Integrations with Jira, Confluence, Notion, and others allow you to sync data rather than copy/paste.
Ready to move faster?
Stop losing momentum to scattered tools and endless alignment meetings. Miro gives your team one workspace where ideas quickly become outcomes.
Start free at miro.com and see why over 250,000 companies trust Miro to accelerate innovation with AI.