Table of contents
Table of contents
From Miro prototype to working code: How the MCP server connects design to development
Summary
In this article, you'll learn:
- What a prototype is in software engineering, and why the type you build determines what you can hand off
- Why design-to-code handoffs break down, and why more documentation isn't the fix
- How the Miro MCP server gives AI coding agents like Claude Code access to your full board context
- A step-by-step walkthrough of the AI design-to-code workflow, from brainstorm to running app
- How Horea Porutiu, Developer Advocate at Miro, went from prototype to working Node.js app in under four minutes
- How to try the workflow yourself using the FinQuest MCP demo template
Collaborative AI Workflows
Join thousands of teams using Miro to build the right thing, faster.
There’s a moment every product team knows well: the prototype is done, it’s on the board, stakeholders have signed off, and then it disappears into a handoff document, a Slack thread, or someone’s memory, leaving the developers who rebuild it from scratch to guess at half of what you meant.
That gap between design and development isn’t a people problem. It’s a context problem, and it’s exactly what the Miro MCP (Model Context Protocol) server is built to close.
This article walks through what a prototype actually is in software engineering, why the design-to-code handoff breaks down so reliably, and how Miro’s AI design-to-code workflow, powered by the MCP server and AI coding agents like Claude Code, gets your team from concept to running app without losing what made the design good in the first place.
What is a prototype in software engineering?
Before we talk about how to turn one into code, it’s worth being precise about what a prototype actually is, because the word gets used loosely, and that vagueness is part of what causes handoff problems in the first place.
In software engineering, a prototype is a working model of a product, feature, or system built to explore, test, or communicate an idea before full development begins. It isn’t the final product; it’s a tool for reducing uncertainty and giving a team enough signal to make the right decisions before committing to a full build.
Prototypes exist on a spectrum. A lo-fi prototype might be a rough sketch or a set of static wireframe screens, useful for testing layout and flow without committing to visual design. A hi-fi prototype looks and behaves more like the finished product, with realistic UI, interactions, and clickable flows that stakeholders can experience directly. A feasibility prototype sits in a different category altogether, because its job isn’t to test the user experience but to answer a technical question: can we actually build this, does this architecture work, and does this API integration behave the way we expect?
The table below breaks down the key distinctions between each type, including what it's built to answer, who it's typically built for, and when in the process it's most useful.
Types of prototypes and when to use them
Lo-fi prototype | Hi-fi prototype | Feasibility prototype | |
What it is | A rough sketch or set of static wireframe screens | A realistic, interactive model that looks and behaves like the finished product | A working model built to answer a specific technical question |
Primary goal | Test layout and flow | Test user experience and validate design decisions with stakeholders | Determine technical feasibility before committing to a build |
What it answers | Does the structure and navigation make sense? | Does this feel right to use? Will stakeholders sign off? | Can we actually build this? Does this architecture or API integration work as expected? |
Level of visual fidelity | Low — no committed visual design | High — realistic UI, interactions, and clickable flows | Varies — visual fidelity is not the focus |
Typical audience | Internal team | Stakeholders, users, and the broader team | Engineering and architecture teams |
When to use it | Early in the design process, before committing to visual direction | After the structure is validated, when you need stakeholder buy-in or user testing | When a technical assumption needs to be proven before full development begins |
The type of prototype you build determines both what questions you can answer with it and what you’ll be able to hand off meaningfully to the people doing the actual development work.
Construct and test: What prototyping is really about
The goal of the construct-and-test prototype cycle is to learn something as fast as possible and then act on what you find. You build just enough to test a specific assumption, gather signal, and iterate before investing more time in a direction that might be wrong. A prototype that takes three weeks to build defeats the purpose, which is why speed, structure, and shared context matter more than polish at this stage.
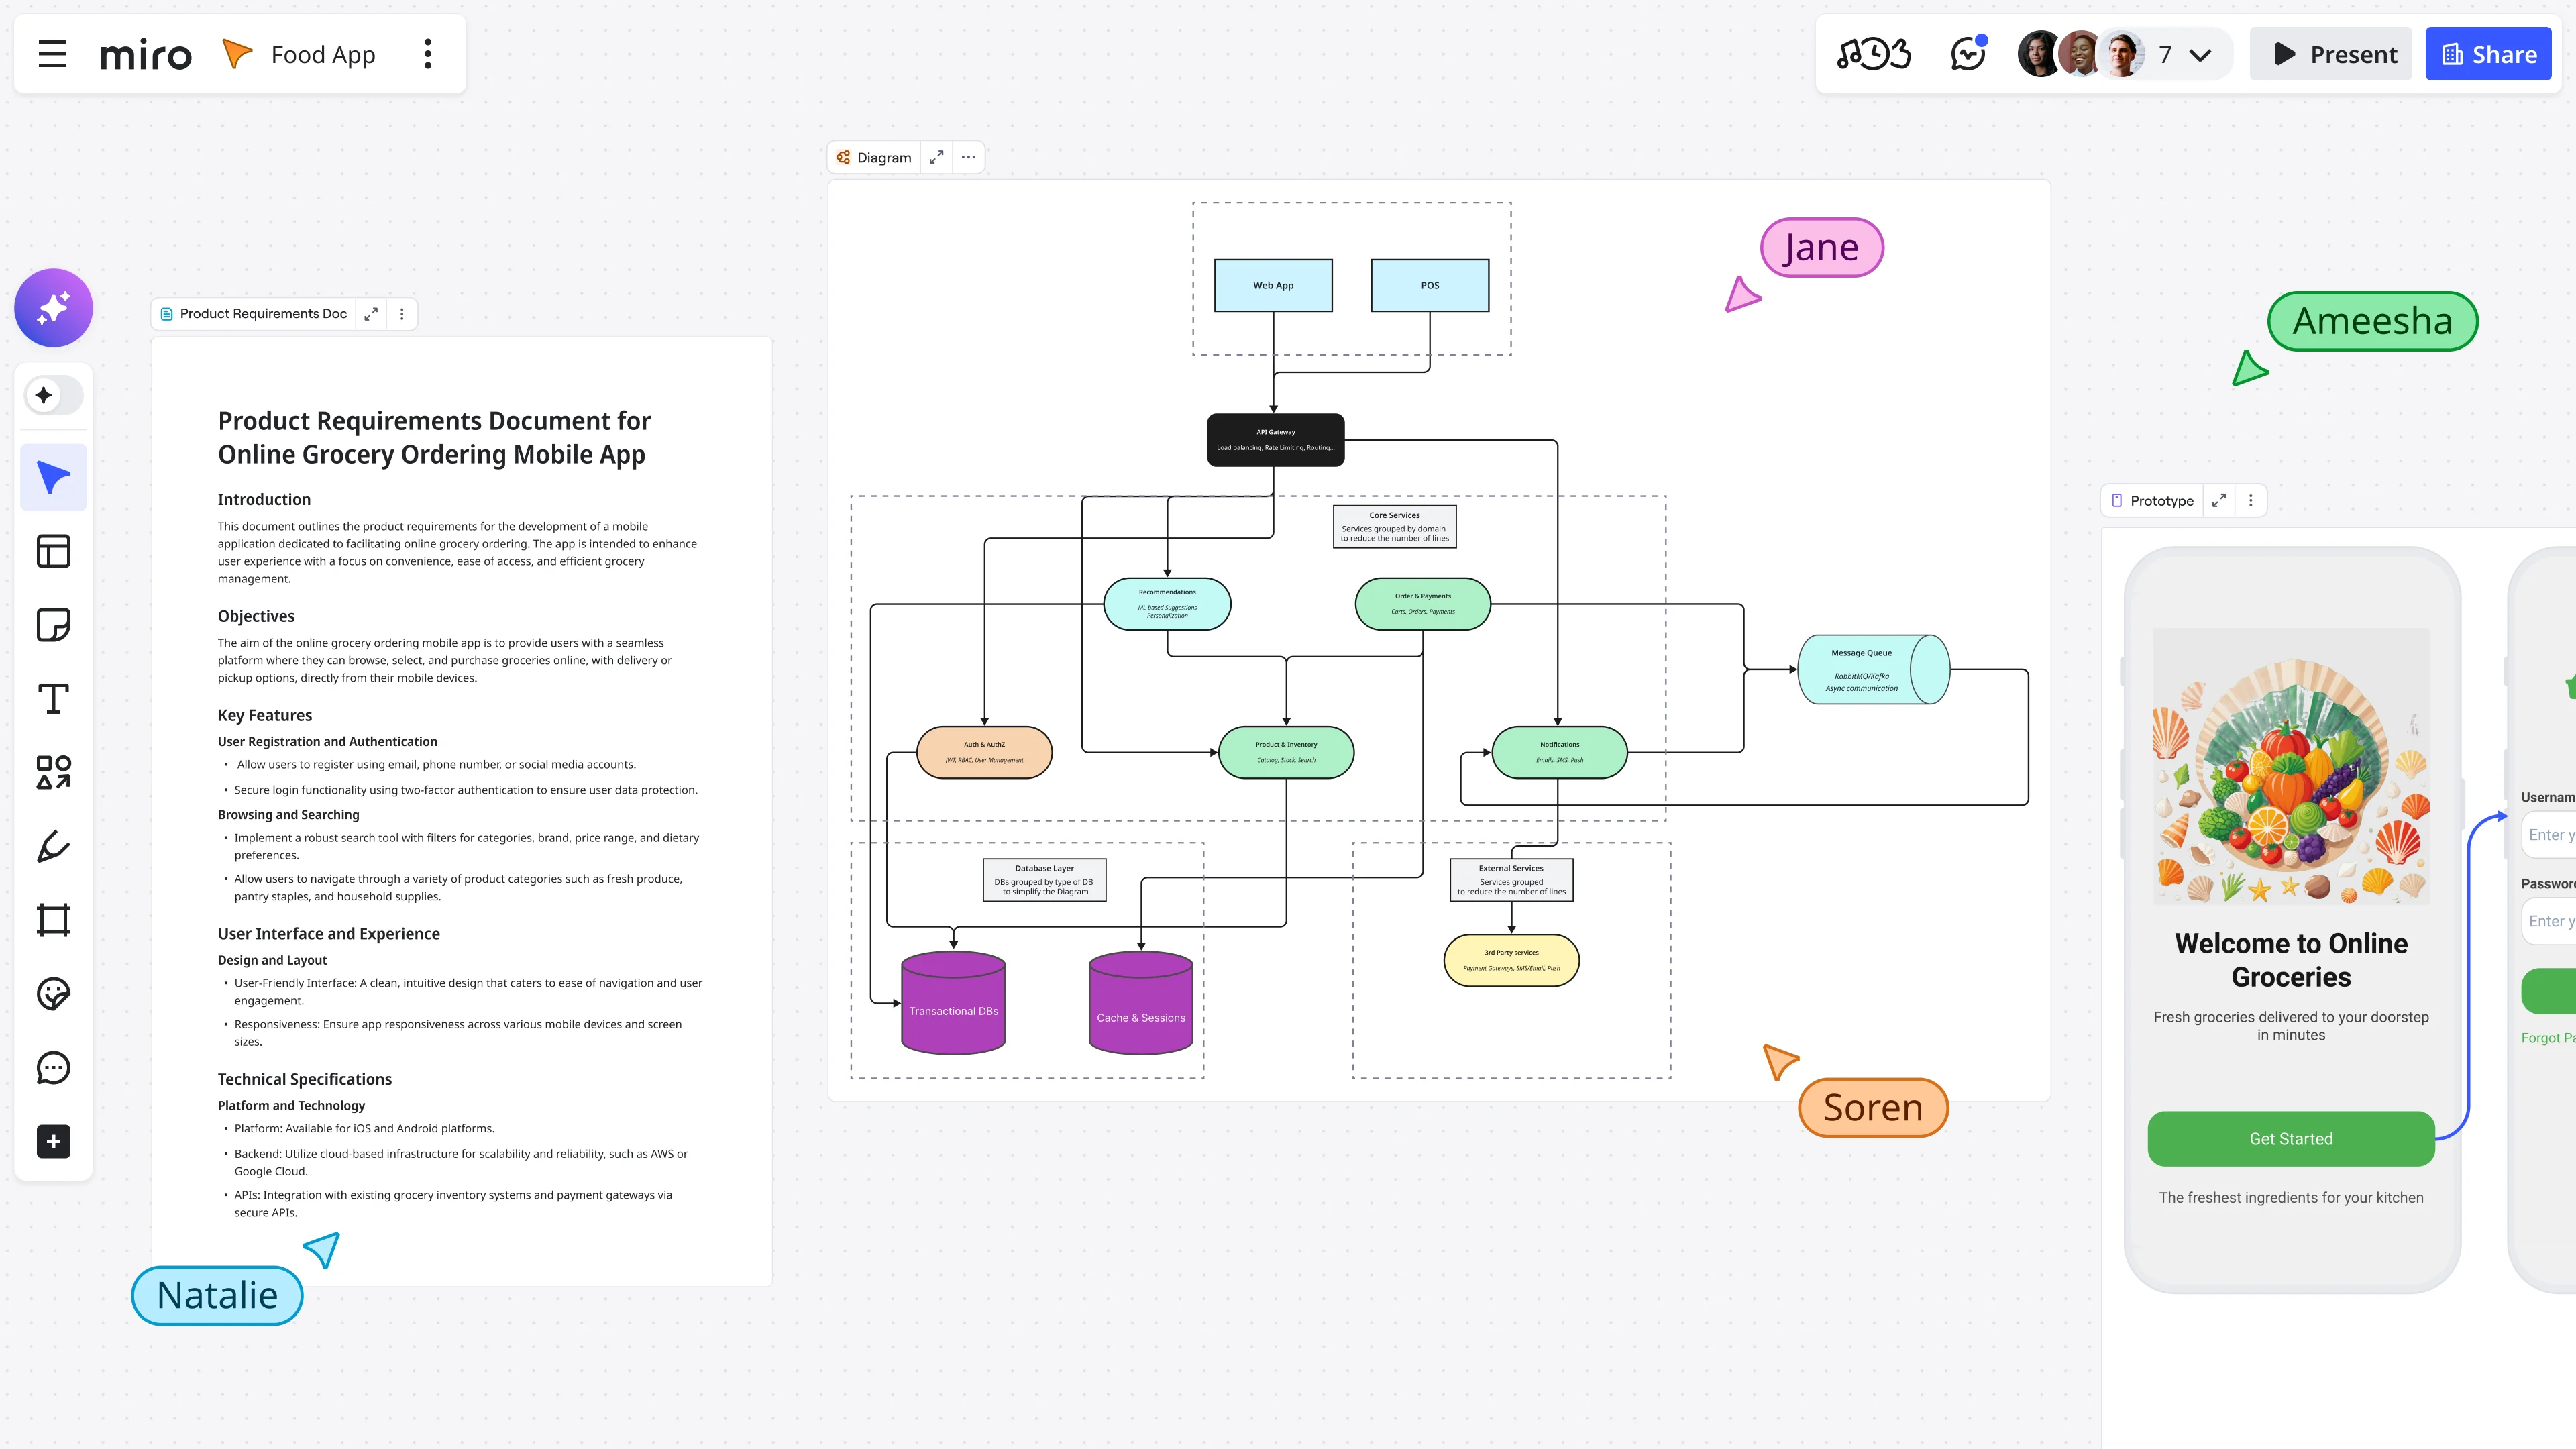
This is where Miro’s canvas already does a lot of work. Teams use Miro Prototypes to build interactive, clickable mobile and web interfaces directly on the board without writing a line of code, and all of those screens, flows, navigation decisions, and content choices live alongside the user stories, research synthesis, and product decisions that shaped them. The prototype doesn’t sit in isolation; it lives inside the full context of how and why it was built, which turns out to be exactly what an AI coding agent needs to do its job well.
The real problem with design-to-code handoffs
Ask any engineer who’s worked from a Figma file or a deck of prototype screens what the experience is like, and you’ll hear the same answer: the design shows them what to build, but not why. The user stories are somewhere else, the edge cases live in someone’s head, and the technical constraints got discussed in a meeting no one documented.
So the developer fills in the gaps with assumptions, some of which are right and many of which aren’t, resulting in a product that technically matches the design but misses the intent, followed by a round of revisions that eats up the time you saved by having a prototype at all.
The fix isn’t more documentation. It’s making sure the right context travels with the design from the start, so that whoever picks it up, whether that’s a human engineer or an AI coding agent, has everything they need to understand not just the surface but the reasoning underneath it.
This is exactly what a construct-and-test prototype workflow on Miro is designed to support. When your prototype, user stories, problem statement, core value proposition, and technical requirements all live on the same board, the question becomes: how do you get that context to the people or the AI agents building the thing? That’s where the MCP server comes in.
What the Miro MCP server actually does
MCP, or Model Context Protocol, is a standard that lets AI coding agents connect to external tools and read structured context from them. When you connect an agent like Claude Code to Miro’s MCP server, the agent can read the content of your Miro board directly and use everything it finds there as the basis for what it builds.
Think about what that means in practice. Your board has a hi-fi mobile prototype, a product brief, a table of prioritized user stories, and a set of annotated screens explaining the key interactions. You’ve also run a feasibility prototype sprint and documented the technical constraints on the same canvas. Instead of writing a multi-page handoff spec and hoping the developer reads it in full, you give your AI coding agent access to the board, and it reads all of it: the prototype screens, the user stories, the problem statement, and the value proposition, giving it a complete picture of what you’re building, who it’s for, and what the most important interactions are before it writes a single line of code.
Horea Porutiu, Developer Advocate at Miro, demonstrated exactly this workflow in a recent video walkthrough. Starting from an AI-generated prototype for a financial literacy app called FinQuest, Horea used Claude Code authenticated with Miro’s MCP server to pull all the board context, including the prototype screens, the product overview, and the user stories, then asked it to build a working Node.js app that matched the prototype as closely as possible. The constraint was intentional: it was a hackathon setting, so speed mattered more than perfection, and the agent was told as much in the prompt. The result, from prompt to running app, took around three and a half minutes.
The AI design-to-code workflow, step by step
Here’s how this workflow comes together on Miro, from the first brainstorm to a running application.
Step 1: Brainstorm and brief on the canvas
Start with your idea on the Miro board and use Miro AI to generate sticky notes, a problem statement, a product overview, and a core value proposition. You’re not just documenting the idea at this stage; you’re building the context layer that your prototype and your AI agent will both rely on later in the process.
This is also the stage where you work through your feasibility prototype thinking: what are the technical constraints, what integrations are you relying on, and what assumptions need to be tested before you commit to a direction? Capturing all of this on the board means it travels with everything else when you connect the MCP server.
Step 2: Generate the prototype
In Miro, open Miro AI and select Prototyping. Prompt it with your idea and any relevant board content, and Miro AI will generate interactive prototype screens, including mobile app flows, web app interfaces, or landing pages, directly on the canvas.
This is your construct and test prototype: a clickable, shareable representation of what you’re building that stakeholders can review and that your AI coding agent can read. Review it, iterate on it, and annotate the screens with any detail that an engineer or an AI agent would need to understand the intent behind each interaction, because that intent is exactly what gets lost in a traditional handoff.
In Horea’s demo, this step also produces a table of prioritized user stories and a pitch deck alongside the prototype screens, giving the board a level of structured context that makes the subsequent MCP handoff significantly more powerful.
Step 3: Connect Claude Code to the Miro MCP server
With your board in good shape, open your AI coding agent and authenticate it with the Miro MCP server, which gives the agent read access to everything on your board. Write a prompt that tells the agent what to build and points it at the board context explicitly.
In Horea’s example, the prompt is direct and time-aware: build a working Node.js app that can run locally, match the FinQuest prototype on the board as closely as possible, and prioritize speed because it’s a hackathon. The agent reads the board, pulls the prototype context, and gets to work with the full picture of what the team was trying to build and why.
Step 4: Review and iterate
The agent generates a full file structure and running application. In Horea’s demo, the FinQuest app included a virtual portfolio view, a weekly challenge, a financial literacy section covering compound interest, and a transaction history, all pulled directly from the prototype screens on the board. From here, you’re in a fast iteration loop where the prototype serves as your source of truth and any changes you make to the board can be fed back into the next prompt cycle.
Why this matters: the canvas as the context layer
The reason this workflow is different from other AI code generation approaches is that the canvas isn’t just a design tool; it’s a structured context layer for your AI agent that carries the full reasoning behind every design decision.
Most AI design-to-code tools work from a visual input, whether that’s a screenshot, an exported image, or a Figma file. They can reproduce what they see, but they don’t know why the design looks the way it does, which user story a particular screen is solving, what the feasibility constraints are, or what got cut in the last sprint review. Miro’s canvas carries all of that. Your prototype sits alongside the research that informed it, the decisions that shaped it, and the stories that define what it needs to do, so when the MCP server gives an AI coding agent access to the board, it doesn’t just get the design; it gets the whole product thinking behind it.
That’s what the Forrester Consulting research Miro commissioned in 2025 points to as the critical gap: 71% of cross-functional product leaders say that switching between tools causes friction and interrupts workflows, and the same proportion say the same about switching between their core work tools and AI tools specifically. The MCP server closes that gap by bringing AI directly into the space where design decisions get made.
The speed advantage in practice
Speed is a real outcome here, not a marketing claim. In Horea’s demo, the full cycle, from brainstorm through AI-generated prototype with user stories and brief to MCP handoff and working Node.js app, takes under four minutes of active agent time. That’s not a polished production app, and it’s not meant to be. It’s a construct-and-test prototype at the code level: a working proof of concept you can run locally, share with stakeholders, and iterate on immediately, which is exactly what matters in a hackathon or a rapid discovery sprint.
For product teams outside the hackathon context, the speed advantage compounds across the whole development cycle. Testing a technical assumption that would normally sit in a backlog for three weeks can happen in an afternoon, and the context that makes that possible is already on the board.
Try it yourself: the FinQuest MCP demo template
Horea’s full workflow is available as a ready-to-use Miroverse template: the FinQuest App: MCP Demo Context to Code template. The board includes the AI playground setup, the FinQuest prototype screens, the user story table, the product brief, and the pitch deck, giving you everything you need to run the full workflow yourself without starting from scratch.
Tip from Horea:
“Write your prompts with as much detail as possible, and select content on your board for additional context. The more structured your board is before you connect the MCP server, the more relevant the code your agent generates will be. For a hackathon, tell the agent explicitly that this is a time-constrained task, so it focuses on the most important screens first rather than trying to build everything at once.”
You can use the template as a starting point for your own app idea by swapping the FinQuest content for your product brief, adding your own prototype screens using Create with AI, and following the same MCP + Claude Code workflow Horea demonstrates in the video.
What this means for engineering, product, and design teams
For product managers, this workflow closes the gap between alignment and execution by keeping your user stories, your product brief, and your prototype in one place that is directly readable by the agent turning your design into code, removing the translation step that normally sits between your thinking and what the development team actually builds.
For designers, the prototype you build in Miro is no longer just a communication tool for stakeholders; it becomes the literal input for code generation, meaning the fidelity you put into your screens, the annotations you add to explain interactions, and the user stories you attach to flows all feed directly into what gets built. Your design work does more because it carries further.
For engineers, the MCP server means less time spent reverse-engineering what a prototype was trying to say and more time building on top of a foundation that already reflects the team’s product thinking. The agent handles the initial translation from design to code, and you take it from proof of concept to production, with the construct-and-test loop getting faster at every stage.
For teams running hackathons, design sprints, or rapid feasibility prototype cycles, the speed difference is immediate and measurable: you’re working with less information loss between each stage, which means fewer revision cycles and faster time to something you can actually test with users.
Getting started with Miro MCP
To run this workflow yourself, you’ll need a Miro account, Claude Code or another MCP-compatible AI coding agent, and the Miro MCP server.
Start with the FinQuest template to see how a well-structured board feeds into the MCP workflow, then adapt it for your own product idea or hackathon project.
Frequently asked questions
What is the Miro MCP server? The Miro MCP (Model Context Protocol) server is a connection layer that lets AI coding agents like Claude Code read the content of your Miro board. When you authenticate your agent with the MCP server, it can access your prototype screens, user stories, product briefs, and any other content on the canvas and use that context to generate code that reflects your full product thinking, not just the visual design.
What is a feasibility prototype, and where does it fit in this workflow? A feasibility prototype is a prototype built to test a technical question rather than a user experience. Instead of showing how an app will look and feel, it tests whether a specific technical approach actually works, for example whether an API integration performs as expected or whether a particular architecture handles the load you need. In the Miro MCP workflow, feasibility thinking happens on the canvas before you generate the hi-fi prototype: you capture technical constraints, document integration dependencies, and note what needs to be proven before full development begins, and that context then travels with the board to the AI coding agent.
How is the Miro MCP workflow different from other design-to-code tools? Most AI design-to-code tools work from a visual input, whether that’s a screenshot or an exported design file, and while they can reproduce what they see, they don’t have access to the reasoning behind the design. Miro’s canvas carries the full context because the prototype lives alongside the user stories, research, product brief, and design decisions that shaped it, so when the MCP server gives an agent access to the board, it gets all of that product thinking, not just the visual surface.
Do I need to know how to code to use the Miro MCP server? You don’t need to be a developer to set up the workflow or structure the board. Miro’s AI handles prototype generation, user story tables, and product briefs without any coding. The MCP + Claude Code step does involve a terminal and some basic prompt writing, so a working knowledge of development environments helps. For teams with a mix of roles, the typical split is: product and design build the board, and an engineer or developer advocate handles the MCP connection and agent prompt.
Which AI coding agents work with the Miro MCP server? The Miro MCP server supports any MCP-compatible AI coding agent. Claude Code (from Anthropic) is the agent used in Horea’s demo and is a natural fit for the workflow, but other MCP-compatible agents can also connect to the server.
Is the FinQuest template free to use? Yes. The FinQuest App: MCP Demo Context to Code template is available on Miroverse and free for any Miro user. You can open it directly on your board and adapt it for your own product idea or hackathon project.
Last updated: April 20, 2026