When you are working on the app it is really hard to keep everything in one’s mind. You should think about your budget, target audience, platforms, features simultaneously, and sometimes there is a high possibility to forget some important details. What is the best way to see the big picture? Sure, you should go visual. And here is a new tool for you – App Development Canvas.
I think you’ve heard about Business Model Canvas or Lean Canvas (we have both in our library), these tools provide visual templates for startups and businesses. Today we are happy to introduce App Development Canvas by MethodKit, which helps to summarize all the important factors of the app development process and keep everything in one place. This is a visual model designed special for those who work on the apps, and that is why it contains all the most important factors regarding the development process (and nothing more).
First of all I would like to thank our friend from Sweden, Ola Möller (founder of MethodKit) for this wonderful tool and for the permission to use it in Miro. This canvas is mostly for people who manages the development process and do not code by themselves, but it would be great to involve the developers in the process. We at Miro have team boards, every team member including marketing, development, design and others has an access and leaves feedback on every important aspect (strategy, new features, interface etc.)
For whom
The canvas will be useful for all those who is involved in the process of app development or plans to start working on the app including:
- Startup founders
- Management
- Project Managers
- UI/UX designers
- Designers
- Content Managers
- Marketers
In other words, if you are already working on the app/plan to work on the app/interested, the App Development Canvas will give you an overview of every important aspect of the app development process and will help to keep your finger on the pulse seeing the big picture at one glance.
Step-by-step guide for using App Development Canvas in Miro
How to find
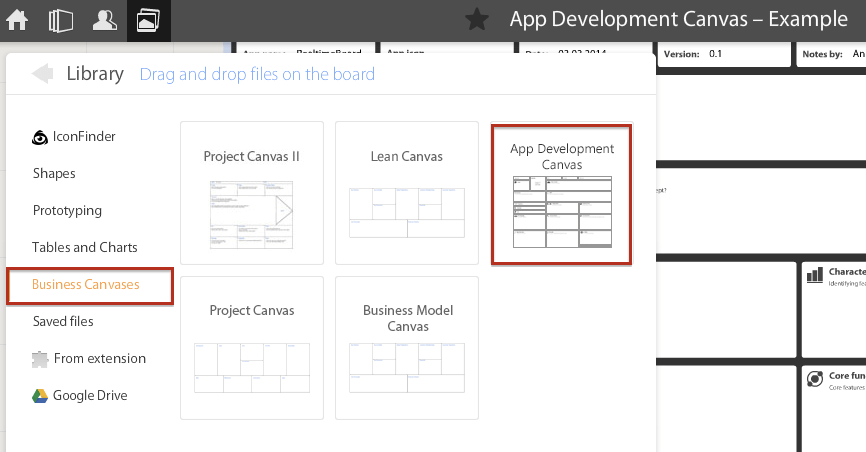
You can easily find the App Development Canvas in our Library, Business Canvases tab. The Canvas is interactive, hence you can double-click in the boxes and type in there. Also you can use several canvases for different purposes on one board simultaneously.
How to use
The App Development Canvas consists of 21 boxes. Let’s explore each of them in detail.
1. Date – type the date here.
2. Version – type the version of your app you are working on.
3. Notes by – simply type the name of a person (you) who is making notes on the Canvas.
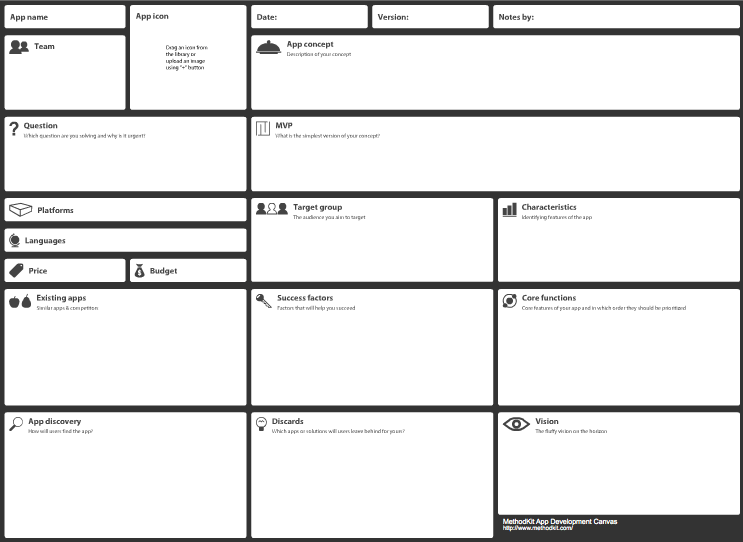
4. App name – type the name of your app here. If you already have the name, it’s just great. If you don’t, it’s time to think about it. Read these 10 tips for naming your app from Creative Bloq or Developers Guide to Marketing an App and start working on your future #1 application with memorable name.
Tip: you can use some creative techniques and brainstorm with post-it notes or create mind maps right on the board.
5. Team – list the names and roles of your team members who is involved in the process of app development.
6. App icon – if you already have an icon for your app, download it and add to the canvas. You can use Chrome Extension to drag and drop files to the board or upload an image using + button. If you do not have an icon or thinking of redesign, you should definitely check this post on icon design by Eugeniu Clim, interaction designer at ustwo. He also mentions Iconfinder, which can be a great source of inspiration. Iconfinder collection is available in Miro library, check this blog post to learn more.
7. App Concept – describe your app concept in this box.What your app is about? What it should do now and in the future? Read this article about the mobile app concept development for inspiration.
8. Question – which question are you solving and why is it urgent? Every app should be an answer to the problem or several problems. As Rahul Varshneya from Arkenea says, “Successful entrepreneurs solve problems and in a way that we could not have imagined. When you look around you, every product and service you use were all created to solve a problem. You wanted to get from one place to another faster, you got a car. You wanted to get from one country to another faster, you got planes”.

9. MVP – think about the simplest version of your product and describe it here.Minimum Viable Product is a strategy used for fast and quantitative market testing of a product or product feature, popularized by Eric Ries (Lean Startup pioneer) for web applications. A Minimum Viable Product has just those features that allow the product to be deployed, and no more. You can read more about the development of MVP here.
10. Platforms – list the platforms which you are going to develop on.Each of the platforms has its pros and cons, and if you are doing the app for the first time and not sure what to choose for the start, a good way is to make a research and ask experts on Quora.
11. Languages – list the languagesyou are going to use in your app.
12. Price – summarize the costs and put a figure here. The costs may include salaries, costs for the software and content you use etc. You can use Google Drive spreadsheets to list all the costs and put in on the board to have it in easy access.
13. Budget – type here the amount of money you or your clients are able to spend on the app development.
14. Target group – describe the audience you aim to target. Who are those people? What are they doing? Why will they buy or use your app? You can try Personas methodology or create Empathy map templates to understand your target audience better. Both templates are available in Miro.
15. Characteristics – identify the features of your app and list them in this box. What your app should allow to do? Remember, that in the box above you described an MVP, list the features of MVP first and then continue with the others.
16. Existing apps – list the similar apps and competitors here.Take a look at best practices before you start working on your app. Choose 3-5 for the benchmark and use your digital whiteboard for competitors’ analysis.
Here is the list of what you should know about your competitors:
– How they look like (grab their screenshots with our Chrome Extension)
– Business model
– Technologies they use
– Market share/user base
– Strengths and weaknesses.
This list is incomplete, but is a good start for your research.
17. Success factors – list the factors that will help you to succeed. You may have a good technology, exclusive partnerships, the best developers in the world. Good when you have a so-called ‘unfair advantage’, which your competitors cannot use (‘unfair’ does not mean ‘illegal’, it may be an access to technology or community, etc.).
18. Core functions – list the core features of your app and prioritize them. What is most important for your target audience? What is necessary in MVP? You can use Swap sort methodology to prioritize the features in your list. Read more in our blog.
19. App discovery – how users will find your app. If you are making iOS or Android app, the respective marketplaces are already the channels. But don’t think it’s enough and don’t stop. You should consider such channels as referrals, social media and search. We highly recommend you to subscribe for Neil Patel’s blog updates, he always has a good advice on increasing your traffic.
20. Discards – apps or solutions users will leave behind for yours. What people use now to solve the same problem? Obviously, there is a great variety of the solutions – if you cannot see them you should search better. List the apps and solutions here and analyze the switch costs – how much users will ‘pay’ (invest time or money) for moving to your app, what will they earn. Good, if you make their life easier and cheaper.
21. Vision – how you see the future of your app (or maybe yours?). You can describe or visualize your aim here. Imagine what your app will be in the future, how many users you will have, how many problems you will solve, etc.
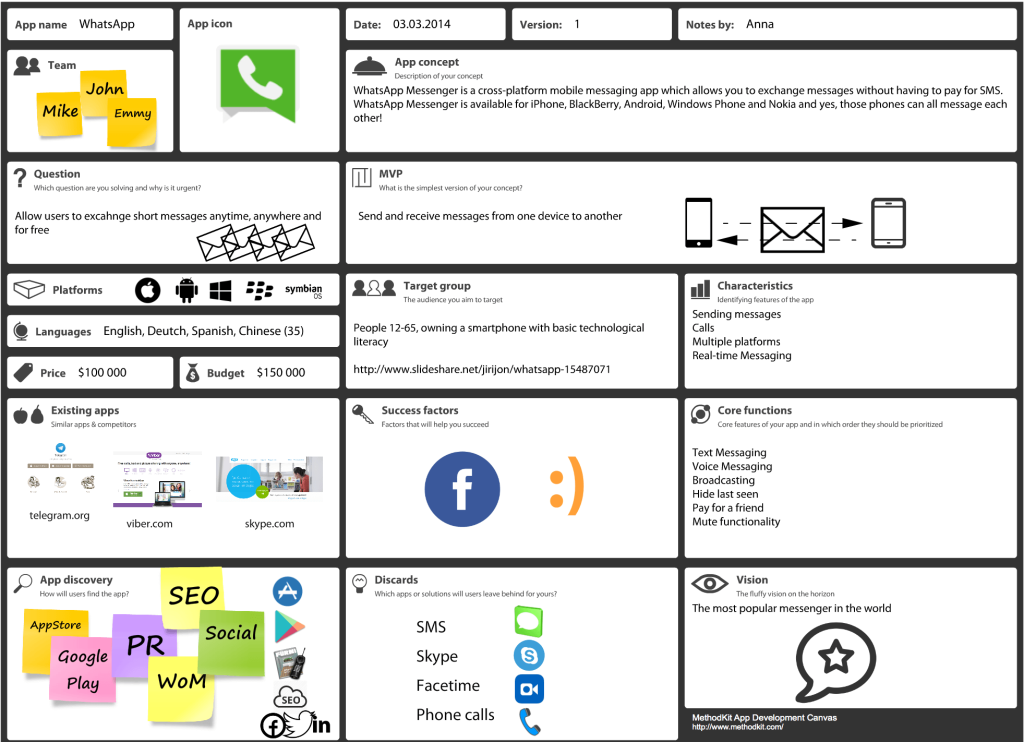
Here is the App Development Canvas made for WhatsApp (it’s just an example, not a complete canvas). You can view the board using this link.
How to get the maximum from App Development Canvas in Miro: tips & tricks
If you are using an App Development Canvas, you already have a powerful tool in your hands. Why not making a bomb then? Here is the list of useful Miro tools, which help you turn your digital whiteboard in a powerful collaborative space for app development:
Google Drive. Connect you Google Drive to work with your documents (i.e. budget) on the board.
Add pictures and videos. It’s great when you can see everything in one place. Add your app video, other videos and pictures, logos you like and everything you need on the board to make a big picture.
Chrome Extension. Use Chrome Extension for collecting references – images, screenshots etc. It is also great for team collaboration as it allows to get real time notifications about updates of your boards.
Iconfinder. Add beautiful icons to your boards with Iconfinder collection built in Miro library.
Prototyping Library. Interactive prototyping library allows you to create mockups of your future app on the board.
Templates for service design. Touch the magic of design thinking and discover that you can do even better apps with our templates for service design – empathy map templates, persona templates, customer journey map templates, service blueprint templates and others.
Work with the other canvases. Besides this awesome App Development Canvas, we have other canvases in our interactive library, they useful when you work on projects or your business model.
Hope you got some inspiration and ready for the new challenge – making your awesome #1 app.
Thoughts? Comments? Reach us at feedback@miro.com