Since the dawn of time—when humans were still living in caves—we’ve been solving life’s problems through innovation. Back then, we invented fire and hunting spears. Today, we create things like portable toasters and wireless headphone translators to meet our needs.
As a product designer, I’ve learned that great design comes down to one important thing: listening. I practice the principles of design thinking to solve problems in a human-centric way. What is this design method, and how can you use it with your remote team? Keep reading for these top tips.
What is design thinking?
Design thinking is a method for understanding customer challenges and finding creative solutions. This is done through design thinking activities like gathering customer insights, framing and reframing the problem, unconstrained ideation, prototyping, and iterative testing. The result? Products that customers (and your bottom line) will love.
Ultimately, the process helps teams:
- Empathize and make informed decisions based on a deep understanding of user needs
- Improve their problem-solving, co-creation, and collaboration skills
- Break down silos by co-creating with experts throughout the organization
- Learn to embrace failure and apply learnings to future decisions
- Take a customer-centered approach to innovation
- Boost creative thinking and generate an innovative solution
What is a design thinking workshop?
A design thinking workshop is a creative problem-solving session. It allows cross-functional teams to discuss, plan, and create solutions for their customers.
Teams use these workshops to streamline the collaborative design process and create a human-centered design. It gives everyone a chance to be involved in generating new ideas and creating innovative solutions. From improving the user experience to offering new products, a design thinking workshop helps teams put the customer at the heart of the solution.
Tackle any problem in five stages with design thinking
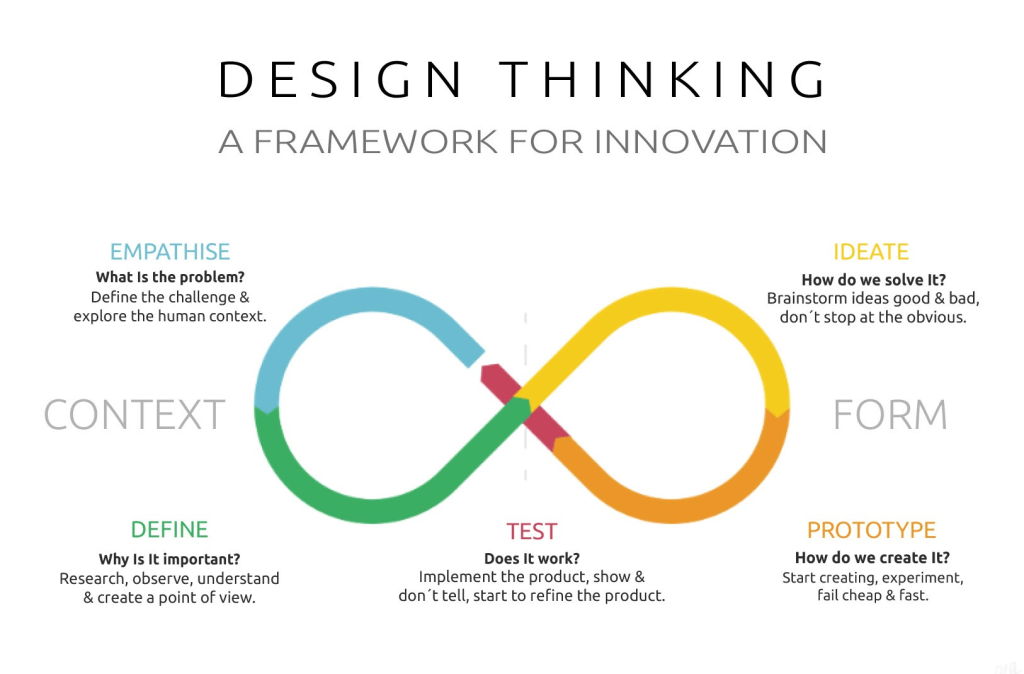
No matter what problem you’re trying to solve, the design thinking process can be broken down into five distinct stages:
- EMPATHIZE: One of the core elements of design thinking is understanding customer challenges. To do this, you need to empathize with your audience to understand their needs, wants, aspirations, and challenges. By getting to the root of who they are, you’ll uncover new opportunities that provide them with a better user experience. We’d suggest using an empathy map to help you visualize this process.
- DEFINE: The second stage is about clarity. With all the insights you have so far, you can start to create a picture of the challenges that your customers are facing. This will help you articulate a customer problem statement and give you a solid foundation on which to build ideas.
- IDEATE: At this stage, you’re ready to generate ideas, brainstorm solutions, and get creative! There are several ways you can facilitate this process. You can use brainstorming, brainwriting, mind mapping, sticky notes (which you can digitize with Miro), or even create a mood board. You can also take a look at these brainstorming techniques to make the most out of the process. Find what works best for your team and run with it. This will help you get new ideas flowing.
- PROTOTYPE: Now that the ideas are on the table, it’s time to refine what you’ve got. The design team will use these ideas to create simple designs of your suggestions. These designs will most likely be low-fidelity to keep things simple and inexpensive. The prototypes allow you to test your potential solutions. Based on what you experience, you can narrow down the best ideas and make any necessary changes before testing them with real users.
- TEST: The final stage of the process is testing your new solution on real users. It’s an iterative process that allows you to gather feedback from real customers and make any last-minute changes before launching.
Get tips from expert facilitators
Don’t worry. No one’s meant to tackle all of this alone. You’ll want to gather a diverse team of experts and put your heads together, especially for the Define and Ideate stages. How do you do this with a remote team? Enter the virtual design thinking workshop.
How do you do a virtual design thinking workshop?
Professional facilitators traditionally conduct design thinking workshops with in-person teams (and lots of sticky notes!). With practice and the right design thinking tools, anyone can run a successful design thinking workshop—even while fully remote.
Here, we’ll outline 12 steps you can follow to host a virtual design thinking workshop for in-person and remote teams.
1. Find your why
Before you send any Google Calendar invites, think about why you want to run a workshop in the first place. What are the workshop objectives? What customer problem do you want to solve? What’s keeping you up at night? Perhaps you want more people to sign up for or engage with your product? Turn this into a question for your team to ponder in the Define stage.
When you’re creating this question, make sure it’s customer-focused. The entire design thinking process is centered around understanding customer challenges and how your product or service can provide a solution. Ask yourself how you can help your customers with their problems, and you’ll be on the right track.
Be sure to keep this question in mind throughout the entire process. You don’t want to stray from your purpose. If you do, you might end up with a final design that’s not centered around what you want.
2. Start with empathy
Think of yourself as a detective. You want to gather every piece of information you know about your audience to crack the case. Are they millennial rideshare drivers, overworked parents, or tech-shy business owners? How do they interact with your product or service? What are their pain points?
Doing this will help you get into their mindset and better understand the challenges they’re facing. This puts you in a pretty good position to figure out how you can help customers overcome their hurdles.
The user persona and empathy map templates can help you deeply empathize with the people you’re trying to help. Do you have survey data, interviews, or relevant stats that might give your team even more context? Track it all down and add it to Miro’s online whiteboard. Remember: the more context your team has, the quicker they’ll arrive at a solution.
Get on your users’ level and truly understand their needs with the empathy map template
3. Assemble your dream team
Now it’s time to recruit the team that will work with you along your design thinking journey.
It’s important to assemble the right workshop participants. You need a group that has the knowledge and experience to create innovative and thoughtful solutions. If you don’t, the entire process will be harder, and you might not reach your desired outcome.
Our advice? Aim for a diverse group. Leveraging knowledge from different disciplines like engineering, product, design, and the executive team will lead to more informed decisions. If you can, involve people who attempted to solve the problem (e.g., low sign-up rate) before so you can build on past learnings and save time.
4. Plan your agenda carefully
There’s no one-size-fits-all agenda for design thinking. You could follow the well-known Design Sprint approach, which races through each stage in five days. Or, you could spend a full day defining the problem and then brainstorming asynchronously. How you approach each stage depends on your unique needs and resources.
Carefully planning your design thinking workshop agenda will make sure that you stay on track. Sure, you’ll probably veer off on tangents throughout the process, and that’s fine. Sometimes it can be a good thing and you’ll generate interesting ideas. But having an agenda makes sure that you cover all your bases. Use a meeting agenda template to effectively plan your agenda.
Whatever you do, be conscious of people’s energy levels—especially with remote teams! Breaks are essential. A good rule of thumb is to plan five to 10-minute breaks after every hour of activity. The more intense the activity, the longer the break should be.
5. Prep your board in advance
The world is your oyster with Miro’s infinite canvas, but it can also be hard to know where to start. Use frames and any of the templates in this post to create space for each activity.
To see other templates, head over to our template library. All of our templates are intuitive, user-friendly, and customizable, making it easy for teams to create a board that’s perfect for their workshop. You can also add plenty of sticky notes to the board for each participant and consider using a Parking Lot for questions or action items that may come up during the session.
Also, make sure you test every single piece of technology ahead of time, especially if you’re planning to use a video conferencing tool and breakout rooms. For more inspiration, read our tips on how to organize your board for a streamlined workshop.
6. Prep your team
Once your board is ready to go, it’s time to get your team prepped. This will help everyone get on the same page and stay aligned throughout the process.
Consider sending an email with instructions to prepare for the session with any pre-reading materials or required exercises. You may want to send out a warm-up exercise to help people get comfortable using Miro, especially for participants who are new to design tools.
7. Break the ice (ice, baby)
Creativity is like a muscle—it needs to be stretched before it gets used. To get the most out of your team, you need to break the ice so everyone feels comfortable. Try a short icebreaker before moving into ideation activities. Check out Miroverse for tons of icebreaker ideas. Icebreakers also help people get comfortable with each other, especially if they’ve never worked together before.
If anyone wanders away and can’t find their way back to the group, bring everyone to you or ask participants to follow you as you move around the board.
The Faces in Magical Places icebreaker by Abracademy will spark people’s imaginations before diving into the workshop
8. Define the real problem
Now that you have everyone in the same room (virtually speaking, of course), it’s time to get specific about the problem you’re trying to solve. Take the sign-ups example. Your data shows that conversion rates are less than ideal—but why?
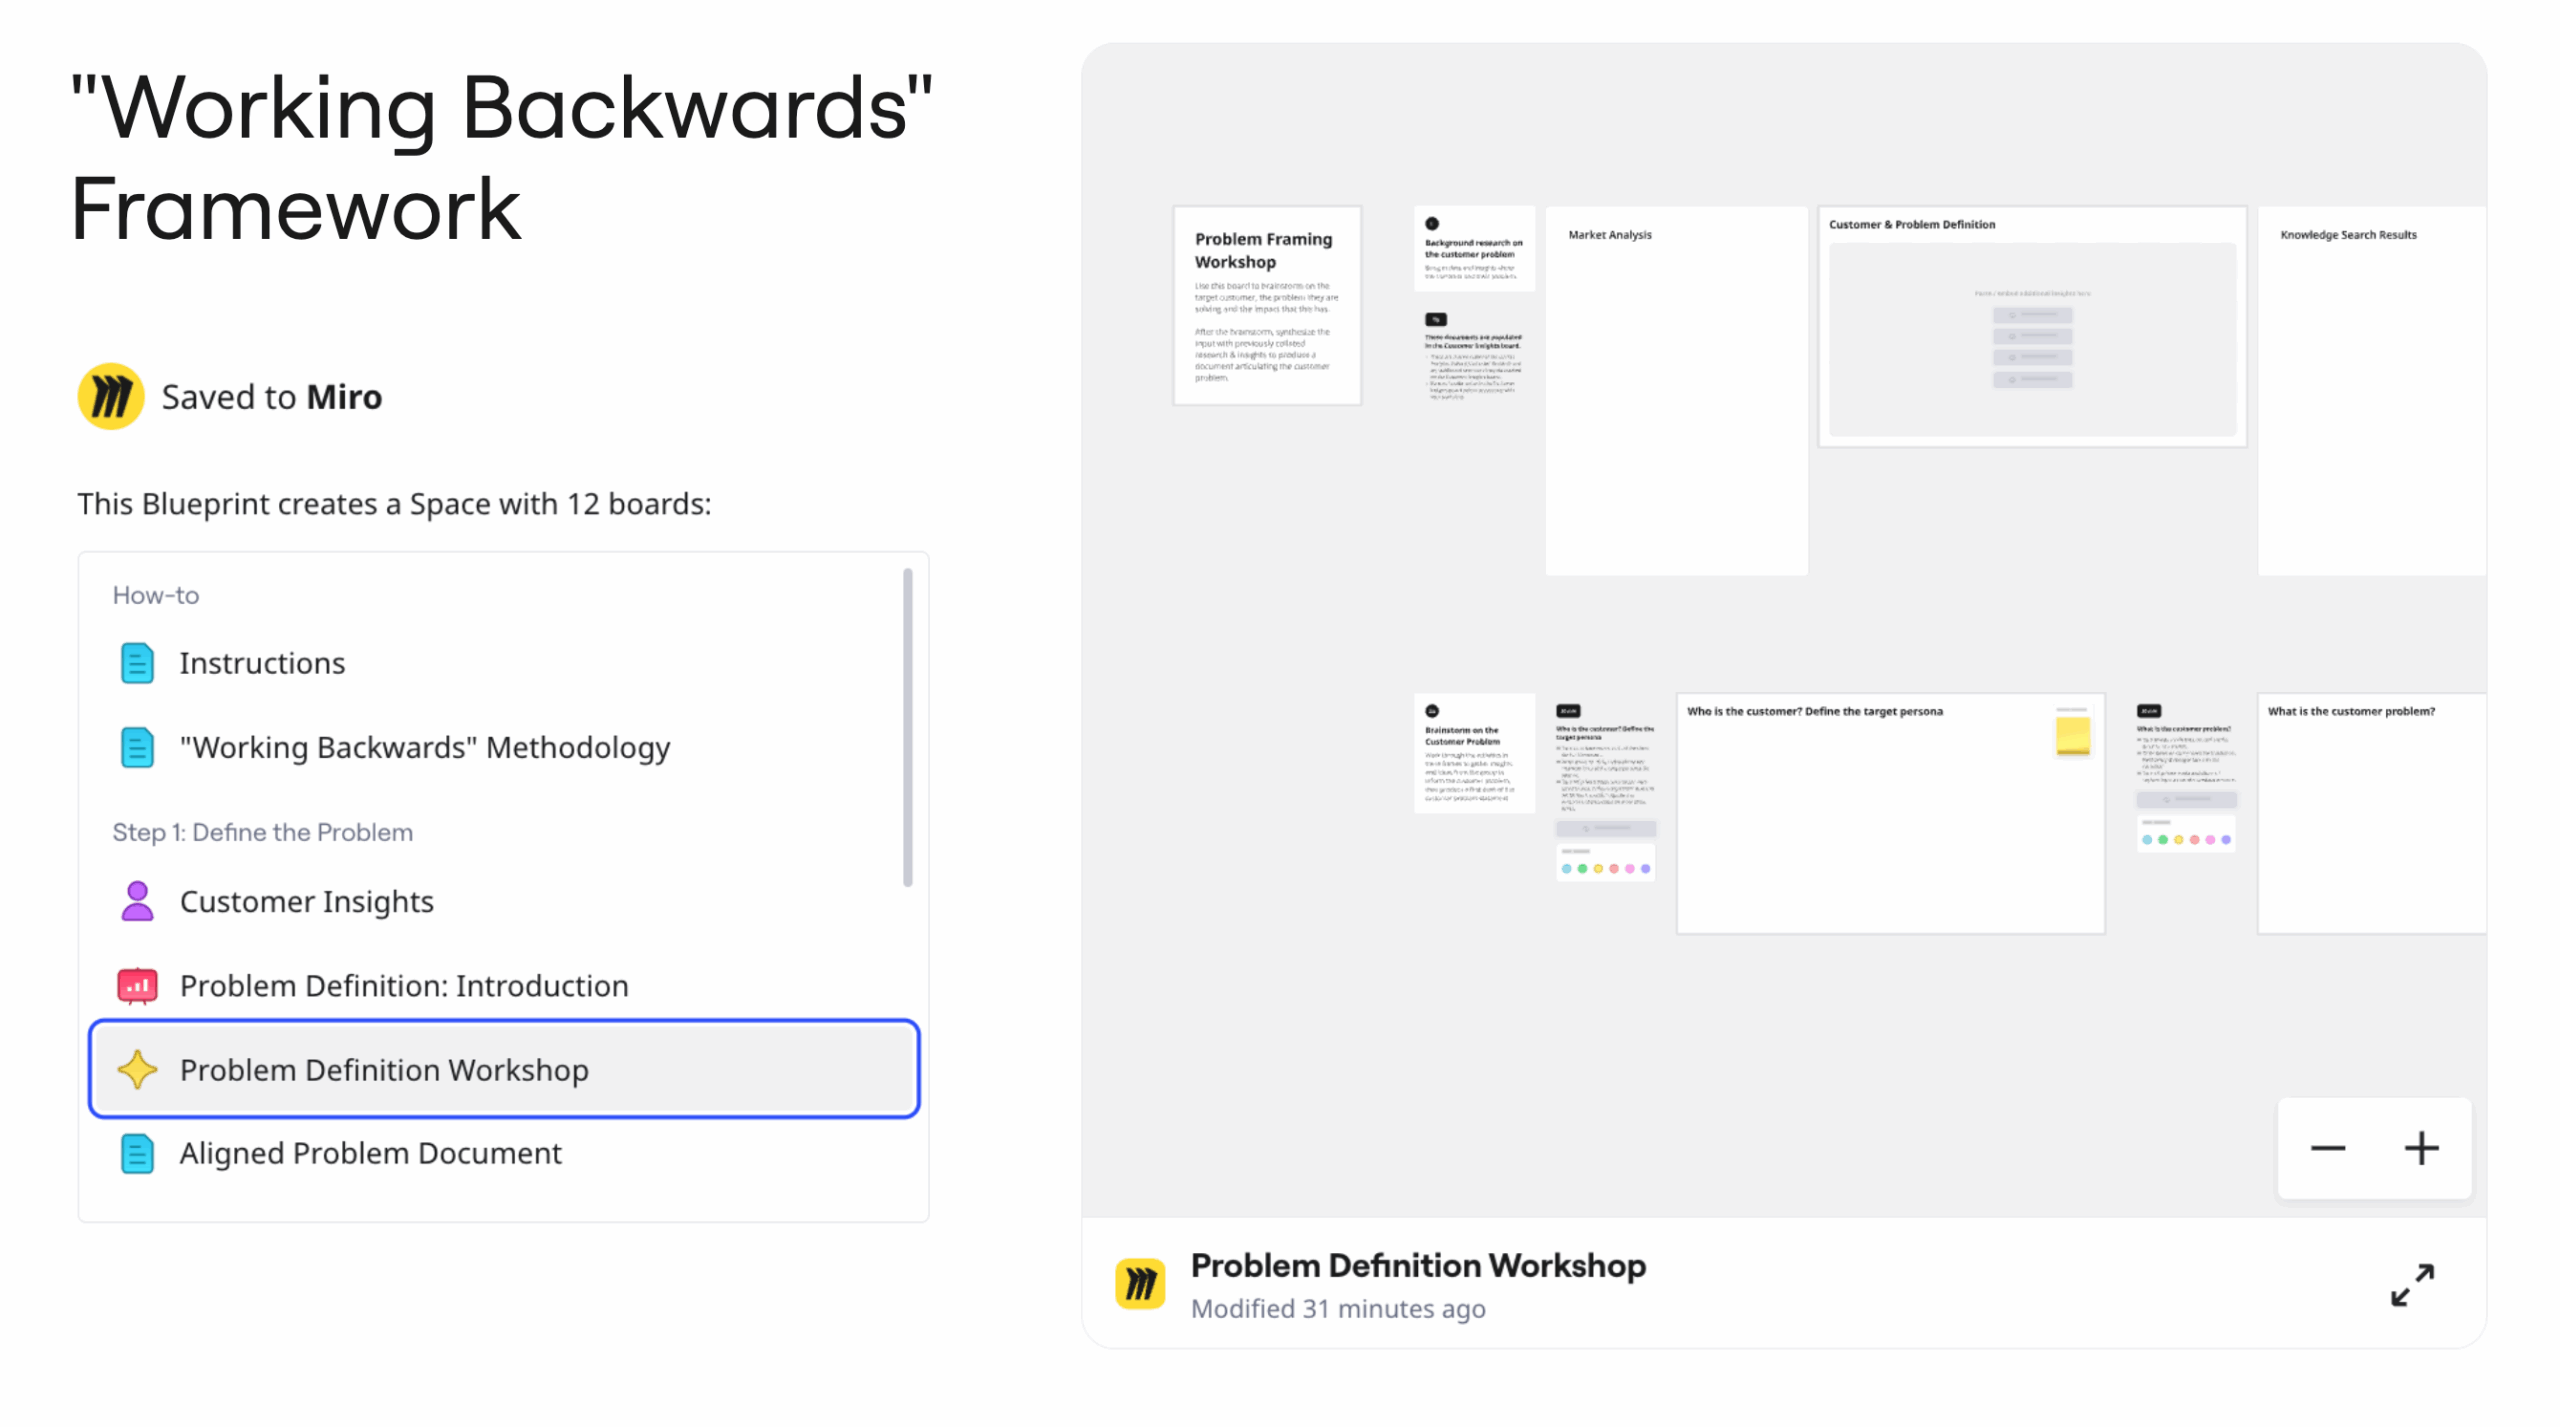
Get your team up to speed by sharing everything you learned in the Empathize stage, then ask: what is the real problem? This will become the focus of your entire workshop, so spend a few hours brainstorming and refining a problem statement (e.g., The mobile sign-up experience is too long.) Try out the 5-Whys analysis template to get an idea of the root causes of a problem, or go even deeper with this Problem Statement workshop by the Design Sprint Academy.
Hone in on your design challenge with the Problem Statement Workshop by Design Sprint Academy
9. Brainstorm creative solutions
The brainstorming process is a chance for your team’s imagination to run wild! How can you solve the problem you’ve just uncovered? There are no “wrong” ideas in the Ideate stage. There are also many different ways to brainstorm.
Engineers might find mind mapping more logical, while others might prefer brainwriting, a great activity for connecting abstract ideas as a sequence of sentences. Visual thinkers might like to wireframe or sketch out their ideas or provide a step-by-step description using this storyboarding template.
Explore different ways to brainstorm as a team and see what works best! Use the brainwriting template to generate and improve on ideas through quiet, written ideation
10. Vote for the best idea
Once you have tons of ideas on the board, it’s time to choose the best one. Give everyone the chance to choose their favorite using the voting app. This is a great way to review everyone’s honest opinion because the results are anonymous. People are more likely to be honest about their opinions if their identity is kept secret.
Once you’ve collected the results, consider whether the winning idea is feasible—can you test it with real users? What will success look like? If the idea holds up under pressure, your team is ready to move to the Prototype phase.
11. Prepare your prototype
End your workshop by discussing how your team will prototype and test your idea. How you build your prototype (and how much you build) completely depends on your resources and the nature of your product. You might assign a small group to create wireframes directly in Miro or another prototyping tool. If you need the design quickly, you might also consider using rapid prototyping.
After the workshop, send out a clear outline of the next steps, as well as who is responsible for each action item. Design thinking workshops can be exhausting and require a lot of creative energy, so providing a summary of the workshop (and who’s accountable for what) can make life easier for your team.
12. Gather feedback and iterate
Now it’s time to put your prototype to the test! For best results, make sure your test subjects match the audience you empathized with in the beginning. Try Welcome Max’s User Feedback Workshop template, Syncier’s Usability Testing template, or Laura Yarrow’s User Research Observation template in Miroverse to collect and organize your team’s observations.
Finally, schedule a follow-up group session to go over the results and decide where you can iterate and improve. Keep prototyping and testing until you create the most viable and valuable solution possible.
Gather valuable user feedback with Laura Yarrow’s User Research Observation template in Miroverse
FAQs about design thinking workshops
Have you still got some questions about design thinking workshops? You’re in luck. We’ve collected some of the most frequently asked questions about design thinking workshops right here.
Where did design thinking come from?
Design thinking was introduced in the ’50s by John E. Arnold. It became popularized in the ’80s by the design and consulting firm IDEO, and it transformed the design industry. In the last 15 years, design thinking has been used across many industries and by big brands such as Dell, BCG, IBM, Airbnb, and Google.
What is a design in design thinking?
Creating a design is a creative process, right? Well, that’s where the ‘design’ element comes into it. There doesn’t have to be an actual ‘design’. It’s just the name of the process, which focuses on creative problem-solving.
What can I expect from a design thinking workshop?
A design thinking workshop is both engaging and challenging. It involves group participation throughout the process, giving everyone a chance to contribute their ideas and make suggestions. By the end of the workshop, you’ll have a user-centered solution.
How do you facilitate a design thinking workshop?
You can follow the 12 steps we outlined above to facilitate a successful design thinking workshop. It also helps to have a central location to store all your notes, ideas, and suggestions throughout the workshop. Miro, for example, is an incredibly useful online tool when it comes to collaboration and sharing information. We’ll help you facilitate the workshop, share information with colleagues, and store all the workshopping information in one location.
A design thinking session requires a lot of preparation and engagement from the participants, but it pays off! Miro has a huge variety of features to help make your workshop successful. Learn more expert tips for facilitators on our blog or take a course at Miro Academy.
If you’re ready to bring your design thinking workshop to life, take a look at our design thinking templates. They’re all customizable, so you can create the perfect board for your design thinking workshop.
You’ve got this!
Juan Real, Product Design Lead at Miro