
Mia Pendergast is a product manager at The Home Depot. During the Miro AI Build Sprint, she built a three-step Flow that turns sticky-note feedback into a clickable prototype, and two-week design reviews into a single meeting. Here’s how she built it, and a template you can try.
As a PM at The Home Depot, I know that design reviews can drag on for weeks. Every handoff — from the review room to the designer, from the designer to engineering, from engineering back to real users — takes time. And in that time, context gets lost while feedback gets filtered, paraphrased, or simply forgotten.
I’d been chewing on this loop for a while when Miro invited me to join a small group of builders to create something with Miro’s AI features in one week. I had a hypothesis that the whole thing — feedback to decision to rapid prototypes to handoff — could live on one Miro board and end in a single meeting, with groomed stories ready for engineering. This was my chance to test it.
From vibe coding to scalable workflow
I needed a sandbox, and I already had one. Outside of work, I’ve been vibecoding a math tutoring app for my nephew. It’s a solo project: No team, no Figma seat, no design system. Just me, Claude Code, and a Miro board where I drop screenshots and scribble notes about what to change next.
That side project has the same loop as my day job, except instead of costing my team two weeks, it was costing me tokens. Every time I prompted Claude Code with a change I ended up not keeping, that was money I’d rather have spent on a feature my nephew would actually use.
So the goals were sharp: Gather the feedback, decide what to implement, see it rendered as a clickable prototype, all before opening Claude Code. If it worked for me solo, it should also work for my team. Same loop, just more people around the board.
Setup took about six hours across a few iterations. Now I can run the whole thing in minutes, using two Miro AI features: Flows and Prototypes.
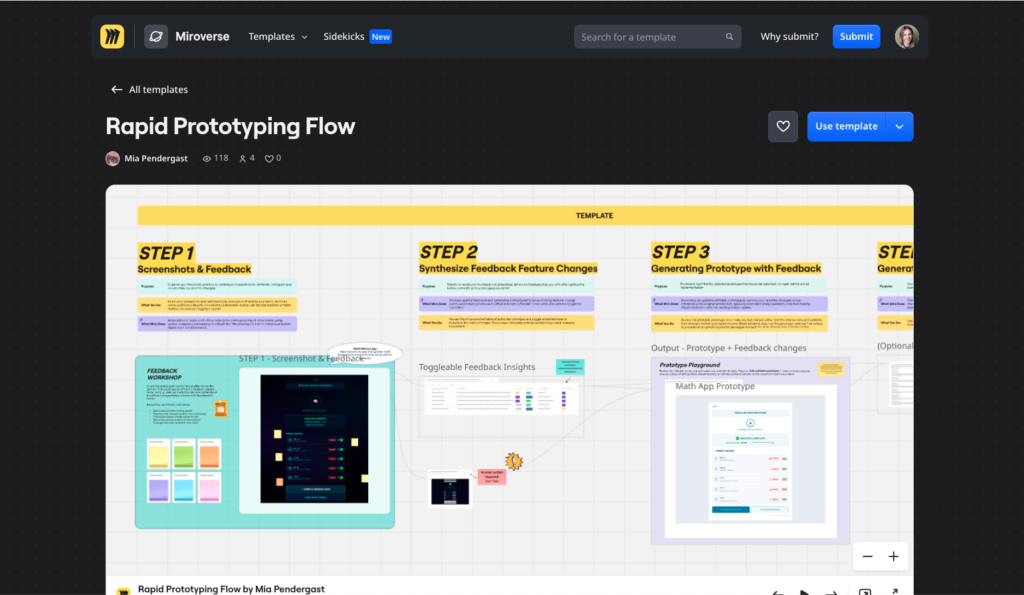
The process: Three steps, one board
The Flow has three steps. Each does one thing well and makes the next step possible.
Step 1 — Start with the raw feedback
Drop your prototype into the board or create it in Miro, then sticky-note all over it. Anything goes. The goal is to capture the range of feedback you’d actually get in the wild. For instance:
- Straightforward edits: “Remove this button”
- Net-new requests: “Add a progress bar across the top”
- Vague notes: “This feels cramped”
The first time I ran it, I was surprised by its spatial reasoning. The AI excelled at picking out which specific UI component each sticky was pointing at, and then it kept that association all the way through the Flow. That’s the context I expected to lose between steps. By the time the prototype rendered, every change was already anchored to the right part of the screen.
Step 2 — Add human review before anything gets built
The Flow then pulls every sticky into a Table. Each row is a piece of feedback, with a toggle column for implement/don’t implement.
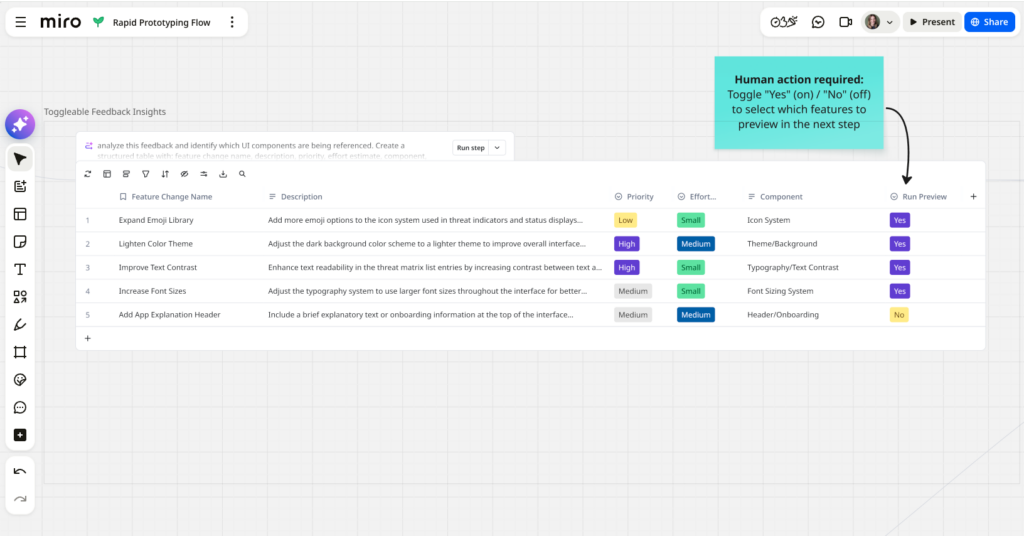
This is the step I care about most. It’s the moment a human decides what’s actually worth building. Not every sticky deserves a code change — some are duplicates, some contradict each other, and others are great ideas for v2. The feedback on/off toggle allows the owner to control the outcome and rapidly produce variations of prototypes based on different sets of criteria.
An AI workflow that goes straight from sticky notes to code is just a faster way to build the wrong thing.
MIA PENDERGAST
This is also the step that makes the Flow work as a team activity. In a design review, the table is what the room is looking at when it decides together what to implement.
Step 3 — Render the prototype before you write the code
This step takes the toggled-on rows and renders a clickable Prototype of the screen with the selected feedback applied. The toggled-off items aren’t factored into the new prototype.
Then a second sub-step generates a list of ready-to-work backlog items. For my solo project, I just dropped the final screenshot into Claude Code, which already has my repo context, and let it make the changes. For a team, those backlog items go straight into Jira.
PMs, designers, and engineers finally in sync
I was halfway through wiring up Step 2 when it actually clicked: This isn’t just a personal workflow hack, it’s the answer to my handoff problem. To every PM’s handoff problem.
Picture that room I described earlier, losing design context with every handoff. Now imagine, instead of going from review to designer, designer to engineering, and engineering back to users, everyone works on the board together. Stickies go up, the table populates, the project lead toggles accepted feedback on, the prototype renders, and the backlog appears. What used to take two weeks ends in one meeting, with groomed stories on the way to Jira.
I haven’t run it this way with my team just yet, but I’ve mapped where it fits, and the shape of the board doesn’t change. Solo or team, it’s the same three steps.
A few things to know before you try it
Here are some things I ran into during my build. Knowing these in advance can help you get the most out of this framework, and others you might build with Flows.
- One screenshot at a time. Multi-screen flows mean running this once per screen, but multi-screenshot support is coming soon.
- A manual sub-step before render. You have to generate an editable copy of the screenshot before the prototype renders because the AI can’t mirror the screen and apply the feedback in one shot. If you’re new to AI workflows, this is the spot where you might get stuck like me. Breaking the request into smaller steps is the key.
- Feedback quality matters. Poor stickies, poor prototype. The clearer the feedback, the better the render.
And one bigger thing worth flagging: This isn’t a do-everything flow. I think of it as a building block — one specific step in the product development lifecycle, done well and repeatably. A lot of the AI workflows getting championed online try to compress the whole lifecycle into a single flow. This one doesn’t. It purposefully completes one slice, and it makes the work on either side of it easier.
The framework for your next design review
Whether you’re shipping a solo side project or running a design review with your team, the steps are the same.
- Start raw. Drop the screenshot into Miro and let people add a sticky note wherever they want. Specific, vague, contradictory, all of it. The Flow handles the mess.
- Decide in the table. Use Flows to pull every sticky into the table, then toggle each row on or off. This is the design review meeting. The place where the team decides, in one sitting, what’s worth building.
- Render before you code. Use Prototype to render the selected changes as a clickable preview, and let Flows generate the backlog items. Hand the prototype and the stories to your developer (or your AI coding tool of choice).
Try it yourself with my template
I turned the Flow into a Miroverse template with instructions built in, so you can run it solo or adapt it for a team design review.
I’d love to hear from you. What worked? What broke? Are you finding this more useful solo or with your team? Find me on LinkedIn and let me know.
Mia Pendergast is a Product Manager at The Home Depot and a participant in the Miro AI Build Sprint.