Today we are happy to introduce a new tool – UX Project Canvas, created by Jim Kalbach, Principal User Experience Designer at Citrix, an author of Designing Web Navigation (O’Reilly, 2007). Jim shared the tool and we were happy to create a new project management template on its basis and include the Project Canvas Template in our Interactive Library.
This is a guest post written by Jim Kalbach. It’ll help you to learn more about UX Project Canvas and start using it. UX Project Canvas template is one of two Project Canvas templates. You can read more about the second template by Simon Stubben here.
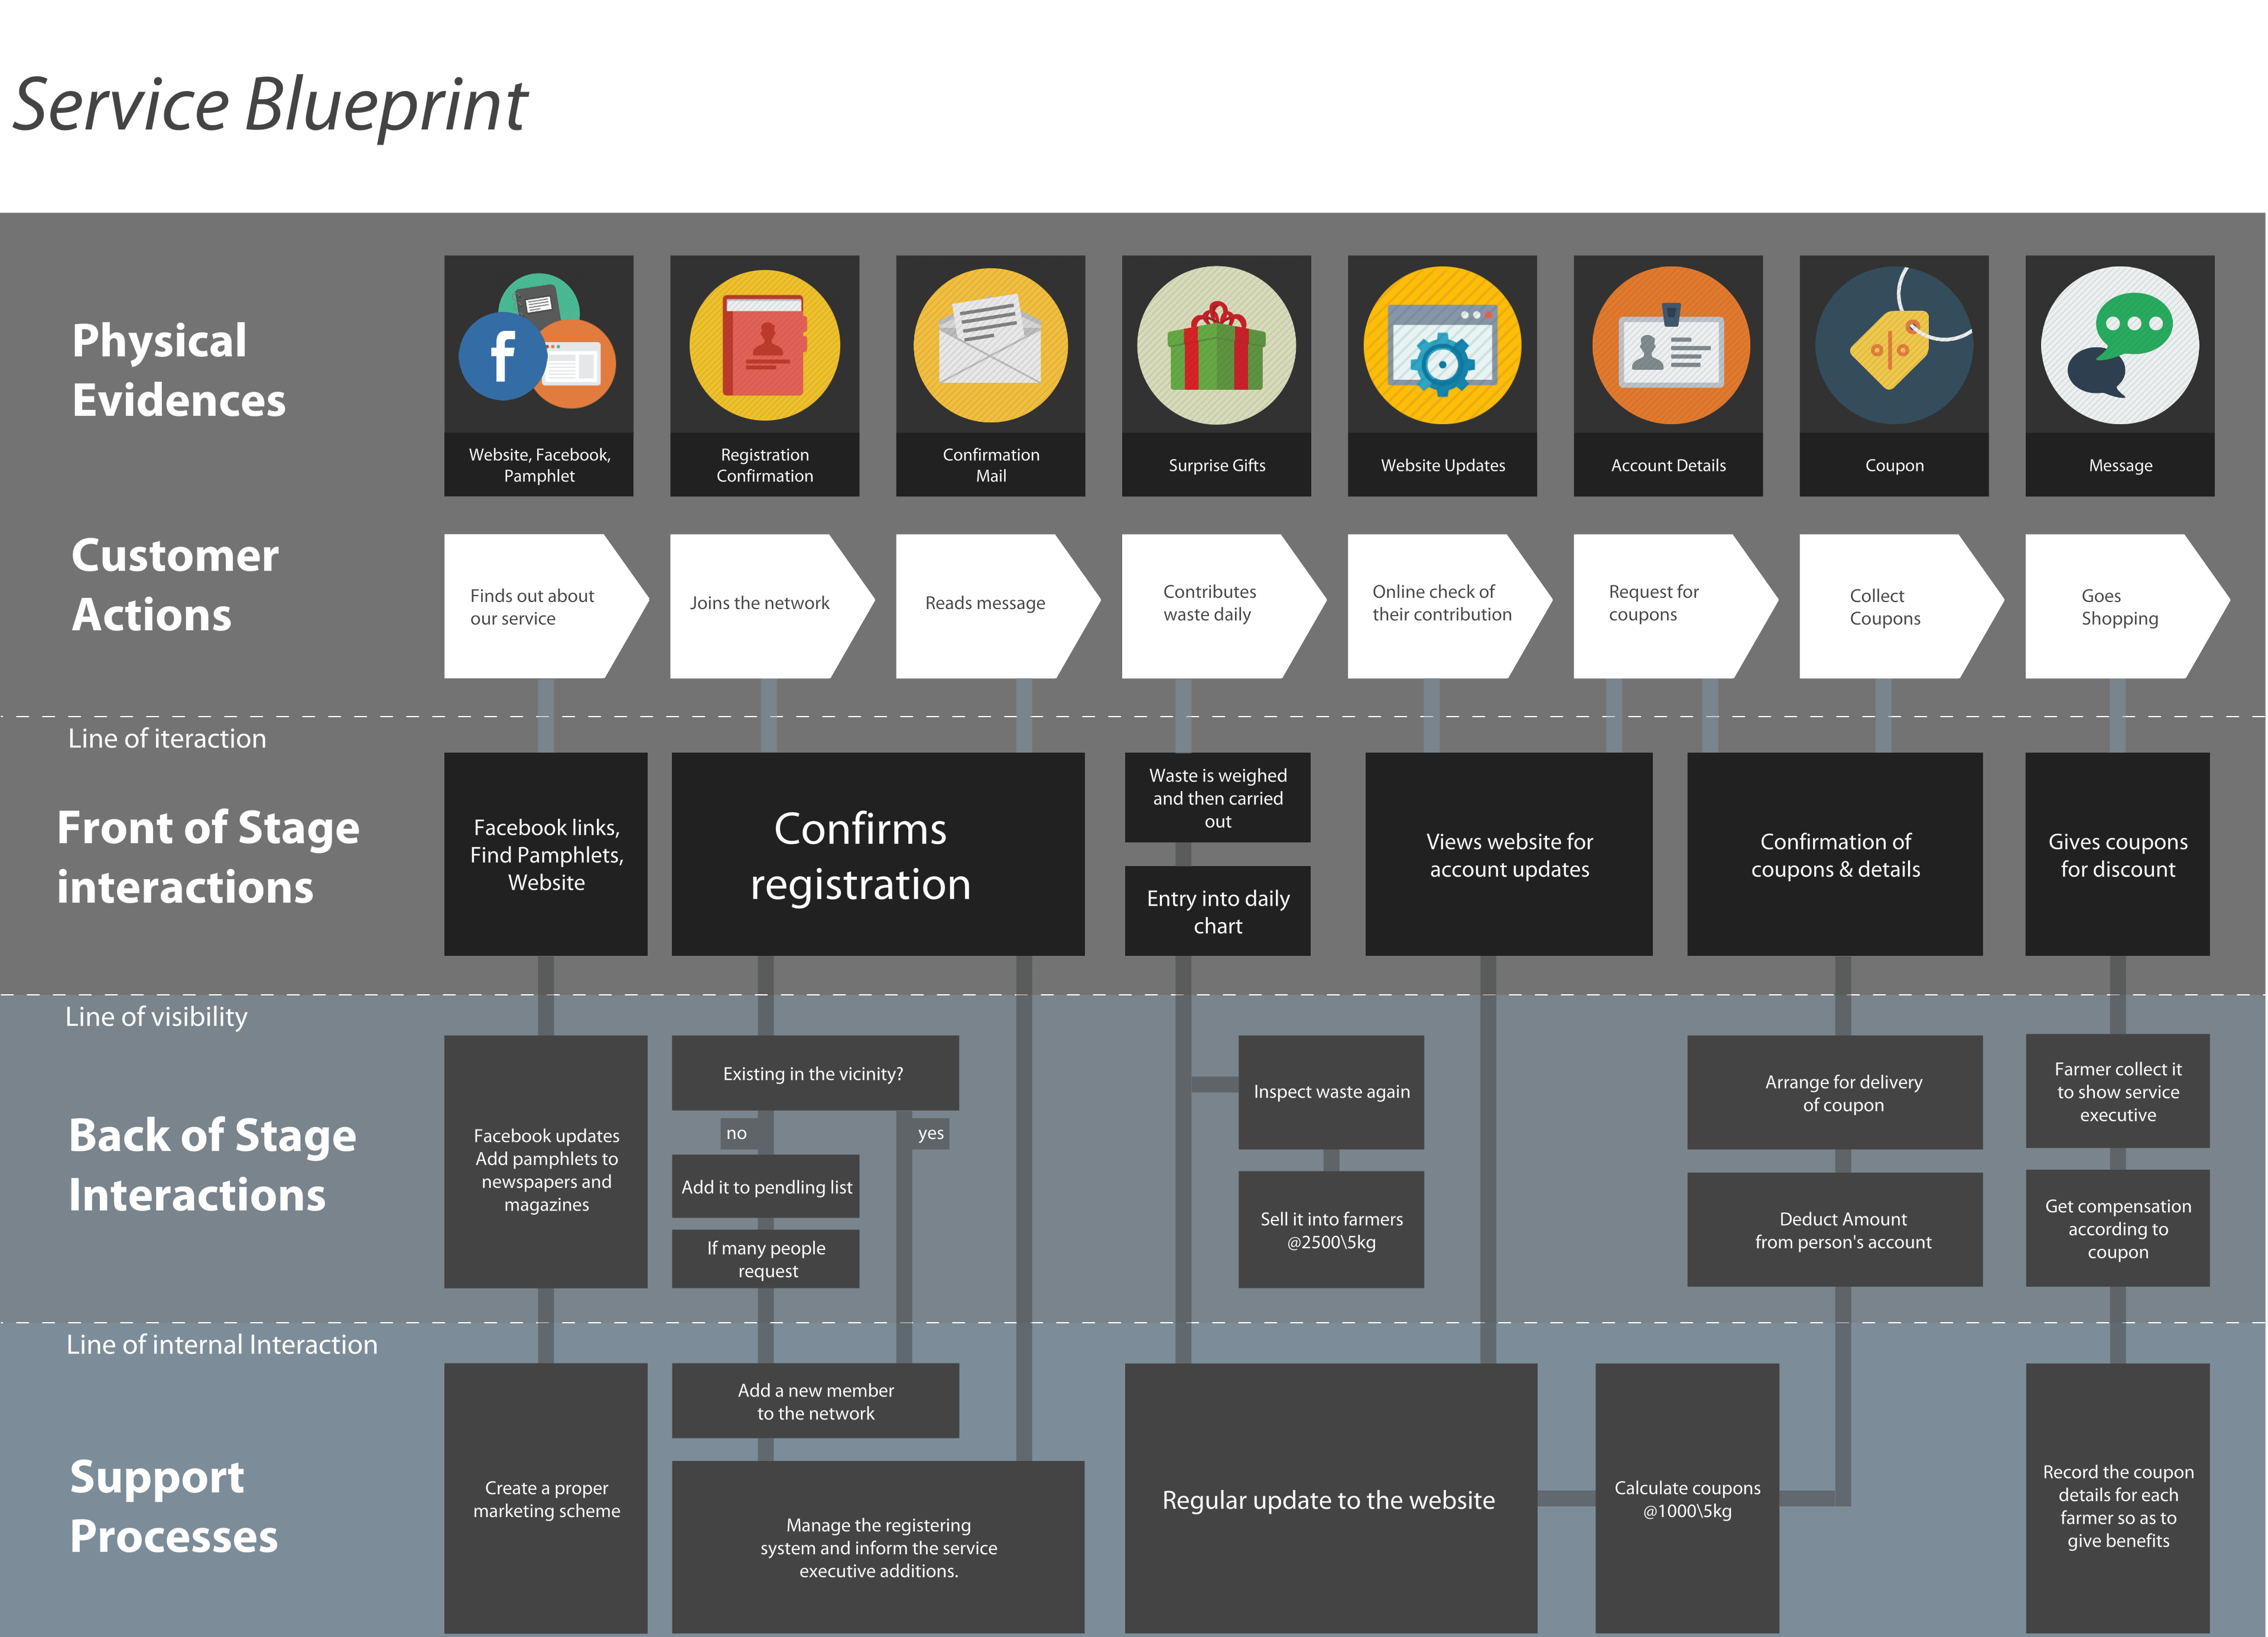
UX project canvas intends to make an otherwise dry and boring topic – defining a project – lively and engaging. It does so by visualizing the key elements that define a project in a single grid.
With this, teams can collectively contribute to the project canvas in an interactive way. And once completed, the project canvas allows you to see relationships between the elements in a single overview.
Miro is the perfect tool to digitize the information on the project canvas, without losing any of the interactivity and visualization. Whether face-to-face in a kickoff workshop or initiating a project with remote team members, using the project canvas with Miro will change the way you start efforts.
Defining a project in its earliest stages is like hitting a golf ball: if the face of your club is slightly tilted , you’ll end up slicing the ball as it travels down the green. Likewise, small miscalculations at the beginning of projects can have massive consequences later on.
Part of the problem is that the logic of a project definition is invisible. You can’t “see“ project goals or risks, for instance. Sure, you can write them down as text. But long documents – if they get read at all – tend to get lost in the shuffle as the project unfolds. What’s more, a written description of project elements doesn’t expose relationships between them. The big picture can fade quickly as work and deadlines pile up.
Here is a tool to help you get a quick, but broad definition of a project in a single overview. It’s called the Project Canvas. And here you can start using a business model canvas template.
This approach is directly inspired by Alexander Osterwalder’s Business Model Canvas. Like project definitions, business models also have an invisible logic. To expose relationships between the elements of a business model, Osterwalder developed a canvas to visualize its 9 most-important dimensions.
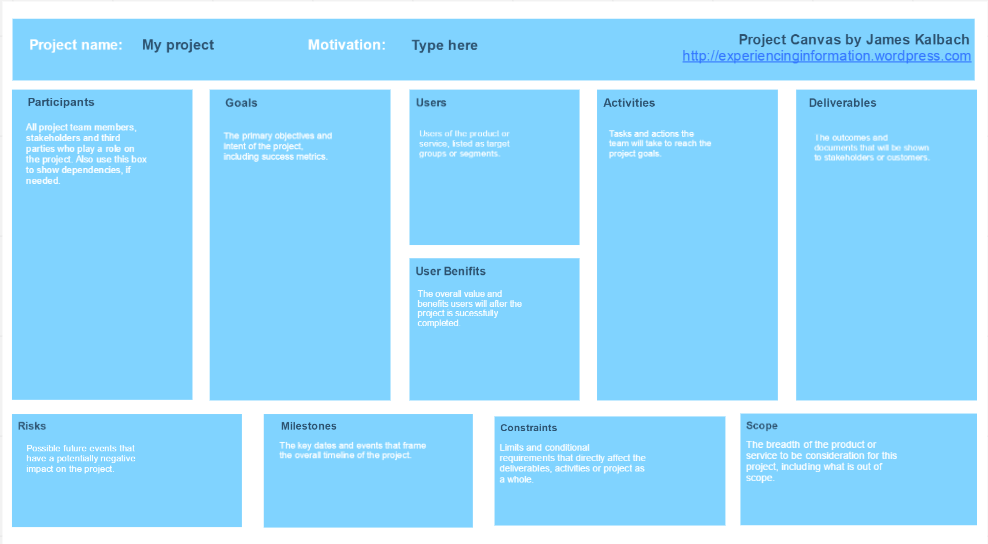
In UX Project Canvas, I’ve focused on 10 aspects of projects most relevant to design-related projects. Each is explained briefly below. For the sake of keeping the canvas simple, I’ve not included all project-defining aspects, like “assumptions” and “critical success factors.” Budgeting and resource concerns are also steps that come later and are not included here.
Elements of the UX Project Canvas
First, there is a group of elements that make up the start and end of the project, located at the top and bottom of the canvas:
- Project – Name the project in the upper left.
- Motivation – Describe the overall intent of the project and what caused the sponsors to decide to initiate the project. Here’s an example: “metrics show that conversion rates are slipping, and an analysis of the problem identified that the check-out process is too long for many shoppers. This project seeks to optimize the check-out process to increase conversion.”
- Project End – At the bottom of the Project Canvas is a place to indicate when the project is over. It may be a launch date or it may be a decision by stakeholders to accept the outcome (such as with agile processes).
The detailed elements of the UX Project Canvas are the 10 boxes in the center:
- Users – I believe users stand at the center of attention in every project. Accordingly, I’ve put “Users” in the center of the canvas. At a minimum, list here the main target groups relevant to the project. This can be at a high level, such as “readers” and “advertisers” for a media portal. You may want to be even more granular in detail. For instance, you can list personas you’ve developed here, as well.
- User Benefits – List the concrete benefits that users will have when the project is successfully completed. What will they gain from it? This can include things like “faster check-out times” or “more control over their own content” and so forth.
- Goals – To the left of users is a region for project goals. You can also map success metrics to each goal in this box. Include subheaders in this box to distinguish different types of information. Note that for many design projects and UX projects the project itself is actually part of a larger program or has a parent project. Be concious of this as you identify goals. Focus on the project goals first. Keep the program goals in a separate list if you don’t want to lose them.
- Participants – On the far left is a list of project participants. This should include all people involved in the project in some way. Distinguish roles at high level with three separate lists: 1. core team, 2. stakeholders and 3. interested parties.” Include individual names as much as possible. Optional: in the lower half of this box you can show dependencies. For instance, if prototypers are depended on getting content from a client, that should be made explicit.
- Activities – To the right of “Users” is a list of key activities. These are the methods and approaches you’ll be employing on the project. Examples include “User research,” “Persona development,” “Concept design,” “Wireframing,” “Creation of detailed mock-ups” and “User testing,” to name just a few design-related activities.
- Deliverables – List the documents that will be delivered. This doesn’t need to include internal working documents, like spreadsheets and analysis documents. It should only include things stakeholders or other teams will see, as well as assets that appear in a product or service that customers may see.
- Risks – This is a list of potential future events that can have a negative impact on the project. For instance, recruiting users for testing may be a risk for target groups that are difficult to get to: in this case the impact would be slippage in testing timelines or a reduced sample size. You can also list how you might mitigate known risks here.
- Milestones – List the key dates and events that frame the overall timeline of the project. This doesn’t need to be a detailed project plan. It should include things like “workshop with senior management,” “user testing sessions” and a launch date.
- Constraints – Time and money are always constraints, and you need not list them here. Resources are also a typical constraint, so only list exceptional resource constraints. The focus should be on overarching limitations on work products and processes. For design, this may be something like: “the designs must comply with the CI guidelines.” Include technology and platform constraints here as well. For instance, if a website needs to work on an iPad and smartphone, you’ll want to know about it from the very beginning.
- Scope – Finally, define the scope of the project. List the features and functions that are in consideration on the project. Also list what is NOT in scope here, if known. Information in this box is helpful in fighting scope creep later on in the project.
UX Project Canvas is a great tool to define the project. Using it with your team will help you to see the big picture of a project, visualize it and collaborate effectively.
UX Project Canvas template is one of two Project Canvas templates. You can read more about the second template by Simon Stubben here.