Table of contents
Table of contents
How to create a flowchart for decision-making
Summary
In this guide, you will learn:
- Stages of decision-making: problem ID, info gathering, option evaluation, decision, implementation.
- How decision flowcharts visually map choices and outcomes.
- Benefits of Miro for creating, customizing, and collaborating on flowcharts.
- How to use yes-no flowchart templates for binary decisions.
- Basics of decision tree diagrams: symbols, structuring points and branches.
- Tips for enriching, sharing, and updating flowcharts collaboratively.
Collaborative AI Workflows
Join thousands of teams using Miro to build the right thing, faster.
Your guide to making a flowchart for decision-making
When it comes to making decisions, especially in product design, there's nothing more clarifying than a flowchart. You could be deciding between features to implement, mapping user journeys, or even setting up an onboarding process for new team members. The beauty of a flowchart is that it transforms abstract thoughts into something tangible—something you can literally see and move around.
Why you need a flowchart
Why not just write everything down in a document or talk it through in a meeting? Well, flowcharts let you visualize the pathways and choices involved in a decision. You can see the whole landscape and identify roadblocks before they become real problems. Think of it as a roadmap but for your thought process. With a decision flowchart, everyone on your team is on the same page, and there's less room for misunderstandings. Plus, it's easier to share and iterate on a flowchart than on a long text block.
What's a decision-making flowchart anyway?
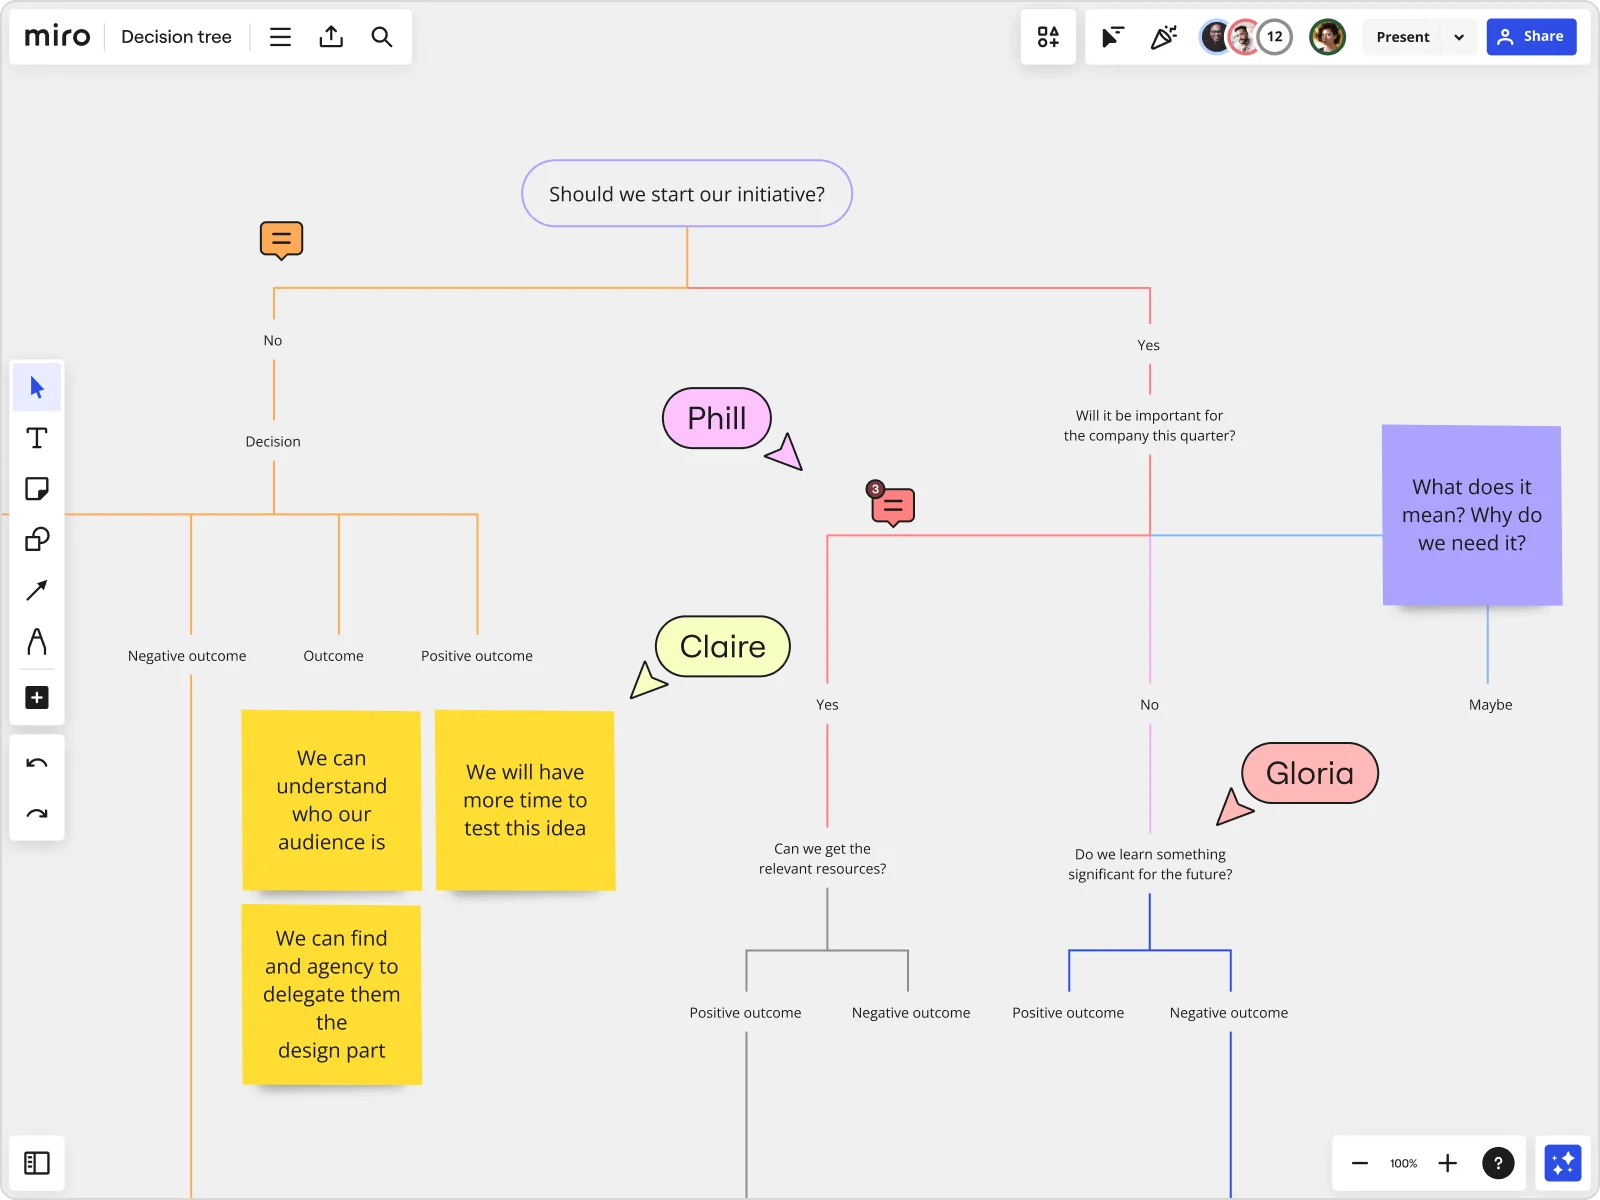
A decision flowchart is a visual tool that helps you map out a series of decisions, guiding you through different pathways based on specific choices or outcomes. It typically starts with a single question or problem, followed by branching options that lead to various conclusions. By breaking down complex decisions into smaller, more manageable steps, flowcharts make it easier to visualize and understand the potential outcomes of each choice.
The beauty of a decision flowchart lies in its simplicity. Whether you're navigating a business strategy, deciding between multiple product options, or figuring out the best course of action for a project, a well-structured flowchart helps ensure you consider all possibilities. Each decision point is represented by a shape or symbol, which can be connected by arrows to show the logical progression from one step to the next. This not only makes it easier to follow but also provides a clear, visual way to think through each option.
Components of a solid decision flowchart
Let's get down to the nuts and bolts. A typical flowchart includes a few basic elements:
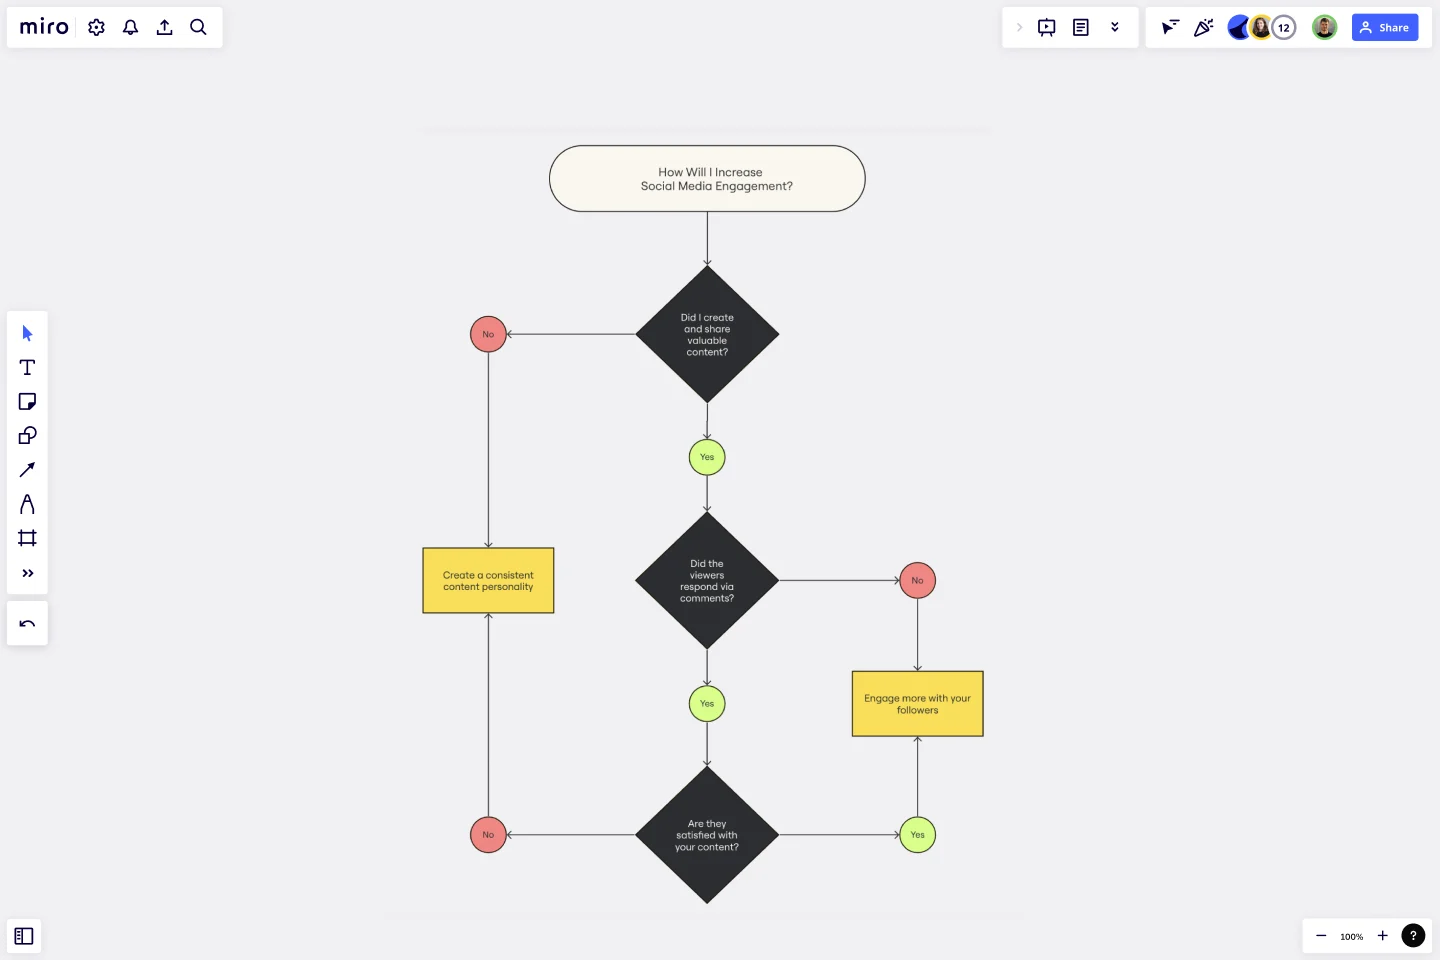
Start/End Symbols: Usually an oval or a rounded rectangle, these mark the beginning and end of the flowchart. They set the boundaries for your process.
Decision Diamonds: These are where you make choices. If there's a question with a "yes" or "no" answer, that's a diamond. It helps to keep the questions simple and clear.
Process Boxes: These are your standard rectangles where actions happen. This is the "do this, then that" part of your flowchart.
Arrows: These show the flow or direction of your process. They connect everything and tell you which way to go.
If you're making a flowchart for decision-making, start by outlining the key choices you need to make and then build around them. Make sure each step or decision is clear, and consider using labels or colors to differentiate between different types of actions or decisions. A little color-coding can make a complex flowchart a lot easier to read.
Tips for designing an effective flowchart
Here are a few tips to ensure your flowchart works well:
Keep it simple: Don't overcomplicate things. If a flowchart gets too crowded, it defeats the purpose. Stick to the essential elements and trim the excess.
Use consistent symbols: Make sure you're using the same symbols for the same purposes throughout the flowchart. It helps avoid confusion.
Leave room for changes: You don't want to redraw everything if you need to adjust. Make sure your flowchart is flexible enough to accommodate changes as your project evolves.
Add notes or comments: Sometimes, a flowchart isn't enough. Add notes or comments to give more context or explain why certain decisions were made. It’s like adding a little commentary to your process.
Test it out: Once your flowchart is complete, test it with your team. Walk through the process and see if it makes sense. If there are questions or unclear sections, refine them before moving forward.
How to make a flowchart for decision-making
Making a flowchart isn't rocket science, but it does require some thought and a solid plan. Here's a step-by-step guide to creating a flowchart for decision-making:
1. Define the decision
Start with the decision you're trying to make. It could be as simple as "Should we launch this feature?" or as complex as "What's the best way to redesign our onboarding process?" Write down the decision in clear terms—this is the anchor for your flowchart.
2. List the key steps
Think about the steps that lead to your decision. These might be actions, questions, or checkpoints. List them in order, but don't worry about perfection at this stage. You can refine as you go.
3. Identify decision points
For each step, consider whether there's a decision to be made. If there is, mark it with a diamond symbol. For example, if you're deciding whether to add a new feature, a decision point might be, "Does this feature add value to our users?"
4. Connect the dots
Use arrows to connect the steps and decision points in the order they occur. This is where your flowchart starts to take shape. If you notice any gaps or loops, this is the time to fix them. Make sure the flowchart follows a logical progression.
5. Add details and labels
Once the basic structure is in place, add details to clarify each step or decision point. This could include notes, comments, or color-coding to distinguish different types of actions. Labels help others understand the flowchart without needing a full explanation.
6. Review and refine
When the flowchart is complete, review it with your team. Make sure everyone understands the flow and that there are no ambiguities. This is your chance to catch errors and make adjustments. Once satisfied, you can share it with stakeholders or use it as a guide for your project.
How the decision-making process works
Decision-making is all about choosing the best course of action from several alternatives. It's important because it affects the direction and success of your product design efforts. The process usually involves several stages:
Problem identification: Recognize there's a decision to be made. This could be a problem to solve or an opportunity to seize.
Gather information: Collect relevant data and insights to inform your decision.
Evaluate options: Consider the pros and cons of each possible action. This is where your flowchart really comes into play, helping you visualize the different paths.
Make the decision: Choose the best option based on the information available and your team's goals.
Implement and monitor: Put your decision into action and keep an eye on the results to ensure it's the right choice.
Flowcharts are valuable because they visually represent this process, helping you and your team navigate complex decisions with confidence and clarity.
The Miro advantage
Creating a flowchart should be as straightforward as the flowchart itself. That's where Miro comes in. It's the leading tool for creating diagrams and flowcharts, offering a user-friendly platform with endless possibilities. You can start from scratch or use one of Miro's flowchart templates to jumpstart your design. Collaboration is a breeze—invite your team, work together in real time, and watch as your ideas take shape.
With Miro, it's not just about drawing shapes and lines; it's about bringing your product vision to life. You can link to other documents, add comments, and even integrate with other tools you use daily. Need to share your flowchart with stakeholders? No problem. Miro makes it easy to share and present your work. When it comes to visualizing your decisions and keeping everyone on the same page, Miro is the tool that makes it happen. Good luck!
Author: Miro Team
Last update: October 10, 2025