
Table of contents
Table of contents
Customer journey map explained: Everything you need to know
Page Summary
In this guide, you will learn:
- What customer journey mapping is and why it’s essential for understanding real customer experiences
- How to spot common pain points like siloed teams, unclear CX ownership, and inconsistent experiences
- The key benefits of journey mapping, from better collaboration to long-term retention
- The five stages of the customer journey and the touchpoints that shape them
- The difference between customer journey maps and user story maps
Without a customer journey map, businesses make decisions based on assumptions rather than real customer experiences, leading to friction, misalignment, and missed opportunities.
From siloed internal teams and an inability to measure CX efforts to low customer retention and an inconsistent customer experience, all of these factors make it difficult to see the end-to-end customer experience.
A customer journey map can solve these problems, offering a vivid, empathy-driven view into how customers think, feel, and act through their entire experience with your brand.
What is customer journey mapping?
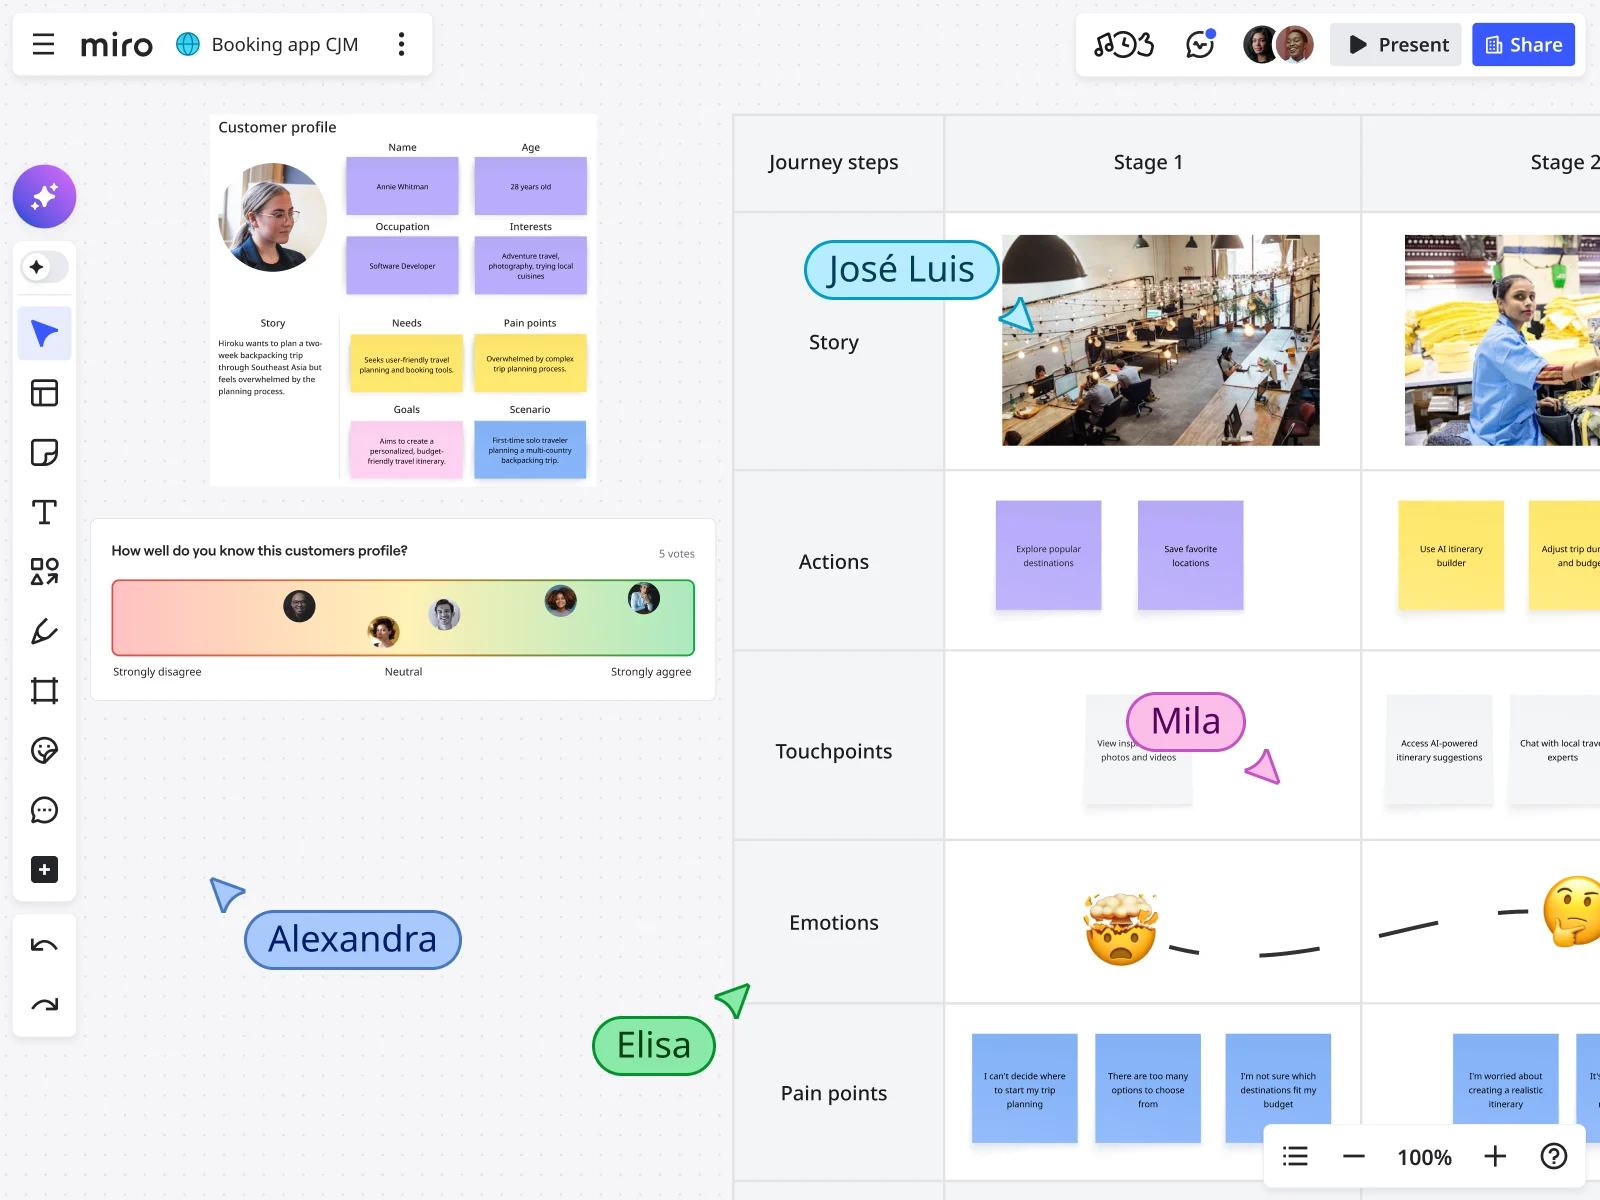
A customer journey map (or CJM) is a visual representation of the process your customers go through when interacting with your company. This diagram takes you through the exact steps that lead to a customer choosing your specific product and buying it from your business.
Creating a customer journey map provides you with a visual storyline of how a buyer or a customer persona engages with your business at every touchpoint. From seeing your brand on social media to going into the store to buy the product — the customer journey documents the entire story. Enhance customer experiences with Miro's Journey Mapping tools for clear visualization.
Collaborative AI Workflows
Enhance customer experiences with Miro's Journey Mapping tools for clear visualization.
Customer journey maps are especially useful when they chart the experience of a single persona. By taking one specific customer persona, such as a small business owner or a single mother, the journey map can be detailed and specific. This provides you with data and information about how to target specific customers.
If you include too many personas on one customer journey map, you risk your diagram becoming too generic, and you may overlook new opportunities. You’ll likely need multiple customer journey maps to accurately depict the many personas of your target audience. But of course, you’ll need to define those personas first.
Miro has a user persona template that can help you represent your target audience and better understand how to satisfy their needs with your product.
Why is customer journey mapping important?
Ever wondered what makes a customer buy a specific product from a certain company? The answer often lies in the journey the customer takes, above all else.
Here’s why mapping the customer journey is so important for every business, no matter how big or small.
Makes complex customer journeys easy to understand
Customer journeys often span multiple touchpoints, teams, and channels, making them difficult to explain with words alone. Like other diagrams and concept maps, turning a complex process like a customer journey into a visual representation brings clarity and shared understanding for everyone.
Most customer journey touchpoints are mapped on a timeline, creating a chronological understanding of the needs and wants of the customer at each stage of the process.
Having a tool that makes it easier for your teams to understand these complex journeys is crucial. For example, marketing, sales, customer service, and technical support may all need to be involved in creating the ideal user experience.
Everyone from each of these departments needs to be clear on how the journey works, where the handoffs are, and how to maximize the experience. By having one diagram act as a point of reference, different departments can ensure they are on the same page and can make informed, collaborative decisions.
Puts you in the customer’s shoes
An effective customer journey map helps you learn both customer behavior and how they interact with your product. It also helps you understand your customers on an emotional level, acknowledging what causes them frustration, happiness, and excitement.
By putting yourself in a customer’s shoes, you can follow their entire journey from brand awareness to advocacy. This allows you to gain deeper insights into the customer’s pain points and what compelled them to choose your company’s product.
Based on this analysis, you can tailor your business processes to attract similar personas and increase conversions.
Creates a clearer understanding of customer expectations
Customer journey mapping is a strategic approach, allowing your company to understand customer expectations and what attracts certain personas to buy your product. By taking the time to understand the customer’s journey, you can understand what they expect from their experience with your business and product.
This deeper understanding of what they need from your business allows you to proactively support them. It may also identify opportunities for upselling and cross-selling.
Contributes to long-term customer retention
Striving to understand what the customer needs and following their journey allows you to optimize their experience with your company. This will make your customer feel heard and appreciated, and, as a result, brand loyalty among your customer base will increase.
In turn, this will lead to high customer retention. It may also lead to an increase in purchase frequency, benefiting your company in the long term.
What are the benefits of customer journey mapping?
Many great tools can help you understand the customer journey. Why should you care about the customer journey map? Here are a few reasons why CJMs should be an essential part of your business toolkit.
Build better experiences
Customer journey mapping gives you a big-picture experience of your customer’s interaction with your brand. Think of a CJM as a map of a physical location like a city or a town.
Once you have a map spread out in front of you, it’s easier to understand where you might run into roadblocks. It helps you plan ahead and make adjustments to help customers overcome those obstacles.
With all phases of the customer journey visualized, you can see where you’re not meeting their expectations. Armed with that knowledge, you can build a customer experience that’s seamless and satisfying.
That translates into improved products and processes, more sales, faster sales cycles, and greater customer retention.
Enable customer success
For your business to succeed, your customer must also succeed. Customer journey mapping helps you see what is and isn’t working for your customer so you can set them up for success.
A stylized picture of your customer’s journey can empower you to create, monitor, adjust, and enhance touch points.
Work better as a team
Even if your objectives are different, everyone in your organization is working toward the same goal: satisfying your customers. But it’s easy to lose focus.
- Engineering teams are busy coding
- Marketing teams are writing ad copy
- Sales teams are trying to sell to their prospects
How do you all stay aligned?
Customer journey mapping is powerful because it keeps everyone focused on the customer. By creating a CJM, you can gain deep insight into what your customers want and need.
For the marketing team, that means building better campaigns. For the sales team, that means deeper engagement with customers and prospects. For engineering, that means a holistic understanding of what programs are meant to achieve.
Customer journey mapping makes it easy to equip every team member with a sophisticated understanding of your customers.
Set yourself apart from the competition
A recent report shows that 90% of organizations using customer journey mapping saw a decrease in churn and customer complaints. Customers and prospects respond positively when they feel like a brand understands their desires and pain points.
The data is clear: customer journey mapping can set you apart from your competition.
5 customer journey stages
The customer journey map can be split into five important stages, as seen in our customer journey mapping template pack. Each customer will go through these stages as they interact with your company during their journey.
1. Awareness
Awareness is the moment when a buyer first becomes aware of your company, product, or brand. This can happen through a variety of mediums, from social media advertising to a word-of-mouth referral from another customer.
Your brand can increase awareness and attract more customers through marketing practices and brand advertising. Paying attention to how your target audience grows their awareness of your brand enables you to optimize your marketing approach, budget, and channel prioritization.
2. Consideration
After your customer has become aware of your brand, they move into the consideration stage. This is a stage of ideation when the customer considers whether they need the product or service your business is offering. They may also consider other companies that offer the same product.
This stage proves the importance of good advertising at the awareness stage. If your company markets itself well, the customer will likely consider your product even more closely at this stage.
3. Purchase/Decision
After the customer has considered all of their options, it’s time to decide on the product or service they are going to purchase. They may also be deciding whether they’re going to make a purchase at all.
Should they decide against buying, that will be the end of their personal customer journey. If that is the case, your company should focus on improving the awareness and consideration stages.
This could be working on customer service, trying out new advertising, or trialling personalized promotional techniques.
4. Retention
The customer journey doesn’t end once they’ve made a purchase. Every company wants a loyal base of customers who return time and time again. This makes it essential for your team to analyze what needs to be done to stop customers from leaving.
Fostering brand loyalty is a great way to improve your business’s general income. You can aim to retain customers by providing things like incentives, better customer support, and reminders about new products through digital marketing.
5. Advocacy
The last stage in the customer journey is advocacy — letting other people know about your brand or the service that you offer. Customers are more likely to advocate for your company if they are completely satisfied throughout each stage of the customer journey.
This shows the interconnectedness of every step and how the journey is a circular pattern, even if it focuses on different personas.
What are customer journey touchpoints?

Throughout the five customer journey stages, there are different customer touchpoints. These are the moments in the customer journey when the customer interacts or engages with the business. Let’s take a closer look at the three types of touchpoints.
1. Pre-purchase touchpoints
A pre-purchase touchpoint includes any time when the customer interacts with your business before making a purchase decision. They may happen at a variety of points in time.
- In the awareness and consideration stages
- When a customer that has already gone through the entire customer journey refers your business
- If a buyer comes into contact with your business by visiting your website, seeing a social media post about you, or hearing about your product from a friend.
This point of the customer journey is all about persuasion and explanation. You need to make sure that when the customer discovers your business for the first time, you demonstrate that you can fulfill their buying needs.
2. Purchase touchpoints
Purchase touchpoints take place during the decision/purchasing stage of the buyer’s journey, whether that’s in-store or online. You should optimize this stage to be as efficient and streamlined as possible so that the customer doesn’t change their mind during the purchase.
For example, having a slow website that isn’t mobile optimized or forcing the customer to jump through hoops with a sales assistant to make a purchase will affect the buying process. Optimizing this touchpoint is essential for retaining customers. A quick and easy purchase process could compel them to return in the future.
3. Post-purchase touchpoints
Post-purchase touchpoints include the journey’s advocacy and retention phases. The success of these touchpoints depends on how well-optimized the previous stages in the journey were.
If the entire journey up until this point was enjoyable for the customer, they are more likely to refer your product or service to their friends and family. Try to stay in regular contact with the customer to remind them about the journey and your company, as this will encourage them to return in the future.
What’s the difference between a customer journey map and a user story map?
Although customer journey maps and user story maps resemble each other, their functions are slightly different.
User stories are used to plan out features or functionalities, typically in an Agile model. In a user story, you describe a feature or functionality from user perspectives. That way, you can understand what the user wants to do and how that feature can help them accomplish it.
Use a customer problem statement template to help you craft these perspectives.
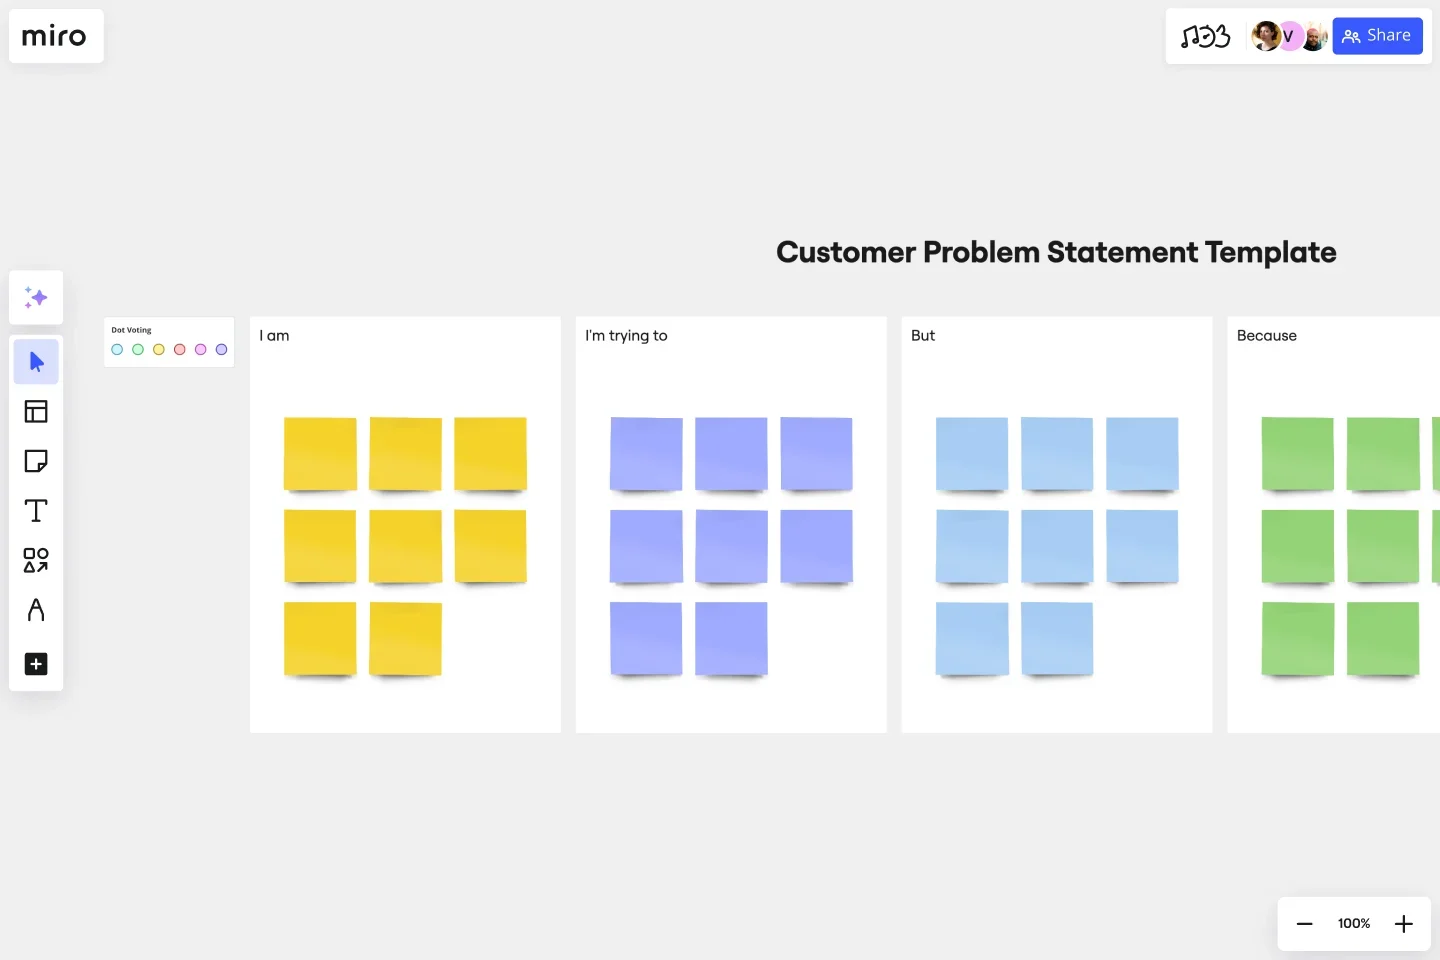
Typically, a user story takes this form: “As a [type of user], I want to [goal], so that [benefit].” For example, “As a UX designer, I want to sketch on an online whiteboard, so I don’t have to be in the same location as my collaborators.”
You can then visualize that user story with a user story map. For example, if you wanted to visualize the user story above, you would start by detailing the various steps the user will take when using that functionality. In this case:
- Sign up
- Sketch on the whiteboard
- Share with teammates
- See teammates sketch in real time
Then, you would document the features required to take each step. Once you’ve done that, you would write these features on sticky notes and rearrange them based on their corresponding functionalities.
In short, user story maps allow you to plan and implement changes to the customer journey. Customer journey maps allow you to discover and understand what those changes might look like.
How to create a customer journey map
Creating a great customer journey map can be challenging. You need to get into the mind of a specific customer persona and understand not only their needs but also the different ways in which they interact with your company.
See how Maureen, Product Designer at Miro, deep dives into understanding users' experiences, working hand in hand with them to sketch out their journey. All within the platform. She'll share the details of how she and her team brainstorm ideas to tackle insights they uncover, crafting a practical plan to move forward.
With Miro’s customer journey mapping tool, you can streamline the process of creating one of these maps for your specific needs. Or, if you'd rather not start from scratch, follow these 7 steps of the customer journey and use Miro’s customer journey map templates:
1. Setting clear goals
What it is: This initial step involves defining what you aim to achieve by mapping out the customer journey. Whether it's to enhance customer service, streamline the buying process, or increase customer retention, setting clear goals helps focus your mapping efforts.
How to do it: Begin with broad objectives, such as improving customer satisfaction, then break these down into more specific goals, like reducing response times in customer service interactions.
Pro tip: Use SMART criteria (Specific, Measurable, Achievable, Relevant, Time-bound) to frame your objectives. This will help you keep your goals precise and trackable, making it easier to measure success.
2. Collecting the right data

What it is: Data collection is gathering all relevant customer interaction data to paint a complete picture of the customer experience. This includes quantitative data from analytics tools and qualitative data from customer feedback.
How to do it: Start by identifying all sources of customer data within your organization. This might include web analytics, CRM systems, customer feedback forms, social media interactions, and sales data. Ensure that data is captured across different stages of the customer journey for a holistic view.
Pro tip: Engage directly with customers through surveys or interviews to gain insights not captured by analytics. This can provide deep dives into why customers behave a certain way or feel a particular emotion at different journey stages.
3. Creating detailed customer personas
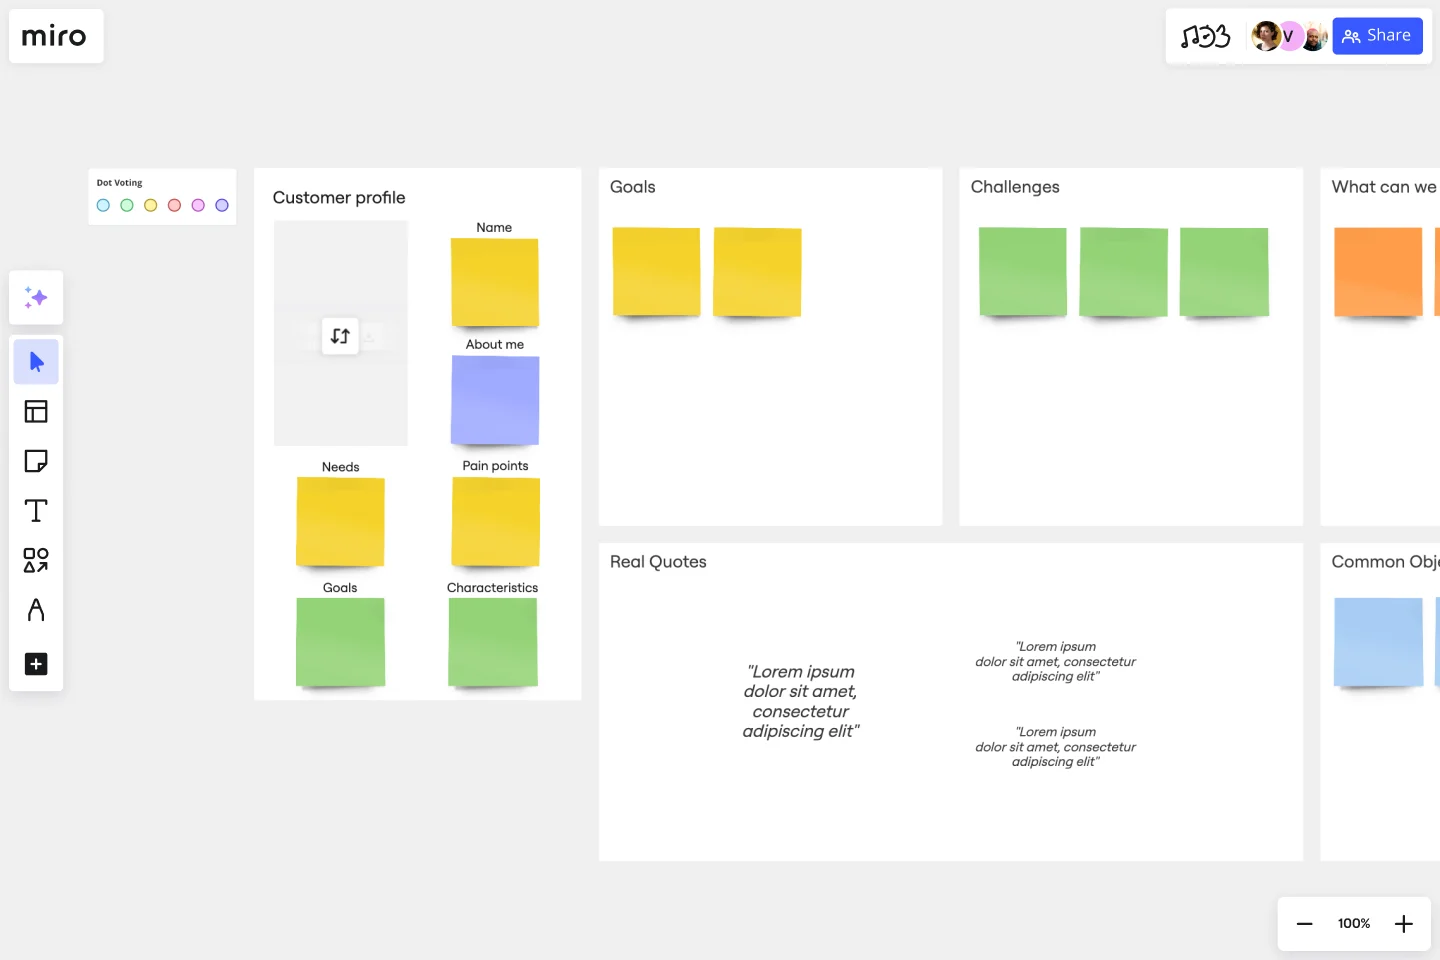
What it is: Customer personas are detailed representations of the different segments of your customer base. These personas help you understand various customer needs, behaviors, and decision-making processes.
It should include:
Demographics: Age, gender, occupation, location, income level, and education.
Psychographics: Interests, hobbies, values, attitudes, and lifestyle.
Behavioral traits: Buying patterns, brand interactions, and product usage.
Needs and pain points: What problems are your personas trying to solve? What obstacles do they face?
Motivations and goals: What drives your personas? What are their aspirations?
For example, a persona for a tech company might be 'Tech-Savvy Tim,' a 30-year-old software engineer who values cutting-edge technology and quick, reliable service.
Creating personas is essential to tailor the customer journey map to meet the unique requirements of different customer segments. Remember that personas represent your average or ideal customers and not actual people.
How to do it: Analyze your customer data to identify common characteristics and behaviors that segment your audience. Develop personas that reflect these segments, including demographic info, psychographics, goals, and pain points.
Pro tip: Make sure to consider the emotional journey of your personas. Understanding their feelings and motivations can provide crucial insights into how to improve their journey. Try our buyer persona template.
4. Identifying all touchpoints
What it is: Customer touchpoints are all the points of interaction between the customer and your brand, from initial awareness through post-purchase.
How to do it: List every possible interaction point, including digital interactions like website visits and social media engagement, as well as physical interactions like store visits or product usage.
Pro tip: Think outside the box by identifying passive touchpoints, such as seeing a friend use your product or recommendations from peers, which can also influence the customer journey.
5. Visualizing the journey
What it is: This step involves mapping out each touchpoint along the customer journey, creating a visual representation of the paths customers take.
How to do it: Organize the touchpoints chronologically for each persona, and plot them on a timeline. Include potential branches where customers might take different paths based on their decisions.
Pro tip: Use visual symbols or different colors to denote positive, neutral, or negative experiences at each touchpoint. This can help quickly identify areas that need attention.
6. Analyzing and identifying gaps
What it is: Here, you examine the journey map to spot where customers might experience problems or less-than-optimal interactions.
How to do it: Look for high drop-off rates, negative feedback points, or stages where the customer seems to stall or disengage. Identify both the obvious and subtle gaps in the journey.
Pro tip: Conduct root cause analysis to understand why gaps occur and consider both internal factors (like process inefficiencies) and external factors (like market changes).
7. Implementing improvements
What it is: This final step involves using the insights gained from your journey map to make targeted improvements to enhance the customer experience.
How to do it: Prioritize improvements based on their potential impact and feasibility. Implement changes incrementally to test their effectiveness and adjust as needed.
Pro tip: Use metrics to track the success of each change. Consider both direct metrics, like sales and conversion rates, and indirect metrics, like customer satisfaction and repeat business.
Extra tips for you to craft the customer journey map
Set clear objectives for the map
Before diving into the creation of your customer journey map, ask yourself why you need to know this information.
- Are you looking to optimize certain touchpoints?
- Are you looking to see why customer retention is low?
- Do you want to determine why customers decide against your product?
Figuring out why you’re building the customer journey map is essential to the success of the exercise.
Identify profiles and personas
You need to focus on a specific persona when examining the customer journey. It’s important to remember that the customer journey map should focus on one specific audience at a time.
This will help you figure out exactly who your target customer base is and gain an in-depth understanding of the buyer’s needs that your company is attempting to fulfill.
List the customer journey touchpoints
Next, you need to understand what happens each time the customer comes into contact with your company. These points in the process will tell you which areas of the journey you need to streamline and optimize to improve the customer experience.
Take the customer journey yourself
For the customer journey map exercise to be productive, you need to put yourself in the shoes of the customer and be honest with the experience you have. This is the best way to see if your customer journey mapping is accurate so you can identify areas for improvement in the customer journey.
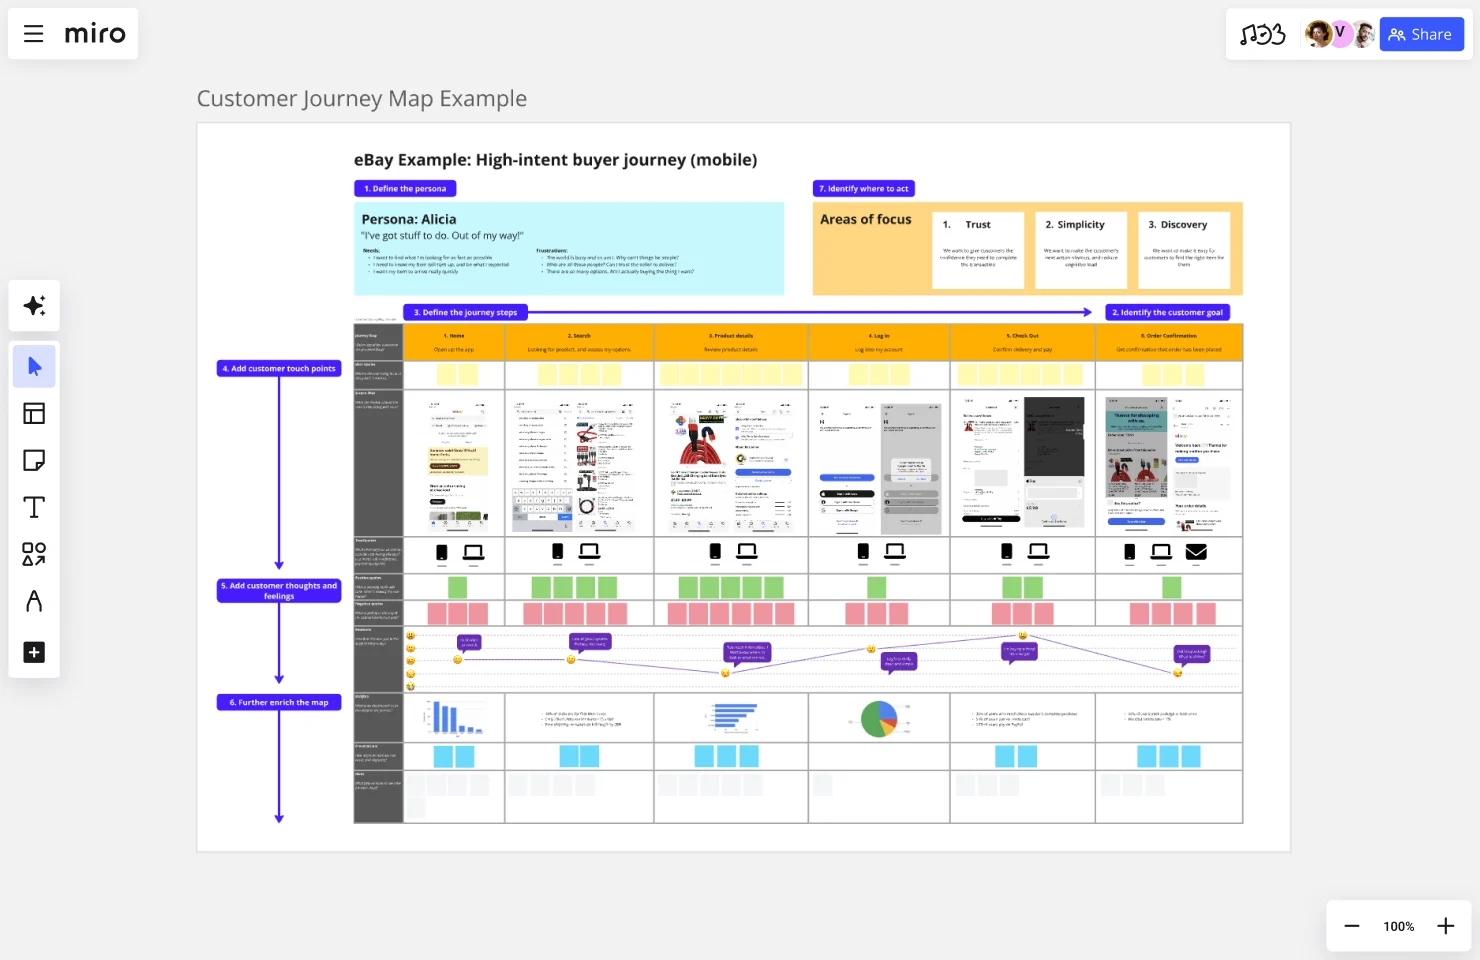
Customer journey mapping example
Here are some customer journey map examples for you to draw inspiration from and better understand what goes into a customer journey model.
Alex Gilev’s Practical Customer Journey Map
Alex Gilev is a certified UX expert and product leader experienced in creating highly usable and intuitive web applications. His practical customer journey map example created in Miro is based on the idea that you want to create an irreplaceable product for your customers.
This customer journey map is divided into four phases:
- Discovery
- Onboarding
- Scaffolding
- Endgame

This take on a customer journey map allows you to figure out practical fixes that will increase your competitive advantage. It helps you identify the value metrics that make your product desirable to the specified persona so that they’ll want to use your product again.
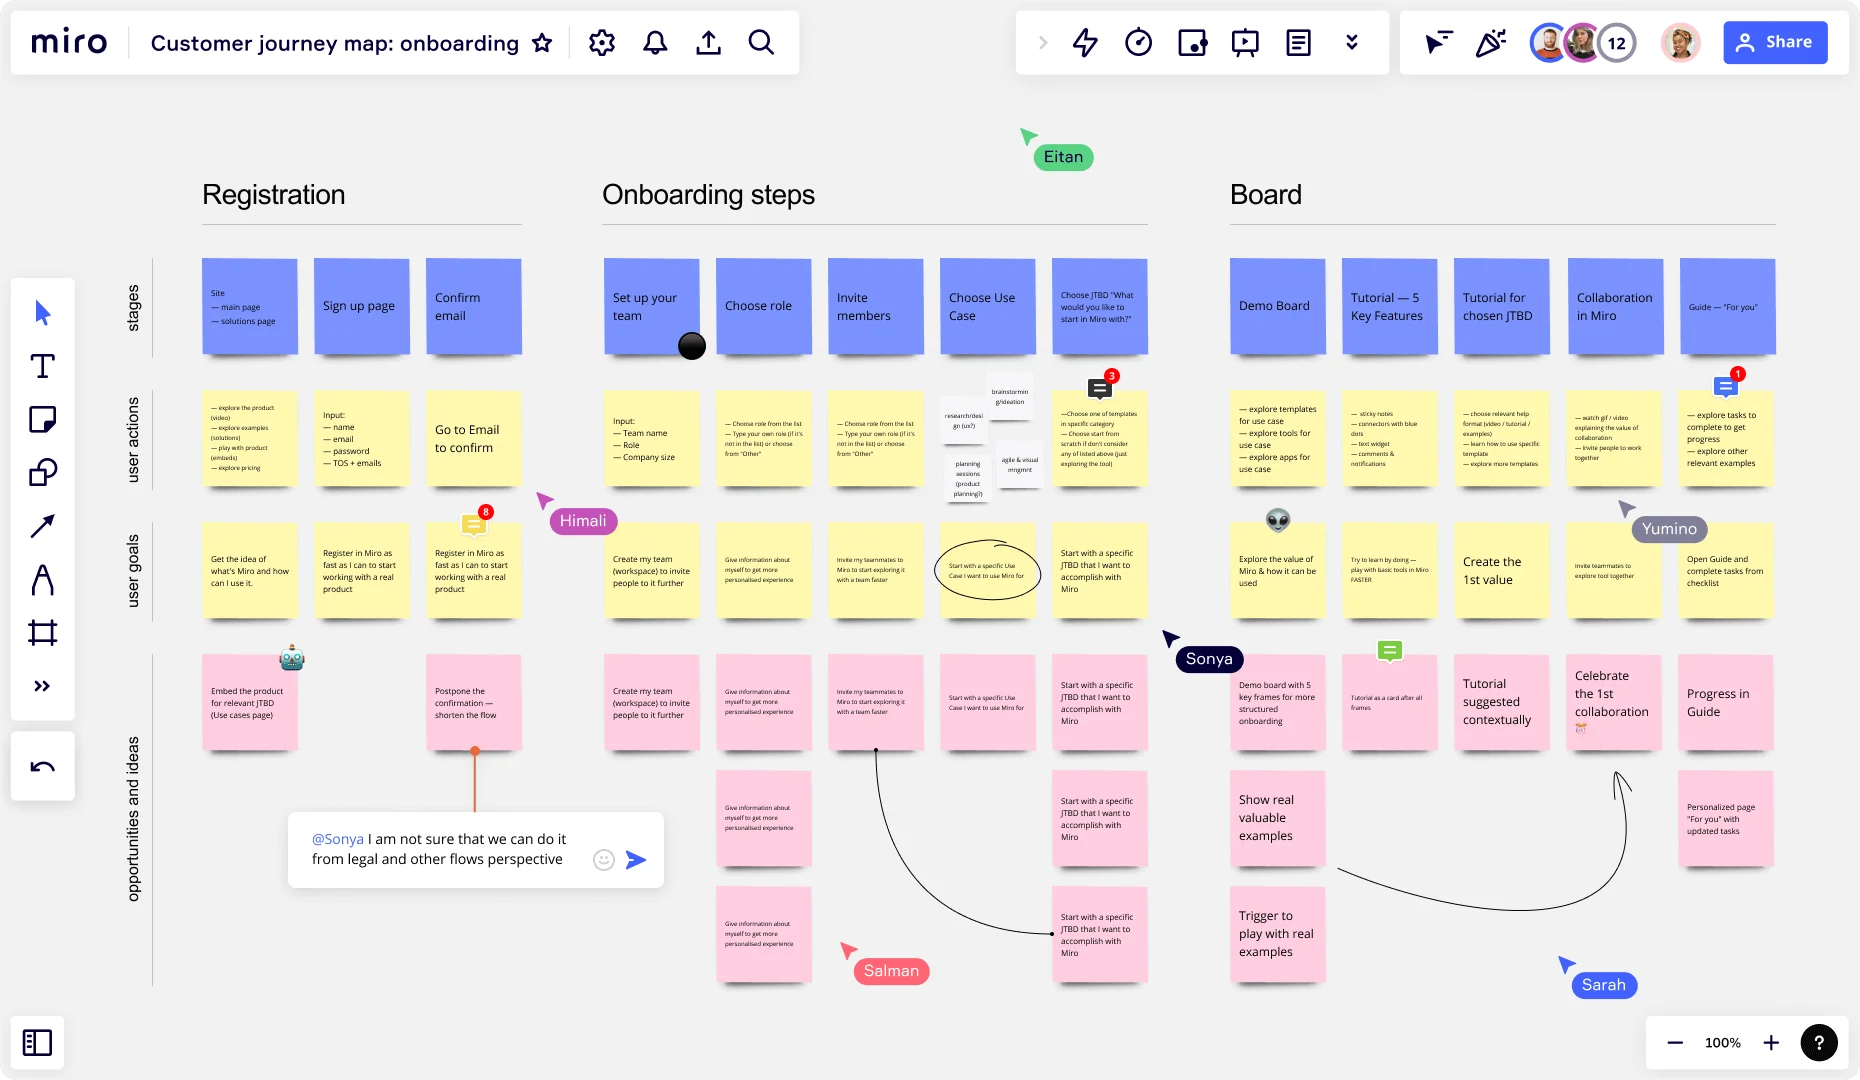
Miro's Customer Journey Map Template
Using Miro's Customer Journey Map Template can significantly improve the way you build your CJM. Our template has a dynamic setup, enabling teams to visualize the customer journey in detail. This customer journey map template helps identify key touchpoints, understand customer emotions and behaviors at each stage, and pinpoint areas for improvement.
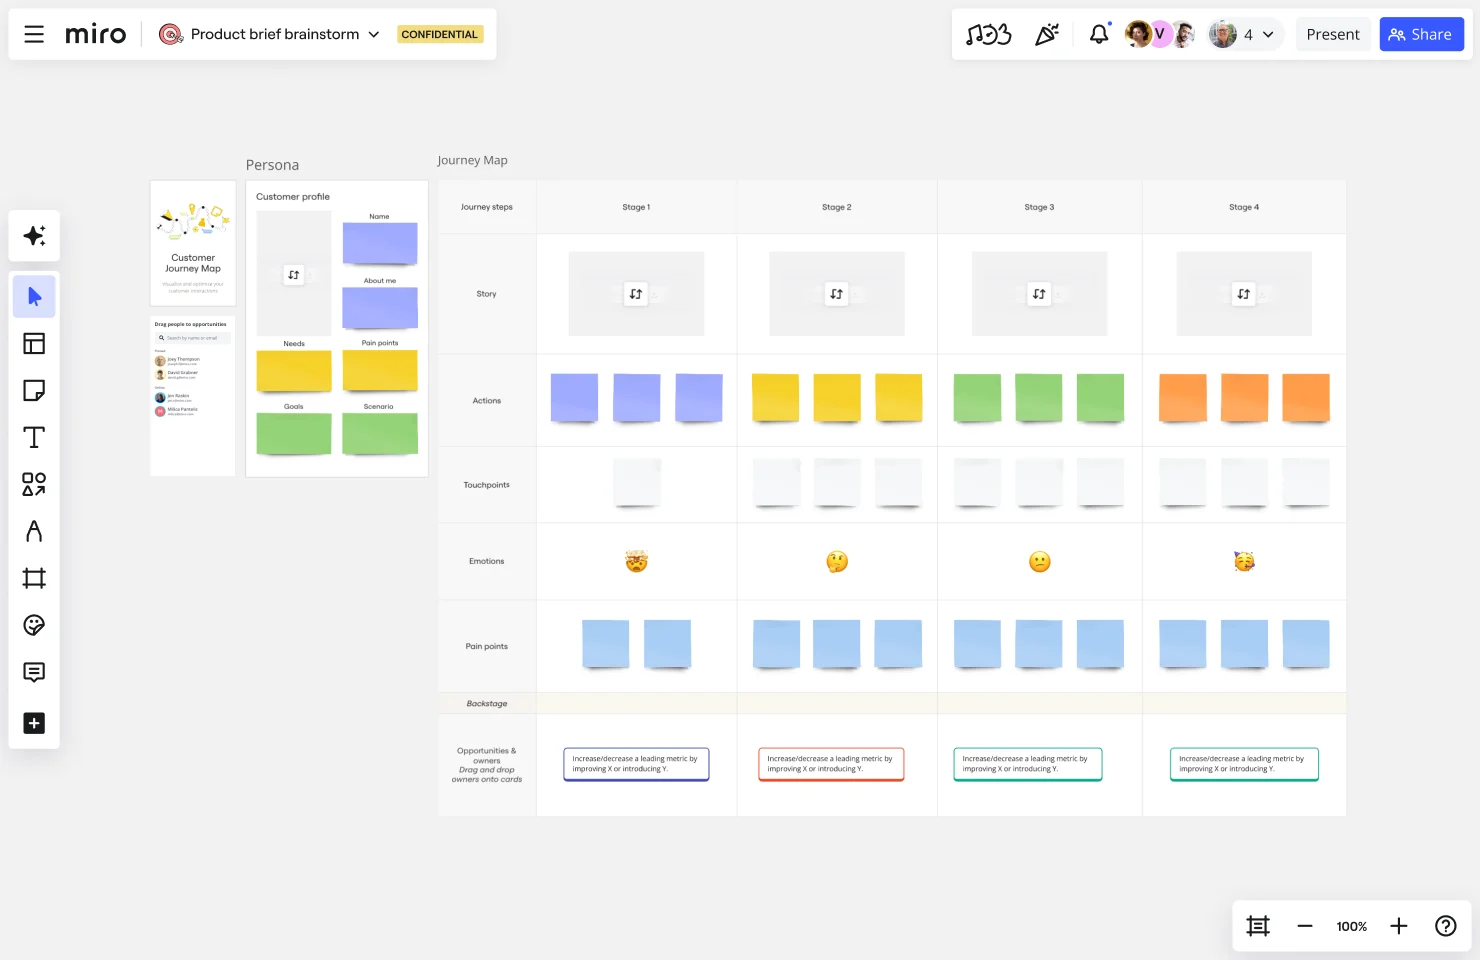
This approach to digital customer journey mapping ensures your customers receive the support and solutions they require at every step of their journey.
CJM by Hustle Badger
This Customer Journey Map (CJM) by Hustle Badger provides a comprehensive visual overview of the connection between the company's touchpoints and the customer's personal experience. It assists in pinpointing areas for enhancing customer experience and aligning different teams and stakeholders on user experiences.
This template is a good customer journey map example for those looking for a more holistic approach to customer journey mapping.
Build a customer journey map suited to your needs
As we’ve shown, creating a customer journey map with your team has many benefits. Mapping the customer journey can help you create the ideal experience for anyone who may come into contact with your company. It could be invaluable to the future of your business and help you build a loyal customer base.
Are you ready to get started with customer journey mapping? Try our Customer Journey Map Template.
Customer journey map FAQs
How many personas should a customer journey map include?
To avoid confusion and missed opportunities, you should focus on one persona per customer journey map. If you map multiple personas in one layout, you may end up with a generic result that can mask specific behaviors or pain points.
When should I update my customer journey map?
A customer journey map should be regularly updated - usually once per quarter or when customer behavior or business processes change. This regular cadence ensures your customer journey map stays accurate and actionable in changing environments.
How detailed should touchpoints be in a customer journey map?
You should include every customer touchpoint in your customer journey map, no matter how big or small. This allows you to create a comprehensive view, including digital, physical, and indirect actions like reviews or referrals.
It’s also a good idea to map the corresponding emotions to further understand where improvements can drive impact.
How do I turn insights from a customer journey map into action?
With a customer journey map full of insights, you can use Miro to brainstorm solutions, assign responsibilities, and turn insights into actions. Our built-in features can help with this, from stickers and comments to @mentions.
How do I create a customer journey map in Miro?
You can create a customer journey map in Miro from scratch or with one of our ready-to-use templates. From here, you can drag-and-drop shapes, text, sticky notes and icons to personalize your map.
You can also use frames to organize stages and swimlanes to separate different user personas or touchpoints.
Can multiple people collaborate on a customer journey map in Miro?
Yes! Miro is built for real-time collaboration where multiple team members can feed into a board simultaneously. Everyone with access can leave comments, vote on pain points, or tag each other for feedback. Miro also offers comment threads and Talktrack for asynchronous collaboration.
Can I link research or data directly into my customer journey map?
Absolutely! Miro’s infinite canvas is completely flexible, making it easy for you to edit, expand or refine your customer journey map as insights evolve. If needed, you can also duplicate versions, track changes, and view version history.
Author: Miro Team
Last update: August 19, 2025