What is a storyboard and how to make one
Summary
In this guide, you will learn:
- What a storyboard is and how it helps map narratives, customer journeys, or business processes
- How to select and use Miro’s storyboard templates for animation, video production, UX, and customer journey mapping
- How to define the main actor or persona and outline their actions
- Ways to design and build your storyboard using images, text, and visuals on Miro’s infinite canvas
- How to collaborate with team members by sharing the storyboard for feedback and iteration
- Tips for presenting and refining your storyboard for alignment with your initial goals and scenarios
Collaborative AI Workflows
Join thousands of teams using Miro to build the right thing, faster.
What is a storyboard?
The typical definition of a storyboard is a visual representation of a story or narrative. It’s a creative process traditionally used to plot the key scenes in a movie, TV show, or commercial. But in recent years, the storyboarding definition has adopted a new meaning by carving its way into the business world. For businesses, creating a storyboard is a technique used to visualize different scenarios, plan business activities, strategize advertising campaigns, and map the customer experience. With a storyboard in place, businesses can identify improvements that’ll offer customers a better experience and provide them with more value. On top of this, business storyboarding encourages design thinking. It puts the customer at the heart of the planning process, forcing team members to approach new ideas from the perspective of a consumer. As a result, businesses are more likely to offer a better customer experience and provide a product or service with real value.

What is a product development storyboard?
Storyboarding is a useful method for product development. Product teams use it to visualize development plans, identify product improvements, and maximize customer value. Take a look at Nono Weinzierl’s Product Storyboard Template as an example. This simple framework allows product teams to storyboard their initial product ideas with customers’ needs. It outlines the phases of the customer journey that need more attention, encouraging product teams to identify the best possible solution for the end user.
What is a UX storyboard?
It’s not uncommon for businesses to use storyboarding for user experience (UX) design and planning. UX storyboards outline what the current user experience looks like, as well as how customers engage with the company at different touchpoints. With this information, UX teams can pinpoint areas for improvement and create the ideal user experience.
Why is storyboarding useful?
Storyboarding can be a valuable tool for helping teams to communicate, collaborate, and plan effectively. Below are just a few of the professional benefits of storyboarding:
Better understand your customers
Storyboarding is a great way to get into the mindset of your target audience. By keeping them at the heart of the process, teams get a deeper understanding of who their customers are and what they want, as well as how to increase customer value.
Boost emotional engagement
When you create a storyboard, you also create a narrative about your customers. This can boost the emotional engagement with your customers by adopting a problem/solution approach to building the narrative.
Present ideas to stakeholders
Storyboarding is an accessible and visually appealing format, meaning it’s easier for stakeholders to see where you’re coming from and picture the outcome. Not only will this increase engagement from internal stakeholders, but it can also increase your chances of getting buy-in from external stakeholders.
Collaborate with your team
Storyboarding is a fun and engaging way to collaborate with your team. You can talk through new ideas, create interesting visuals, and work together to fully understand what your customers want — and how you can deliver it to them.
What are the main elements of a storyboard?
There are four main elements of a business storyboard: the scenario, the activities, the visuals, and the story. Let’s take a look at each of these areas in more detail.
The scenario
The scenario is the purpose behind the storyboard. It outlines the reason you’re creating the storyboard in the first place, such as low customer engagement. You create a storyboard to understand the customer journey better and find a way to improve it — that’s your scenario.
The activities
Activities are the specific stages that reflect the customer journey or product development, such as “signing up for a discount code” or “adding new product features.”
The visuals
Visuals are any images, shapes, or videos that support the different stages of your storyboard. They provide context and make the storyboard more engaging.
The story
Finally, the story is the storyboard’s narrative. When all of your activities come together, you should be able to see the overall story.
How many frames should a storyboard be?
You can use as many or as few frames as you need, depending on what you’re trying to create. For example, if you’re using a storyboard to plan and develop an entirely new product, chances are you’ll need many frames. You’ll create a detailed storyboard that outlines the following information:
- Your challenges
- Who your customers are
- How they use your product
- What features they like
- What features they don’t like
But if you’re creating a storyboard for a new Instagram reel (which can be a maximum of 60 seconds), you probably won’t need as many frames. You’ll still need to think about who you’re trying to target and what challenges you might face, but the end product won’t require as much detail and planning as product development.
What are the two types of storyboards?
There are two ways to create a storyboard — hand-drawn or online. A hand-drawn storyboard involves using pens, a piece of paper, or a whiteboard to draw your storyboard physically. It can be a fun process if you’re working with a team, but it’s not very practical — especially if your team is remote or distributed. Here's why: Remote workers might struggle to take part
With a remote or distributed team, creating a physical storyboard is challenging. Remote employees can dial in virtually, but the collaborative experience won’t be the same if they’re simply watching you draw a storyboard. Remote workers won’t be able to review the storyboard when the meeting ends
If you only have one physical copy in the office, remote workers will struggle to access the information in their own time. In other words, it’ll be harder to store and distribute the information. Updating the storyboard is messy work
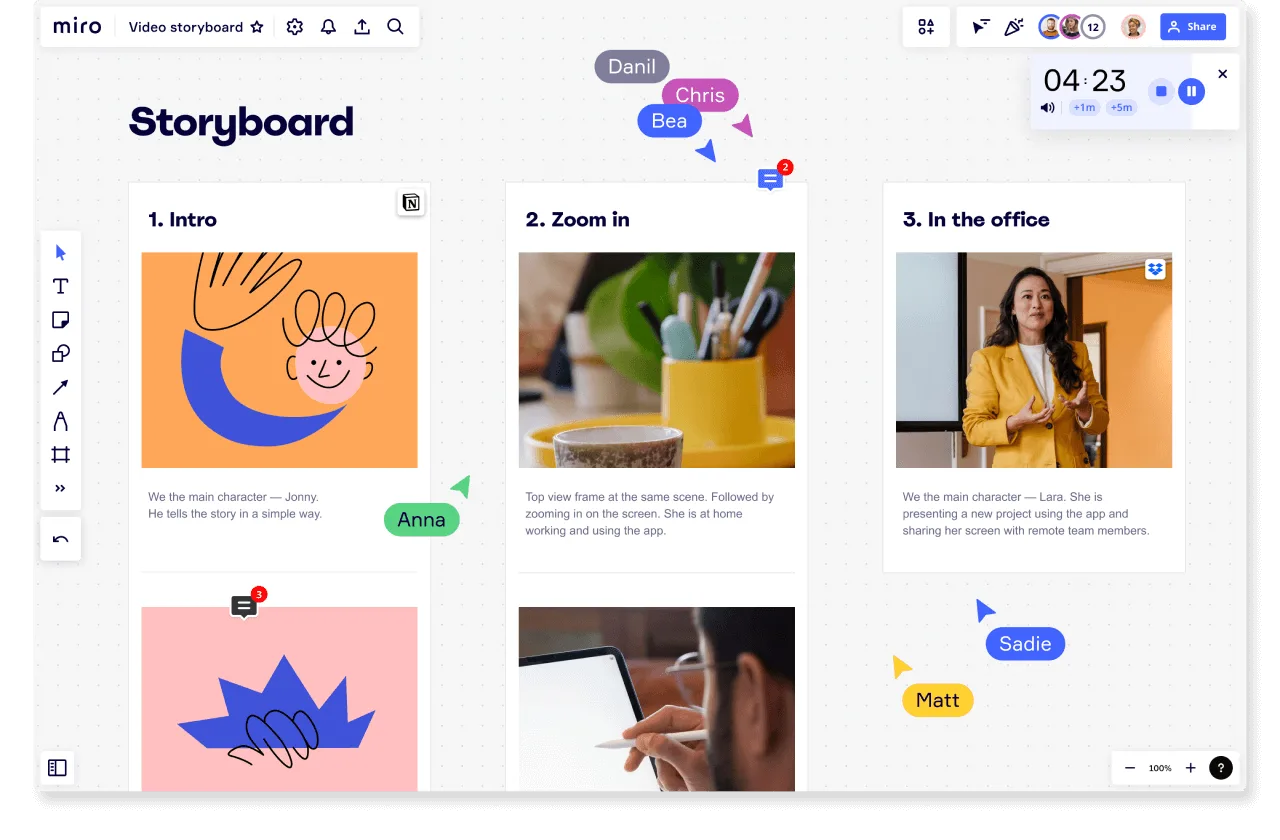
If you need to edit or update your storyboard, you’ll have to scribble over existing notes or start from scratch. After a while, things can get pretty messy, which defeats the purpose of creating a clear and engaging storyboard. Fortunately, there’s a solution to all these problems: an online storyboard. An online storyboard involves creating a storyboard virtually. The process is the same as creating a physical storyboard, but it takes place online. This means that all employees can access the storyboard anytime, from anywhere. When working on an online storyboard, you can run a video chat to create an inclusive and engaging experience for everyone involved. Colleagues can join in, ask questions, and even add comments directly onto the storyboard. When the session is over, you can share it with all the participants so they can access it whenever they like. This means they can return to the storyboard at any time in the future to review the information.
How to make a storyboard
Now that we’ve covered a bit of a background on storyboarding, let’s walk through some of the steps you can take to create a quality storyboard of your own. In this example, we’ll show you how to create a storyboard to improve the customer journey. The same principles apply to any business storyboard that you create.
1. Start with a template
While you can always create a storyboard from scratch, you can also use a storyboard template to add some structure and clarity from the start.
2. Define your scenario
Next, it’s time to define your purpose (otherwise known as the scenario). This involves clarifying the reason you’re creating the storyboard in the first place and what you hope to achieve. Without this information, the entire storyboarding process could lack direction. To define your purpose, start by creating a statement explaining why you’re creating the storyboard. An example could be: To better understand the customer journey and identify key areas of improvement. From here, you can flesh out the details to create a full-rounded explanation of your current situation. Here’s some additional information you might want to include:
- Who your customers are and what drives them
- Your customer’s key goals and needs
- Any challenges your customers face
- Key activities and tasks that’ll take place throughout the journey
If you’re not sure how to identify the right scenario for your customer, you can create a user persona to better understand your target audience. Using this framework, you can review and analyze customer data to pinpoint your ideal customer.
3. Design the storyboard
Now, it’s time to get creative and design your storyboard. Start by adding the steps and actions that your target audience performs throughout the customer journey. Plot every action — from their initial touchpoint with your company to making a purchase — in your storyboard. At this point, you can also add any images or visuals to support the different stages of the customer journey. After you’ve mapped the entire journey, you can identify areas for improvement. This is a great opportunity to collaborate with your team and brainstorm solutions. At the end of this process, you should have an ideal version of your customer journey and a clear idea of how to add customer value.

4. Share the final storyboard
Before making any changes to your existing processes, share the storyboard. That way, other team members and stakeholders have a chance to collaborate and offer feedback. With Miro, collaboration is easy. Simply share it with the relevant people, and they can provide feedback directly on the board. This makes it easier for you to review their suggestions and make any changes. You can also hop into presentation mode to run through the storyboard as a slide deck. Then, team members can ask you questions or provide feedback as you move through the presentation slides. After reviewing all the feedback, remember to refer to your scenario statement. Does the final storyboard align with your initial storyboard statement? If the answer is yes, great. If not, you probably haven’t solved the issues you set out to resolve. Look back through your storyboard and pinpoint any areas that may have taken you off track.
Create your next storyboard with Miro
Storyboarding is a great way to map business processes visually and engagingly. Visualize the customer journey, plan an upcoming video, or outline your upcoming plans for product development.
Use one of Miro’s intuitive Storyboard Templates to create the perfect storyboard for whatever you need.
Author: Miro Team
Last update: October 22, 2025