We have already talked about the value of an ordered Backlog and the way it helps teams understand what to do next. User story mapping is one of the practices that is implemented to prioritize items from the Backlog. It also allows Product Teams to release updates that are valued by the customers. This approach describes stories, not features, and it helps to serve the client.
As teams become distributed and the nature of work changes, how can Scrum masters ensure that the process is transparent and convenient for all team members? Miro has some useful features you can use to facilitate transparent user story mapping.
This use case is based on the article written for a Miro guide to effective visual collaboration in Agile development. Check it out to help your team become more productive!
Make sure to check our free user story mapping tool with a template.
What is user story mapping?
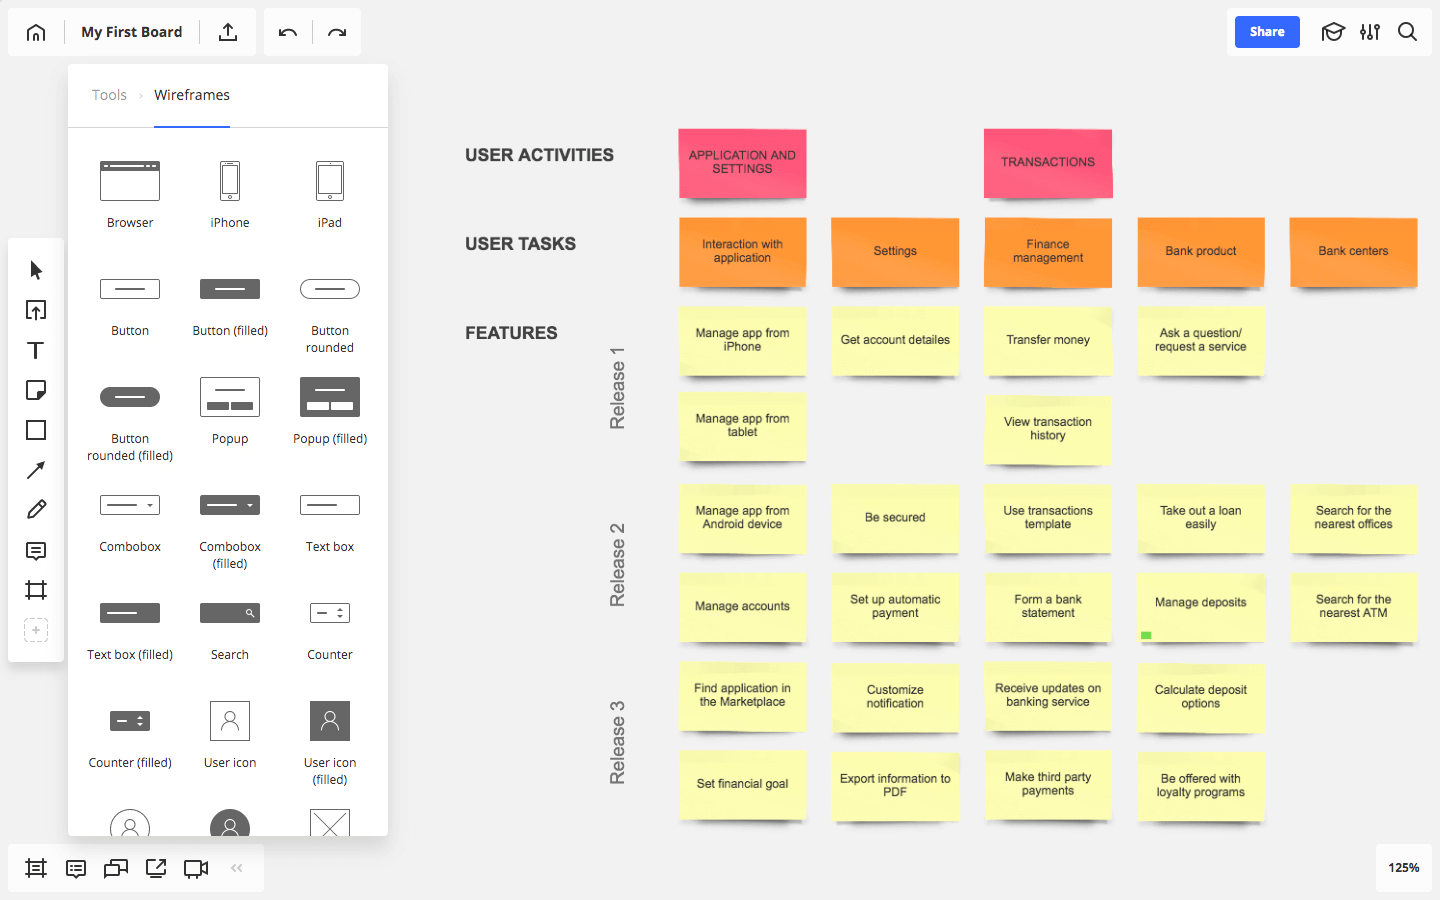
User story mapping is an Agile approach for release planning that is widely used by software companies. The story map consists of user stories that are ordered in two independent dimensions. The horizontal axis represents the order of goals from the user’s point of view, and they describe the behavior of the system. The vertical axis represents the increasing sophistication of implementation.
How to maximize the value
of user stories?
In 2001, Ron Jeffries described three essential user story components (the 3 Cs) that are still valid and distinguish user stories from other tools.
As a specific framework, user stories are meant to be:
- tangible artifacts (card);
- for meaningful conversation between the business and Development Team (conversation);
- where success is determined by the acceptance criteria (confirmation).
By improving your performance in all directions, you will receive a synergetic effect, leading you to success in terms of time, budget absorption and customer satisfaction.
In 2001, Ron Jeffries described three essential user story components (the 3 Cs) that are still valid and distinguish user stories from other tools
How to do user story mapping
with your team?
In the past, teams willing to map user stories had to gather in a large conference room equipped with whiteboards and bring a variety of office supplies to tag and label the map. After the session, they had to take photos of the wall to save all the information and pass it to remote workers.
This is how you can do user story mapping in Miro, an online whiteboard for seamless collaboration between Scrum Masters and Product Teams.
Now you can use online tools like Miro to eliminate paperwork, collaborate with your remote teammates in real time and save all the results for the future.
Setting up
To start user story mapping, create and name a board in Miro. Choose the User Story Map template. Invite your team members to the board by opening the “Share” settings. When they accept the invitation, every individual edit is viewable and saved.


Building a story map
Writing good user stories is never a solution for one C (card). When we verbalize our vision of the user experience, it often turns out that there is no single point of view. The main idea of the user story workshop is to discuss the stories, come up with an updated vision and finally write down several sentences that can easily describe the whole picture.
If your Product Owner or customer is isolated from the Development Team, you will probably not build something of value for the end user. Using Miro, you can invite remote collaborators to participate in the event. You can use comments, screen sharing, chats and video chats inside our tool.
Start user story mapping in Miro

Estimating user stories
Another purpose of writing and discussing user stories is to choose the most valuable solution from a variety of options the team found. In Miro, all team members can add tags to the cards to separate stories into different groups.
One of the criteria is the effort needed to build the story. For estimation at that level, teams may use story points (Fibonacci sequence 0, 1, 2, 3, 5, 8) or T-shirt sizes (XS, S, M, L, XL).

Defining success
It is not easy to eliminate all assumptions and maintain the right level of detail to be sure the team builds what a customer needs. To keep the third C (confirmation) within a user story, you can use comments to describe the acceptance criteria.
To enrich your stories, you can add wireframes, tables and icons to the board. To open the library, click “Add Files” > “Wireframes.” Choose from a wide range of objects for a web page/mobile app layout. Drag and drop the object anywhere you need on the board.
To add an icon, click the “+Insert” menu, choose “Iconfinder” and pick one of the suggestions or use the Search line to find the icons you need. Then click the icon or drag and drop it on to the board.
Enrich you user story map in Miro

Saving a template
If you are creating your own template for user story mapping instead of a pre-existing one, you can select it for future Sprints. Select a group of objects and choose “Save as a template” in the “Context” menu or choose the “Save as a template” option in the “Export this board” menu. The whole board will be saved as a template.

What is a good user story? It is:
- Independent;
- Negotiable;
- Estimable;
- Valuable to users or customers;
- Small;
- Testable.


