Design workshops help UX teams foster a user-centric mindset as they align and iterate on a design that meets the needs of their users. These workshops require the ability to not only collaborate, but also visualize ideas in a way that can be consumed by development teams actually building the product. Yet not all design tools were created equal. Some tools promote collaboration but don’t allow wireframing, while others are excellent design tools but make it hard for teams to work together.
In this “How I do it in Miro” video, part of a series, we’ll learn from Dataiku’s director of UX, Thibaut Dupré, how his product design team solves a lot of their design challenges by using Miro.
Understand the baseline
Thibaut and his team are responsible for delivering a consistent, frictionless product experience. In this example, they’re working on refactoring a presentation software.
He likes to tell his team: “When you get somewhere, start by checking the map.” In the world of product design, that means the first step is to create a sitemap that helps them understand the architecture, layout, and navigation.
Miro makes this easy because they can add screenshots, arrows, and labels. This way, they have an overview of the whole system.

Establish focus of user research
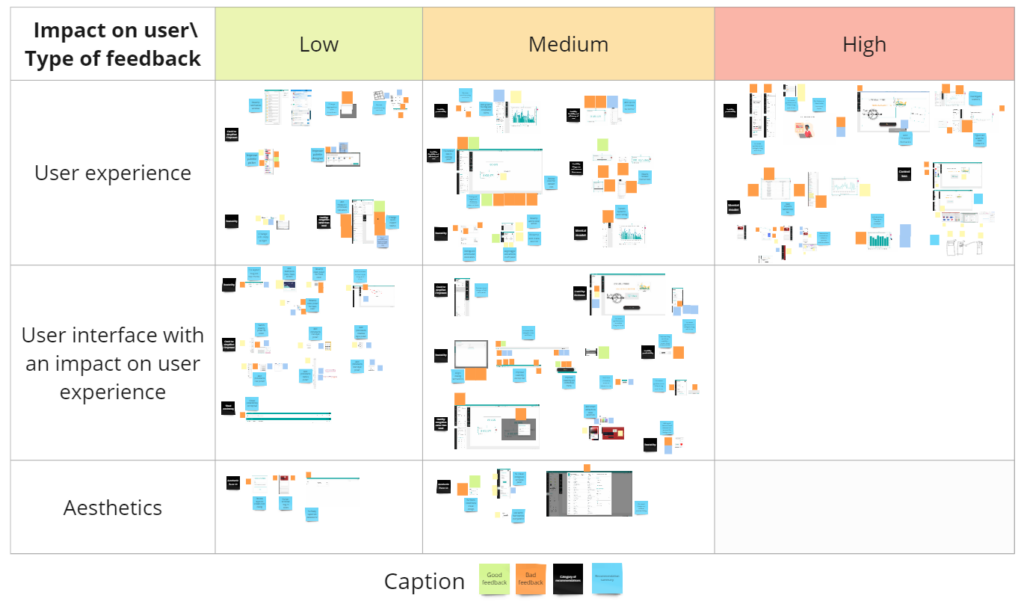
Next, Thibaut and his team use Miro to identify usability issues. They add color-coded sticky notes — orange for problems and blue for potential solutions — as they work. Then they use a table in Miro to organize the feedback all into low-, medium-, and high-impact work. By establishing how each usability issue impacts the user, they can prioritize their efforts.
This exercise helps them establish a baseline of the problems that will guide them in their user research.
Conduct user interviews
Now the team can define the test protocol. They use Miro to build their test protocol, as well as the user journey. They can outline the users, tasks, and test flow.
They recruit people and run the test several times to get a good sample. Based on their findings, they create user profiles — listing tasks and needs and mapping out their journeys. This includes the highlights and low points in the experience and corresponding opportunities for improvement.

For more information on how you can use Miro to do customer journey mapping, check out this other video, “How I do Customer Journey Mapping in Miro.”
Share findings with stakeholders
Each session is recorded and linked in debrief slides, so that the product development team can watch them later to understand the problems with their own eyes. The findings can also be prepared into a report or presentation to be shared with stakeholders.
What’s cool is if anyone has questions, Thibaut and his team can simply show them the Miro board, where they explain the findings and unpack the details.
This is a perfect example of the Double Diamond process: They discover the problem, discuss it with users, watch session replays, and explain the findings.
Prioritize projects
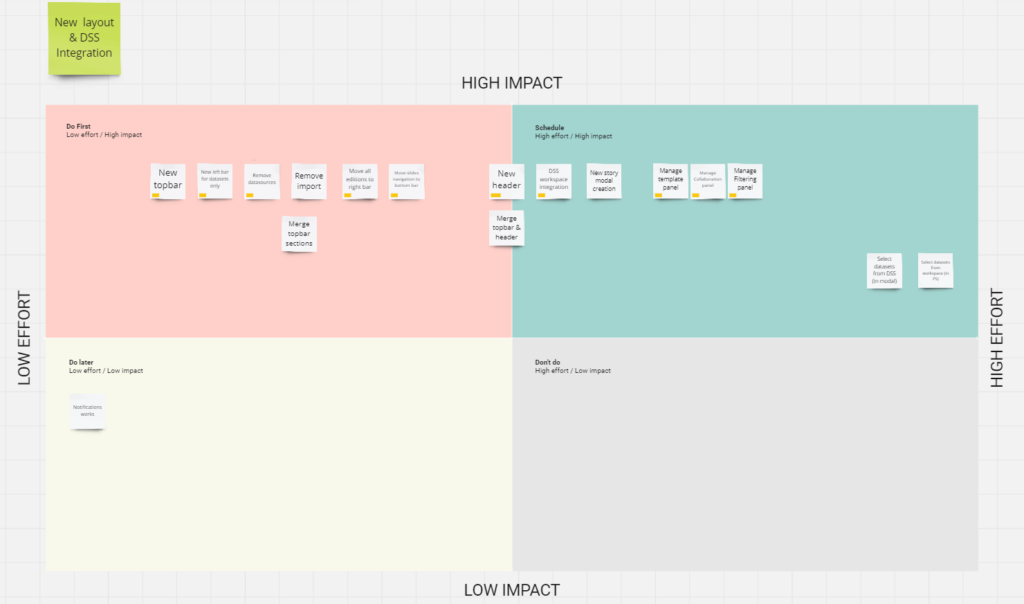
Now, the team has a wish list of things to tackle. To help prioritize the work, they use Miro to create an impact/effort matrix. They can hotlink these notes to Shortcut and Dovetail, so they know, for instance, that a particular topic will be tackled with a specific ticket. They complete this impact/effort exercise for all the feedback areas that came up during their user research.
Plus, they can collect and embed best practices for reference, right on the board.
Organize the work
Once the work is prioritized, Thibaut and his team plan it out. They like to use weekly workshops to go through each task, where they collaborate on designs, create tickets for the work, and send it on to the development team to take it over the finish line.
Plus, Miro has a built-in wireframes app, which they use to kickstart the collaborative design process. Anyone on the team can discuss, add feedback, and more. They use the same Miro board to capture months of work, so they can keep everything in one central place and never lose context.

Before Miro, Thibaut and his team had to complete cross-team workshops on old-fashioned, physical whiteboards. This required taking photos, erasing, taking more photos, and transcribing everything along the way.
But now with Miro, they can work together so no transcription is necessary. And everything is ready at the end of each workshop and everyone on the team knows what to work on.
The result is Dataiku can ship a completely new user interface in just months.
As you can see, it’s easy to use the same Miro board for all your design workshopping needs.
Be sure to watch the video to hear straight from Thibaut how you can revolutionize your user design projects in Miro.